Do you have a question about the Supermicro Supero X8DTL-i and is the answer not in the manual?
| Form Factor | ATX |
|---|---|
| Chipset | Intel 5520 |
| USB Ports | 8 x USB 2.0 |
| CPU | Dual Intel Xeon 5500/5600 series |
| Memory Slots | 6 |
| Max Memory | 48GB |
| Supported Memory Types | DDR3 800/1066/1333 MHz |
| Storage Interfaces | 6 x SATA 3.0Gb/s |
| Network | 2 x Gigabit Ethernet |
| CPU Socket | Dual LGA1366 |
| Expansion Slots | 2 x PCI-E x16, 1 x PCI-E x8, 1 x PCI-E x4, 1 x PCI |
Describes the manual's purpose, audience, and scope.
Details the motherboard's capabilities, processor support, and target applications.
Outlines the structure of the manual, including chapters and appendices.
Explains special symbols and warnings for safe installation.
Provides the primary contact address, phone, fax, and website for Supermicro.
Lists contact information for Supermicro's European operations.
Offers contact details for Supermicro's Asia-Pacific region.
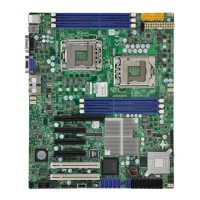
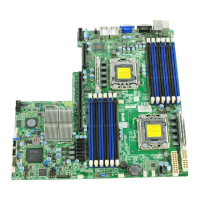
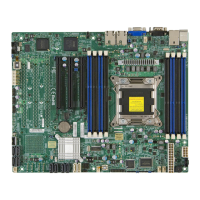
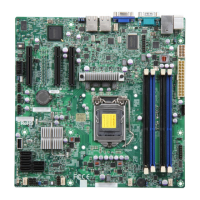
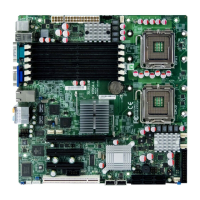
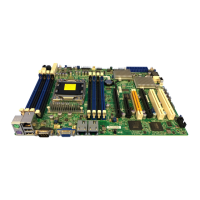
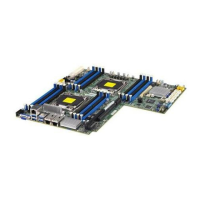
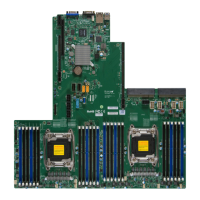
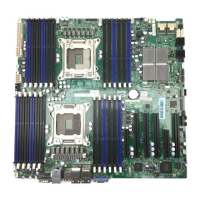
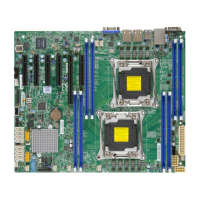
Introduces the motherboard and lists contents of the retail package.
Details supported CPUs, memory, chipset, expansion slots, and monitoring.
Lists and describes onboard ports, utilities, and physical dimensions.
Visual representation of the chipset's internal connections and components.
Detailed explanation of the 5500 chipset, QPI, and RAS features.
Describes features like AC power loss recovery and system setup.
Details voltage, fan, and environmental temperature monitoring.
Covers ACPI, suspend state indicator, power button override, and Wake-On-LAN.
Discusses power supply requirements, connectors, and warnings.
Describes the Super I/O controller and its functionalities.
Explains the Baseboard Management Controller (BMC) for specific models.
Provides essential guidelines for handling ESD-sensitive components.
Step-by-step instructions for mounting the motherboard into the chassis.
General guidance and steps for installing the CPU and heatsink.
Comprehensive guide for installing and removing RAM modules.
Tables showing optimal DIMM slot population for performance.
Overview of motherboard connectors and I/O ports.
Specifies pin details for various front panel functions.
Instructions for connecting internal power and data cables.
Details internal buzzer and JD1 header for power LED/speaker.
Explains WOL header and JOH1 header for overheat/fan fail LEDs.
Describes SGPIO headers and the I-Button feature.
Details Power SMB and IPMB connectors for system monitoring.
Explains the UID switch and LEDs for system unit identification.
Introduction to motherboard jumpers and their functions.
Instructions for clearing the CMOS settings using the JBT1 jumper.
Describes the Watch Dog jumper for system monitoring and reboot.
Explains jumpers for connecting the System Management Bus to PCI slots.
Describes the jumper for enabling the onboard VGA connector.
Explains the jumper to enable or disable onboard SAS connections.
Describes the jumper for selecting SAS RAID configuration mode.
Explains the jumper for flashing firmware and entering recovery mode.
Describes the jumper for enabling ME Firmware Recovery mode.
Overview of the motherboard's status LEDs.
Explains the LEDs for Gigabit LAN ports indicating activity and link status.
Details LEDs for the IPMI LAN port.
Describes the SAS heartbeat LED indicating normal SAS function.
Explains the BMC heartbeat LED for normal BMC operation.
Describes the LED indicating system power status.
Details the rear UID LED for system identification.
Information on connecting SATA and SAS devices.
Describes the onboard SATA ports and their pin definitions.
Details the onboard SAS ports for specific models.
General steps to diagnose and resolve system issues.
Initial checks to perform before powering up the system.
Steps to diagnose and fix issues where the system does not power on.
Procedures for troubleshooting when no video output is displayed.
Steps to resolve issues related to losing BIOS/CMOS settings.
Guidance on diagnosing and resolving memory-related errors.
Guidelines on what information to provide when contacting technical support.
Answers to common user questions about the motherboard.
FAQ detailing the process and warnings for updating the system BIOS.
Procedures for obtaining warranty service and returning products.
Introduces the AMI BIOS Setup Utility and its navigation.
Instructions on how to access the BIOS setup screens.
Describes the primary BIOS setup screen and its information display.
Displays detected CPU and memory information.
Introduction to advanced BIOS settings submenus.
Settings related to system boot process, including Quick Boot.
Configuration options for CPU ratio, clock settings, and spread spectrum.
Setting to enable or disable Intel Virtualization Technology.
Introduction to advanced settings for the motherboard chipset.
Settings for QuickPath Interconnect and Integrated Memory Controller.
Allows forcing DDR3 memory to specific frequencies (800, 1066, 1333 MHz).
Options for memory operation modes like Independent, Mirror, and Lockstep.
Settings to manage CPU power consumption and heat dissipation.
Enables Intel Virtualization Technology for Direct I/O.
Allows sharing PCI devices among virtual machines.
Allows enabling specific numbers of onboard USB ports.
Detects and configures IDE and SATA devices and modes.
Sets SATA#1 to Compatible (legacy) or Enhanced (native SATA) mode.
Selects the drive type for SATA#1 (IDE, RAID, AHCI).
Enables or disables SATA Advanced Host Interface support.
Sets the timeout value for detecting ATA/ATAPI devices.
Configures LBA addressing for large drives.
Settings for IDE drive transfer modes.
Settings for PCI bus, Plug and Play, and NVRAM.
Option to clear Non-Volatile Random Access Memory.
Determines if the OS or BIOS configures Plug and Play devices.
Configures I/O port and IRQ addresses for serial ports.
Sets Serial Port 2 as a normal COM port or for Serial-Over-LAN.
Settings for enabling and configuring remote console access.
Controls console redirection behavior after system boot.
Provides access to system health monitoring features.
Configures alarms and actions for CPU overheating.
Displays detected CPU temperature status (Low, Medium, High).
Settings to control onboard fan speeds based on CPU temperature.
Displays various system voltage levels.
Settings for Advanced Configuration and Power Interface management.
Enables system operation without keyboard, monitor, or mouse.
Introduction to Intelligent Platform Management Interface settings.
Allows viewing the Baseboard Management Controller's system event log.
Option to clear the BMC system event log.
Configures the IPMI LAN adapter's network settings.
Sets the action for the BMC watchdog timer when the system hangs.
Options for viewing, marking, and clearing event logs.
Configuration options for system passwords and boot sector protection.
Indicates whether a supervisor password is set.
Indicates whether a user password is set.
Defines the access privileges for users in BIOS setup.
Settings for configuring the system's boot sequence.
Specifies the order in which boot devices are checked.
Configures the boot sequence for detected hard disk drives.
Configures the boot sequence for removable media.
Sets the boot priority for CD/DVD drives.
Options for saving or discarding changes and exiting BIOS setup.
Saves current settings and restarts the system.
Loads BIOS settings optimized for system performance.
Loads BIOS settings for maximum system stability.
Procedures for recovering the BIOS if it becomes corrupted.
Detailed steps for recovering the main BIOS code block.
Method to recover the boot sector using a USB device.
Method to recover the boot sector using an IDE CD-ROM.
Method to recover the boot sector via a serial port connection.
Lists the necessary hardware and software for serial flash recovery.
Step-by-step guide for performing serial flash recovery.
Lists beep codes and error messages for POST failures.
Step-by-step instructions for installing Windows OS on a RAID array.
Instructions for installing Windows OS on a non-RAID system configuration.
Guide for installing drivers and utilities from the motherboard CD.
Description of the software installation interface on the CD.
Instructions for setting up and using the Supero Doctor III system monitoring tool.
Overview of the Supero Doctor III interface for health monitoring.
Overview of the Supero Doctor III interface for remote system management.