Do you have a question about the Supermicro SUPERO X8ST3-F and is the answer not in the manual?
Details about the X8ST3-F/X8STE motherboard features and target audience.
Outlines the structure of the manual with chapter summaries.
Explains symbols like Danger/Caution, Warning, and Note for better understanding.
Contact details for Supermicro's main office, including address, tel, fax, email, and website.
Contact details for Supermicro's European branch, including address, tel, fax, and email.
Contact details for Supermicro's Asia-Pacific branch, including address, tel, fax, email, and support.
Provides an overview and lists components included in the retail box for verification.
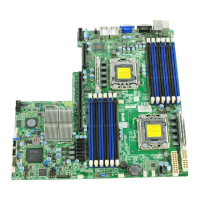
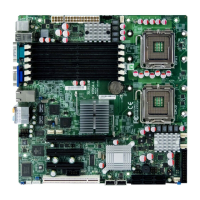
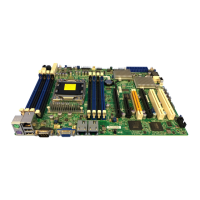
Visual representation of the X8ST3-F motherboard for identification.
Diagram showing component placement and important notes for users.
Details about various jumpers, their labels, functions, and default settings.
Lists and describes onboard headers and connectors with their pin definitions.
Explains the function and status of different LED indicators on the motherboard.
Lists supported Intel Core i7 and Xeon processors for the motherboard.
Details supported DDR3 SDRAM DIMM types, speeds, and population rules.
Identifies the Intel X58 Express Chipset (IOH) and ICH10R (South Bridge).
Lists the types and number of expansion slots available on the motherboard.
Mentions support for PCIe graphics cards and onboard Matrox G200.
Details the Intel Gigabit Ethernet controllers and LAN ports.
Describes SATA ports and RAID support.
Details SAS ports and RAID support specifically for the X8ST3-F model.
Describes IPMI 2.0 support via WPCM450 Server BMC for the X8ST3-F.
Mentions the floppy port interface for legacy drives.
Details rear and front accessible USB ports.
Mentions PS/2 keyboard and mouse ports on the I/O backplane.
Describes COM ports with Fast UART 16550 capabilities.
Mentions the Winbond Super I/O 83627DHG chip.
Lists BIOS features like SPI Flash BIOS, DMI, ACPI, USB Keyboard support.
Lists ACPI/ACPM, Wake-on-LAN, and AC power recovery settings.
Details CPU monitoring, fan status, and system management.
Mentions PECI, Supero Doctor III, I2C sensing, Chassis Intrusion.
Lists BIOS flash utility and chipset drivers provided on CD.
Specifies the ATX form factor dimensions.
Visual representation of the motherboard's system architecture and component connections.
Explains the Intel X58 Express chipset and its role in system performance.
Configures system response after AC power outage.
Monitors CPU, memory, and chipset voltages, with user-adjustable thresholds.
Checks fan RPM status using Supero Doctor III software.
Warns of CPU overheat via LED and controls CPU speed.
Chassis LED blinks when CPU is in suspend state.
USB keyboard functions as a normal keyboard during boot.
Describes power button functions for suspend and shutdown.
Enables remote system power-up via LAN.
Recommends high-quality ATX12V power supplies.
Details Super I/O chip functions like floppy drive control and serial ports.
Describes the BMC controller features and interfaces.
Lists additional features of the WPCM450 controller.
Steps to prevent Electrostatic Discharge (ESD) damage to components.
Instructions for safely unpacking the motherboard.
Important notes regarding power cord, CPU installation order, and heatsink compatibility.
Step-by-step guide for installing an LGA 1366 processor.
Details the steps for installing an LGA 1366 processor.
Notes the requirement for BKT-0023L bracket for screw-type heatsinks.
States that thermal grease is pre-applied and should not be added.
Guides on installing the heatsink bracket and heatsink onto the CPU.
Step-by-step guide for removing the CPU heatsink.
Instructions for physically installing the motherboard into the computer chassis.
Guides on inserting and removing DIMM modules from slots.
Tables showing memory population rules for UDIMMs.
Specifies the maximum supported memory capacity.
Table showing how system memory is allocated and what is available.
Identifies and locates the rear panel connectors and I/O ports.
Details pin definitions for PS/2 keyboard and mouse connections.
Explains USB port locations and provides pin definitions for rear and front panel access.
Describes onboard Ethernet ports and IPMI Dedicated LAN.
Details COM port locations and pin definitions for front and back panel access.
Explains the VGA connector for video output.
Explains header pins for chassis buttons and indicators.
Pin definitions for the Non-Maskable Interrupt button.
Pin definitions for the Power LED indicator.
Pin definitions for the Hard Drive Activity LED and NIC LEDs.
Pin definitions for Overheat and Fan Fail LEDs.
Pin definitions for the Power Fail LED indicator.
Pin definitions for the chassis Reset button.
Pin definitions for the chassis Power button.
Provides pin-out definitions for onboard headers and connectors.
Details pin definitions for 24-pin ATX and 8-pin CPU power connectors.
Explains fan header types and pin definitions.
Pin definitions for the internal buzzer used for beep codes.
Pin definitions for internal and external speaker connections.
Pin definitions for Overheat and Fan Fail LEDs.
Pin definitions for the chassis intrusion detection header.
Pin definitions for monitoring power supply status.
Pin definitions for the system power status LED.
Details SGPIO headers for enclosure management and Alarm Reset function.
Pin definitions for the Wake-On-LAN header.
Describes the I-Button for RAID data storage and HostRAID.
Explains how jumpers are used to modify motherboard operations.
Jumpers JPL1/JPL2 to enable/disable LAN ports.
Procedure to clear CMOS settings using jumper JBT1.
Jumpers JWD for enabling Watch Dog Timer.
Jumpers JI2C1/JI2C2 to manage SMB to PCI/PCI-E slot speeds.
Jumper JPG1 to enable/disable onboard VGA.
Jumpers JPUSB1, JPUSB2, JPUSB3 for enabling USB wake-up functionality.
Jumper JPS1 to enable or disable SAS connectors.
Jumper JPS2 to select Software RAID or IT Mode.
Jumper JBMC1 to enable/disable BMC and IPMI.
Explains the activity and link/speed LEDs for LAN ports.
Explains LEDs for IPMI Dedicated LAN on X8ST3-F.
Indicates SAS activity status.
Indicates SAS connector readiness.
Explains the onboard power LED indicator LE1.
Notes on connecting SATA and floppy drive cables.
Details SATA connector locations and pin definitions.
Details the floppy connector location and pin definitions.
Initial checks before powering on the system.
Steps to diagnose and resolve no power issues.
Steps to diagnose and resolve no video output issues.
Steps to diagnose and resolve memory-related errors.
Solutions for issues with losing CMOS setup configuration.
Guidance on contacting Supermicro technical support.
Answers common questions about memory support and BIOS updates.
Procedures and warranty information for returning products for service.
Instructions on how to enter the BIOS setup screens.
Explains how to access and modify BIOS configuration settings.
Describes the main BIOS setup screen and its layout.
How to set the system time and date in BIOS.
Displays CPU type, speed, and core count.
Displays installed memory size and available memory.
Navigating to and configuring advanced BIOS settings.
Configures Quick Boot, Quiet Boot, ROM Display, Num-Lock, PS/2 Mouse.
Configures system behavior on errors and setup messages.
Manages power button action, AC power loss, and Interrupt 19 capture.
Sets CPU clock multiplier for performance tuning.
Manages EMI, data prefetching for performance.
Configures Intel VT and Execute-Disable Bit for security.
Configures AES-NI, Hyper-Threading, Active Cores.
Manages EIST, Turbo Boost, C1E, C-States for power efficiency.
Manages C3 demotion, ACPI T State, DCA performance.
Configures QuickPath Interconnect speed and power states.
Selects memory frequency and modes like Mirror, Lockstep.
Enables Demand and Patrol Scrubbing for ECC memory.
Configures closed-loop throttling and Intel VT-d.
Manages SR-IOV, I/OAT, Active Power Management, USB functions.
Configures legacy USB support and IDE/Floppy drive settings.
Sets SATA modes, RAID, and IDE master/slave parameters.
Selects device type and configures LBA for large drives.
Configures Block Transfer and PIO modes for IDE drives.
Configures DMA modes for IDE drives.
Enables or disables S.M.A.R.T. for drive failure prediction.
Configures 32-bit IDE transfer and PCI/PnP options.
Manages NVRAM, PnP OS, Latency Timer, Bus Master, ROM Scan.
Controls LAN/SAS ROMs and boot graphics priority.
Configures serial ports, floppy controller, and remote access.
Configures serial port mode, flow control, redirection behavior, terminal type.
Submenu for monitoring CPU overheat alarm and other health statuses.
Selects Early Alarm or Default Alarm for CPU overheat triggers.
Displays CPU temperature as Low, Medium, or High for status.
Shows the absolute system temperature.
Displays fan speeds and allows selection of control modes.
Shows current voltages for various system components.
Manages HPET, ACPI OS support, OEMB table, APIC support.
Configures APIC IRQ, Headless Mode, ACPI versions.
Sets IPMI LAN config, views/clears BMC logs, checks BMC status.
Sets IP source, address, subnet mask, gateway, MAC address.
Configures BMC watchdog action and event log options.
Clears event logs and enables PCIe/ECC error logging.
Manages supervisor and user passwords, and access levels.
Sets the sequence for bootable devices (Floppy, USB, SATA, Network).
Manages user password clearing and boot sector virus protection.
Options for saving, discarding, or loading default BIOS settings.
Sets boot order for HDD, Removable, and CD/DVD drives.
Loads BIOS settings for maximum system performance.
Loads BIOS settings for maximum system stability.
Lists specific beep codes and their meanings.
Step-by-step guide for installing Windows XP/2003 with RAID.
Step-by-step guide for installing Windows XP/2003 without RAID.
Guides on installing drivers and software using the CD.
Instructions for configuring SuperDoctor III for system monitoring.
Shows the SuperDoctor III interface for remote control.
Steps to recover BIOS using a USB flash drive.
Process to recover the boot sector of the BIOS.
Steps to recover BIOS using a CD/DVD ROM/RW drive.
| Form Factor | ATX |
|---|---|
| CPU Socket | LGA 1366 |
| Memory Slots | 6 |
| Memory Type | DDR3 |
| Maximum Memory | 24GB |
| SATA Ports | 6 |
| RAID Support | RAID 0, 1, 5, 10 |
| Chipset | Intel X58 |
| PS/2 Ports | 2 |
| Expansion Slots | 2 x PCI-E x16, 1 x PCI-E x4, 1 x PCI-E x1, 2 x PCI |
| USB Ports | 12 (6 rear, 6 via headers) |