MNL-2273-QRG-10b
© 2022 Supermicro Computer Inc. All rights reserved. Reproduction of this document whether in part or in whole is strictly prohibited without Supermicro's
written consent. All Trademarks are property of their respective entities. All information provided is deemed accurate at the time of printing; however, it is
not guaranteed.
Notes
• Graphics shown in this quick reference guide are for illustration only. Your components may or
may not look exactly the same as drawings shown in this guide.
• Refer to Chapter 2 of the User Manual for detailed information on jumpers, connectors, LED
indicators, memory support and CPU/motherboard installation instructions.
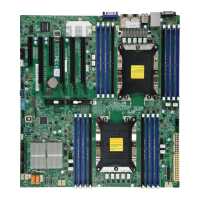
Front Control Panel (JF1)
CPU and PHM Installation
Back Panel I/O Connectors
1. LAN1: RJ45 1Gb LAN Port 6. Dedicated IPMI LAN Port 11. USB6: USB 3.2 Gen. 1 Port 16. Line In
2. USB9: USB 2.0 Port 7. USB7: USB 3.2 Gen. 1 Port 12. USB4: USB 3.2 Gen. 2x2 Port 17. Line Out
3. USB10: USB 2.0 Port 8. USB8: USB 3.2 Gen. 1 Port 13. Center/LFE Out 18. Mic In
4. COM1 Port 9. LAN2: RJ45 10Gb LAN Port 14. Surround Out 19. UID Switch
5. VGA Port 10. USB5: USB 3.2 Gen. 1 Port 15. S/PDIF Out
Power Button
UID-LED
NIC1 Active LED
Reset Button
HDD LED
PWR LED
Reset
PWR
P3V3_STBY_UID SW
P3V3_STBY
Ground
19
X
Ground
X
P3V3_STBY
20
1 2
Ground
Power Fail LED
NIC2 Active LED
SW_NMI_N
P3V3
OH/Fan Fail LED
P3V3
1
1
Using Pin 1 as a guide, carefully align
the CPU keys (A & B) on the processor
against the CPU keys on the carrier (a
& b) as shown in the drawing below.
Once they are properly aligned, carefully
place one end of the processor into the
latch marked 1 on the carrier, and place
the other end of processor into the latch
marked 2.
1
2
Carefully place the corner marked "a" on the processor carrier assembly into the corner of the heatsink
marked "A". Repeat the same step to place the corners marked "b", "c", "d" on the processor carrier
assembly into the corners of the heatsink marked "B", "C", "D" making sure that all plastic clips are properly
attached to the heatsink.
1
3
Gently place the Processor Heatsink Module
(PHM) on top the CPU socket, making sure
that each PEEK nut is properly attached to its
corresponding threaded fastener.
1
2
A
B
Latch
Latch
a
processor)
CPU Key (on the
carrier)
CPU Key (on the
processor)
CPU Key (on
the carrier)
b
Processor Carrier Assembly
(Reverse Side View)
Pin1
A
B
C
D
a
b
c
d
Processor Heatsink Module (PHM)
(Reverse Side View)
a, b, c, d:
Threaded Fastener on the CPU Socket
PEEK Nut on the Heatsink
A
B
C
D
a
b
c
d
Pin 1
(triangle marker on
the CPU)
Pin 1
(hollow triangle marker
on the carrier)
1
2
3
X12SPA-TF
4
5
6
7
8
9
10
11
12
13
14
15
17
18
19
16

 Loading...