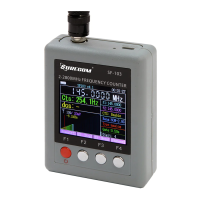
User manual SURECOM SF-103
1.1 Power On / Off:
Power on, press and Hold down the [Red key] by 3 second
Power off, press and Hold down the [Red key] by 3 second of number count
down to 0
1.2 Charging the battery:
Plug the power cord into adaptor, micro usb connect SF-103
The Led indicating: *The RED light Charging, * The Green light is Full
1.3 Setup the frequency Range:
Press [F2 stop] button, [F3 -->] select function to "Range"
Press the [F4 Ent] Select 27 MHz -2.8 GH z (27 MHz – 2800 MHz) / <= 200
MHz (below 200 MHz),
and then press [F2] to Run
1.4 Setup the time Gate:
Press [F2 stop] button, [F3 --->] select Function to "Gate"
Press the [F4 Ent] select: 0.1s / 0.25s / 0.5s / 1.0 s, and then press [F2] to Run
1.5 Setup the Frequency counter digital:
Press [F2] button, [F3--->] select Function to "Gate"
Press [F4 Ent] Select: 3 / 4 / 5 / 6, and then press [F2] to Run
27 MHz - 2.8 GHz for 3 / 4 only, 2 – 200 MHz for 3 / 4 / 5 / 6, Detail Please see
Table 1.
1.6 How to check Frequency of Digital DMR Radio
Press [F 2 ] button, [F3 --->] select Function to" type": Press [F4] select Analog
/ Digital (DMR),
and then Press [F2] to Run
! Note. Digital mode have 3 Decimal only.