Microphone G3 User Manual
Thank you for choosing SYNCO product. Please read this manual
carefully before use and follow all instructions mentioned herein.
Caring For Your SYNCO Product Product Introduction
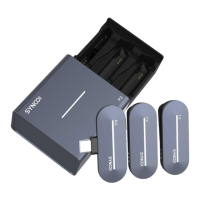
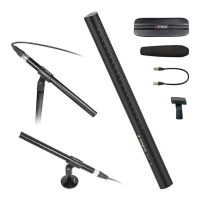
Package List
Please keep the product in a dry, clean, dust-free environment.
Keep corrosive chemicals, liquids and heat source away from the
product to prevent mechanics damage.
Use only a soft and dry cloth for cleaning the product.
Malfunction may be caused by dropping, impact of external force.
Do not attempt to disassemble the product. Doing so voids warranty.
Please have the product checked or repaired by authorized technicians
if any malfunctions happened.
Failure to follow all the instructions may result in mechanics damage.
Warranty does not apply to human errors.
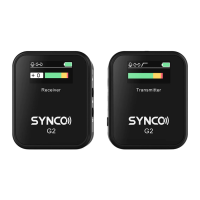
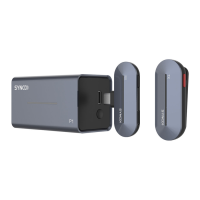
RX Receiver
x1
Carrying Bag
x1
TX
Transmitter
x2
User
Manual
x1
Mic
Windshield
x2
Lightning
to Type-C
Adapter x1
TRRS to
TRRS Cable
x1
Usb-A to
Type-C
Adapter x1
Type-C to
Type-C
Cable x1
RX Receiver
TX Transmitter
① Volume Control Button
② Built-In Mic
③ Switch Button
④ 3.5mm Monitoring Port
① Switch Button/Back Button
② Setting Button
③ Up Option Button
④ Down Option Button
⑤ Display Screen
⑤ Recording Button
⑥ Pocket Clip
⑦ Contacts (For Charging And File
Transmission)
⑥ Type C/Digital Output Port
⑦ 3.5mm TRS/TRRS Output
⑧ 3.5mm Monitoring Port
⑨ Rx Built-In Mic
⑩ Pocket Clip
TX Indicator
Blue/green indicator on transmitter corresponds to the A/
B transmitter shown on the receiver screen
Blue/green indicator
ashes
Blue/green indicator keeps
on
Orange indicator on
Red indicator on
Red indicator o
Orange indicator o
Blue / green indicator
lights up and ashes at the
same time
The transmitter waiting for
connection
The transmitter successfully
connected to the receiver
Charging
Recording on
Recording o
Fully charged
Reset completed
Working
Indicators
Recording Indicators
Operations
Tx Transmitter
RX Receiver
1. Power On
Method 1:Push out the TX upwards in the direction shown in the gure.
The TX automatically powers on and the blue and green indicators light
up and ash.
Method 2:Long press the switch button on the front of the transmitter
for 3 seconds, and the blue and green indicators light up and ash.
2. Power O & Charging
Method 1:Slide the TX into the receiver in the direction shown in the
gure, and the orange indicator lights on for automatic charging. The
orange indicator turns o and the TX automatically shut down when fully
charged.
Method 2:Long press the switch button on the front of the TX for 3
seconds, the blue/green indicator turns o, and the TX shut down.
Method 3:The TX automatically shuts down in 5 minutes when there is
no connection or recording.
3. Reset
The TX automatically power on when took out from the
RX. Long press the switch button for 3 seconds to shut
it down, then long press the switch button for 8 seconds
until the blue and green indicator ashe. Reset completed.
4. Recording
Recording on: Long press the recording button on the side
of the TX for 3 seconds until the red light on.
Recording o: Long press the recording button for 3
seconds until the red light turns o.
Note: A single recording audio le lasts for a maximum of
22 hours (48K16bit)
5. File Transfer
Put back the TX into the RX and set the card reading mode in the RX to
read the les.
6. Monitoring
Insert the listening device into 3.5mm monitoring port for
the RX input sound, such as the RX microphone sound/the
RX input audio from mobile phone.
Adjust the ve-level monitoring volume when press the
volume button on the TX.
Note: This port of the TX is used as output only, not input.
1. Power On /O
Long press the power button on the RX for 3 seconds until the screen
turns on/o to switch on/o.
5. Monitoring
3.5mm Monitoring port of the RX supports 32 ω earphones for in-ear
monitoring to mobile phone input or computer input audio.
2. Reset
Press the up and down buttons for 8 seconds to reset the RX when power
on.
3. Paring
Automatic paring:
Take out the TX after turn on the RX, the TX will automatically turn on
and pair with the RX.
Manual pairing:
Method 1:After the RX turns on, enter the setting panel for pairing
without taking out the transmitter,
Method 2:Take out the TX and reset it rst. Enter the setting panel for
when the receiver powers on.
4. File Transfer
① Connect the Type-C port of the RX to the output of the mobile phone/
computer through adaptor cable.
② Connect the 3.5mm OUT output port of the RX to the device such as
camera through TRRS/TRS cable.
③ The 3.5mm monitoring port of the RX is used for monitoring and can
be set as the TRS output port in the Settings panel.
The output LR has 3 channels: TXA-TXB-RX. The device supports a
maximum of 3 outputs, and the output devices corresponding to TRRS
and TRS channels can be combined freely.