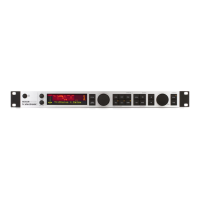
20 21Quick Start Guide2290 P DYNAMIC DIGITAL DELAY
(EN)
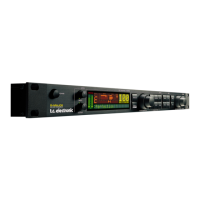
Step 2: Controls
(1) KEYBOARD Encoder
The encoder is used to adjust most settings on the
pedal. Press a button to adjust a parameter and turn
the KEYBOARD encoder to get the desired setting.
(2) PRESET Section
PRESET – Press to cycle through the 64 boards.
Press PRESET again to load the selected board
or directly activate preset A or B with the
footswitches. Each of the 64 boards contains 2
presets, A and B, making a total of 128 presets.
STORE – Press once to select where to store a
preset. Press again to store your preset. If needed
use the KEYBOARD encoder and footswitch A or B to
change preset slot (green is active slot) and board
number before the second press of STORE button.
(3) OUTPUT Section
DLY – Press to adjust the output level of the
delayed signal.
Press DLY twice to enable phase inverting
of the output signal (0 = not inverted,
1 = output inverted).
DIR – Press to adjust the output level of the
direct signal.
PAN – Press DLY and DIR to adjust the amount of
xed panning between left and right. The amount of
panning can be controlled for both the direct and the
delayed signal. In order to activate panning see the
PAN - DYN Section.
(4) FEEDBACK Section
SELECT – Press to select which of the three feedback
settings to display or adjust. Pressing SELECT cycles
through the feedback level (LEVEL), the high cut lter
(HIGH) and the low cut lter (LOW).
F. BACK – Press to adjust the selected feedback
parameter. Adjust feedback level to control number of
repeats, set high cut lter (range: 1 kHz to 20 kHz) or set
low cut lter (range: 0-800 Hz, where 0= ‘o’).
INV – Inverses the phase of the feedback signal.
(5) DELAY Section
DELAY – Press to set the delay time. Press and hold
for faster adjustment.
MOD – Enables modulation of the delayed signal, as
set in the MODULATION section.
INV – Inverts the anger sweep start and env. pitch
shift direction. Note: INV only has eect if MOD is
enabled and if the WAVEFORM for the DELAY is ENV or
TRIG in the MODULATION section.
SUB.D - Sets the delay time as a subdivision of the
tap tempo.
Tapping this button, toggles between subdivision
types: o, straight, dotted and triplets.
Turning the KEYBOARD encoder after selecting the
subdivision type, changes the subdivision e.g., ⁄, ½,
¼, ⁄, ⁄, ⁄, ⁄.
TIME – The TIME LED ashes to indicate the resulting
delay time. Either the manually set delay time, or the
result of the tapped tempo and the SUB D setting.
PAN – DYN Section
(6) DYN MOD – Enables the dynamic modulation as set
in the MODULATION section.
(7) REVERSE – Reverses the eects of the
dynamic modulation.
(8) DELAY / DIRECT - Activates panning of the delayed
signal (DELAY), the direct signal (DIRECT) or both,
as indicated by the red LEDs. The amount of xed
panning is adjusted by simultaneously pressing DLY
and DIR and turning the KEYBOARD encoder - see
the OUTPUT section.
(9) PAN MOD – Enables modulation of the
panning, also called ‘autopanning’, as set in the
MODULATION section.
(10) MODULATION Section
SELECT - Selects which of the three modulation
settings to display or change. Pressing SELECT
cycles through modulation of the delayed signal
(DELAY), the panning (PAN) and the dynamic
modulation (DYN).
Note: The modulation speed can be set as a
subdivision of the tap tempo. This is done by pressing
SPEED on the modulation section and then pressing
SUB.D on the delay section.
WAVEFORM – Cycles through the 4 selectable
waveforms: SINE, RAND, ENV and TRIG.
SPEED - press to adjust the selected modulation
parameter.
DEPTH - Press to display or adjust the modulation
depth parameter.
THRE – Simultaneously press SPEED and DEPTH
to display or adjust the threshold. THRE is
only applicable when ENV or TRIG waveforms
are selected.
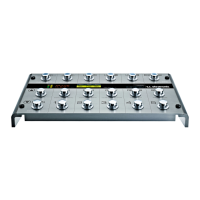
(11) FOOTSWITCHES
A or B - Press a footswitch to activate the preset in
that particular slot. Press again to bypass the eect.
A and B can also be used when storing a preset, to
select which slot to store in.
LEARN – Tap to set a tempo (tap tempo). The
resulting delay time and modulation speeds will
be changed depending on their respective SUB.D
setting. MIDI clock output will also follow the
tap tempo.
A and B – Press simultaneously to move ‘down’
in the preset list for example, from preset 22 to
preset 21.
B and LEARN – Press simultaneously to move ‘up
in the preset list for example, from preset 22 to
preset 23.
REAR PANEL
(12) INPUT (MONO/STEREO) – These jacks accept
standard ¼" TS connectors. Stereo inputs use both
connections, while mono inputs only use the ¼"
MONO jack.
(13) STEREO IN/OUT Switch – Use this switch to
change the functionality of the STEREO input and
STEREO output.
In the ‘up’ position these jacks function as regular
stereo jacks.
In the ‘down’ position these jacks function as a send
and a return for the delayed signal.
(14) OUTPUT (MONO/STEREO) – These jacks accept
standard ¼" TS connectors. Stereo outputs use both
connections, while mono outputs only use the ¼"
MONO jack.
(15) EXP – Connect an external expression pedal with a
¼" TRS connector.
(16) USB – Connect via USB-C to a computer for use with
the free 2290 P app, or for rmware updates.
(17) DC IN – Connect a standard 9 V / >250 mA power
supply. For safe operation, only use the external
power supply that comes with your product.
(18) MIDI (IN/THRU/OUT) – These MIDI jacks allow you
to remotely control footswitches, preset changes,
and various FX parameters in real-time via external
MIDI devices (like a foot controller or your DAW).
 Loading...