Quick Start Guide
(EN)
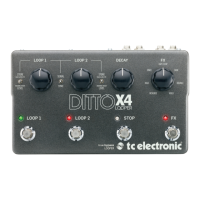
Controls
(1) STORE/LEVEL switches – Briey ip the switch
up to store the current loop as a backing track,
or hold up for 3 seconds to delete stored backing
track. Hold the switch in the down position while
turning the associated LOOP knob to adjust the
level of the backing track.
(2) LOOP knobs – Adjust the level of a loop or
backing track.
(3) SERIAL/SYNC switch – When set to Serial, either
loop 1 or 2 can be played at a time. In Sync mode,
both loops can be played simultaneously.
(4) DECAY knob – Controls the amount of volume
reduction that occurs each time an overdub repeats.
(5) FX knob – Selects one of the 7 FX options.
(6) LOOP 1 and 2 footswitches – Use these
to control several loop-related functions.
(see reverse side)
(7) STOP footswitch – Press to stop both loops
immediately. Hold to erase the loops.
(8) FX footswitch – Press to engage the selected
loop FX.
(9) INPUT jacks – Connect one ¼" TS cable for mono
operation, or 2 cables for stereo.
(10) OUTPUT jacks – Send audio via one or two
¼" TS cables.
(11) Power input – Connect the 9V power supply.
(9 V DC, >300 mA)
(12) MODE switches – Adjust ne details of pedal’s
operation. See the full manual for details.
(13) USB input – Connect to a computer to transfer
les back and forth, and for rmware updates.
(14) MIDI jacks – Allows connection of an external
MIDI clock, and program and CC changes from a
MIDI controller.
IMPORTANT SAFETY INSTRUCTION
Before operating the device, please see “Important
Safety Instructions” on page 3 of the full manual.
Visit tcelectronic.com to download the full manual
DITTO X4 LOOPER
Simple and Intuitive Dual-Track Guitar Looper Pedal with Powerful Loop Eects
(1)
(2) (3) (4) (5)
(6) (7)
(8)
(9) (10) (11) (12) (13) (14)
V 2.0