2800 LAURA LANE • MIDDLETON, WI 53562 • (800) 288-9383 • FAX (608) 836-9044 • www.tcsbasys.com
11
Checkout & Troubleshooting
CHECKOUT
Note: The fan has a minimum on and off time of 30
seconds. The heating and cooling stages have a mini-
mum on and off time of 2 minutes.
You may verify the status of heating and cooling stag-
es and fan in monitoring screens 5, 6, and 7, which are
accessed by pressing the SERVICE STATUS button.
1. Verify all wiring prior to powering the thermostat.
2. Turn power on. The thermostat will display a
momentary screen with the model number , and
then the main monitoring screen with the time, day,
date (SZ1033 only) and current temperature.
3. Press the PROGRAM SETUP button until you
reach the screen # 14 which allows you to set the
occupant setpoint adjustment limits. Change this to
+/-20°F (11.1°C). Press the PROGRAM SETUP but-
ton once more to store the change. Then press the
SERVICE STATUS button once to exit programming.
4. Press the FAN SWITCH button to access the
fan mode and change the mode to AUTO. Press
the FAN SWITCH button once more to store the
change. Press the SYSTEM SWITCH button to
access the system mode and change the mode to
AUTO. Press the SYSTEM SWITCH button once
more to store the change.
5. Verify that the thermostat is operating in the occu-
pied mode by making sure that the top LED is lit. If
not, press the OVERRIDE button. The LED should
light up.
6. Take note of the current temperature reading. Press
the WARMER (up) button. The setpoint adjustment
screen should now be showing. Press the WARMER
button until the heating setpoint is greater than the
current temperature by at least five degrees. The
fan will come on. The reversing valve will move to
the heating position. The compressors and heating
stage(s) will sequence on after 30 seconds.
R
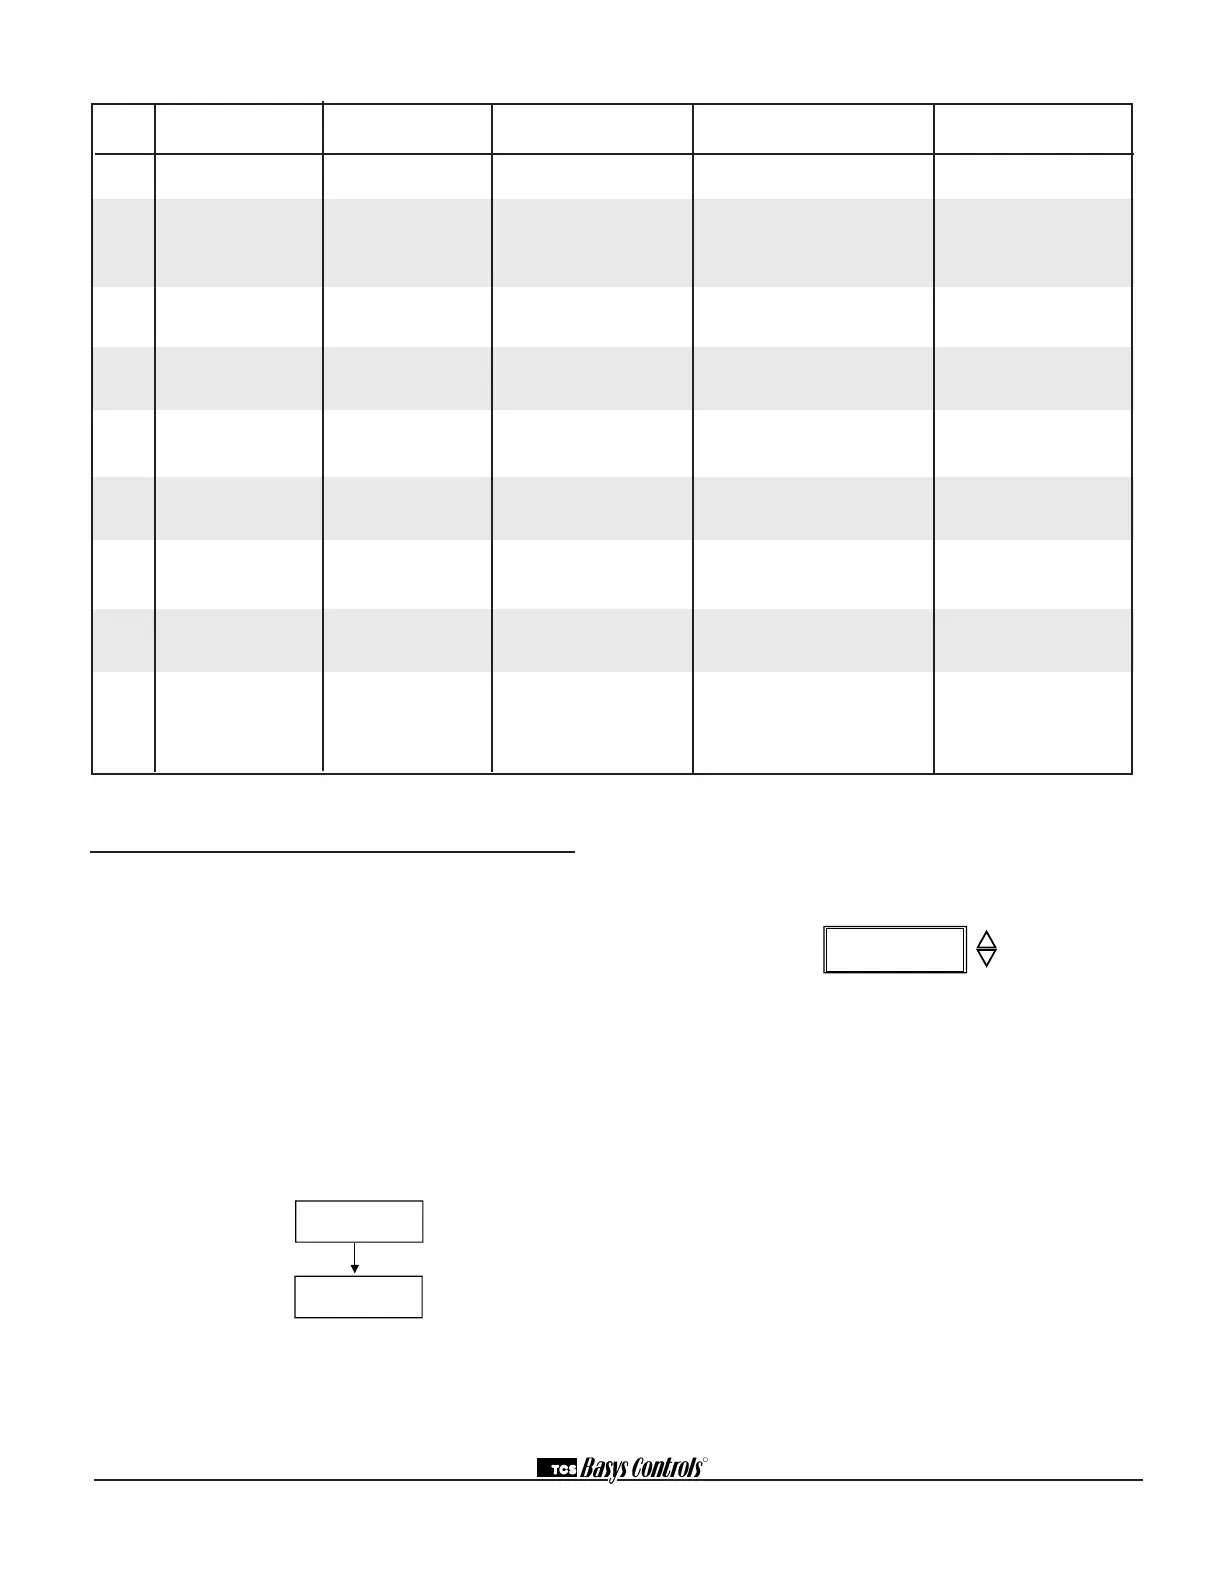
DIGITAL APPLICATION LED SERVICE SCREEN CONTROL SENSOR OR
INPUT INDICATION? (DI STATUS SCREEN) PROVIDED DEVICE NEEDED
DI1 Fan Proving YES CHECK FAN, YES - turns system mode to "off" Differential
FAN OK — requires manual re-start pressure or
or FAIL (set system to auto) current switch
DI1 Equipment NO OK NO Dry contact, switch. Any type
Monitoring (DI1 OPEN or CLOSED) for monitoring and indication
DI2 Service Alert YES OK or CHECK DI2 NO Dry contact, switch. Any type
(DI2 SERVICE OFF or ON) for monitoring and indication
DI2 Monitor with NO OK YES - shifts setpoint by Dry contact, switch.
setpoint shift (DI2 OPEN or CLOSED) programmed amount
DI2 Cooling Lockout NO OK YES - locks out 2nd
(COOL LOCKOUT ON or OFF) and 3rd stage cooling
DI3 Filter Service YES OK or CHECK FILTER NO Differential pressure switch
(FILTER OK or CHECK)
DI3 External Occupancy Override NO OK YES - switches to occupied mode Dry contact such as twist
(EXT OVER ON or OFF) as long as contact is made* timer, light switch, etc.
DI3 External Time Clock Input NO OK YES -input overrides thermostat Dry contact;
YES (EXT TIMECLOCK ON or OFF) occupancy program* external time clock
Occupied? (TCS part SL1001a)
Digital Input Summary Table
*see delay on Power-up.
TCS V1.0
MON
12:00 AM 72F
11-19-01
LIMIT SETPOINT
ADJUST +/-: 5F
 Loading...