Notes
about
record
styluses
•
If
a
stylus
becomes
bent
or
damaged,
it
mi
ght
not
be
able
to
fol
low
the
audio groove. Since a bent
stylus could al
so
damage records and cause malfunction, handle styluses
carefully.
• Always
u
se
a
commercially
-ava
ilable stylus cleaner
to
clean
a
stylus.
Use
of
anything other th
an
a
stylus cleaner could
damage the
stylus.
If
the
tip
of
the
stylus
becomes worn,
not
only will
it
wo
r
sen
the
so
und
quality,
it
could also
damage records. After
about
300
hours
of
playback
time
,
replace
the stylus
with one
that
we spec
ify.
Pl
ease
use
an
Aud1o-Technica
ATN95E
replacement stylu
s.
•
The
ca
r
tridge
installed
in
this
unit
is
equival
ent
to
the
Audio-Technica
AT95E
VM
Type cartridge.
VM
type
cartridges have
the
same characte
ri
stics
as
MM
type cartridges.
•
Fo
l
low
the
replace
ment
instructions in the
manu
al
of
the
replacement stylus.
•
Since
lo
ud
noises
could suddenly
occur,
put
the unit
int
o
standby before changing the
styl
us.
•
Be
careful
not
to
hurt
your hand
or
the equipment.
•
Be
careful
not
to
a
ll
ow
sma
ll child
re
n
to
accidentally swal-
l
ow
styluses.
•
Be
aware that bent
stylu
se
s,
for
example,
that
res
ult
fr
om
in
suff
icient cu
stomer
ca
uti
on
or
an
outside
c
au
se
are
not
covered
by
the warranty.
6
Names
and
functions
of
parts
Ell
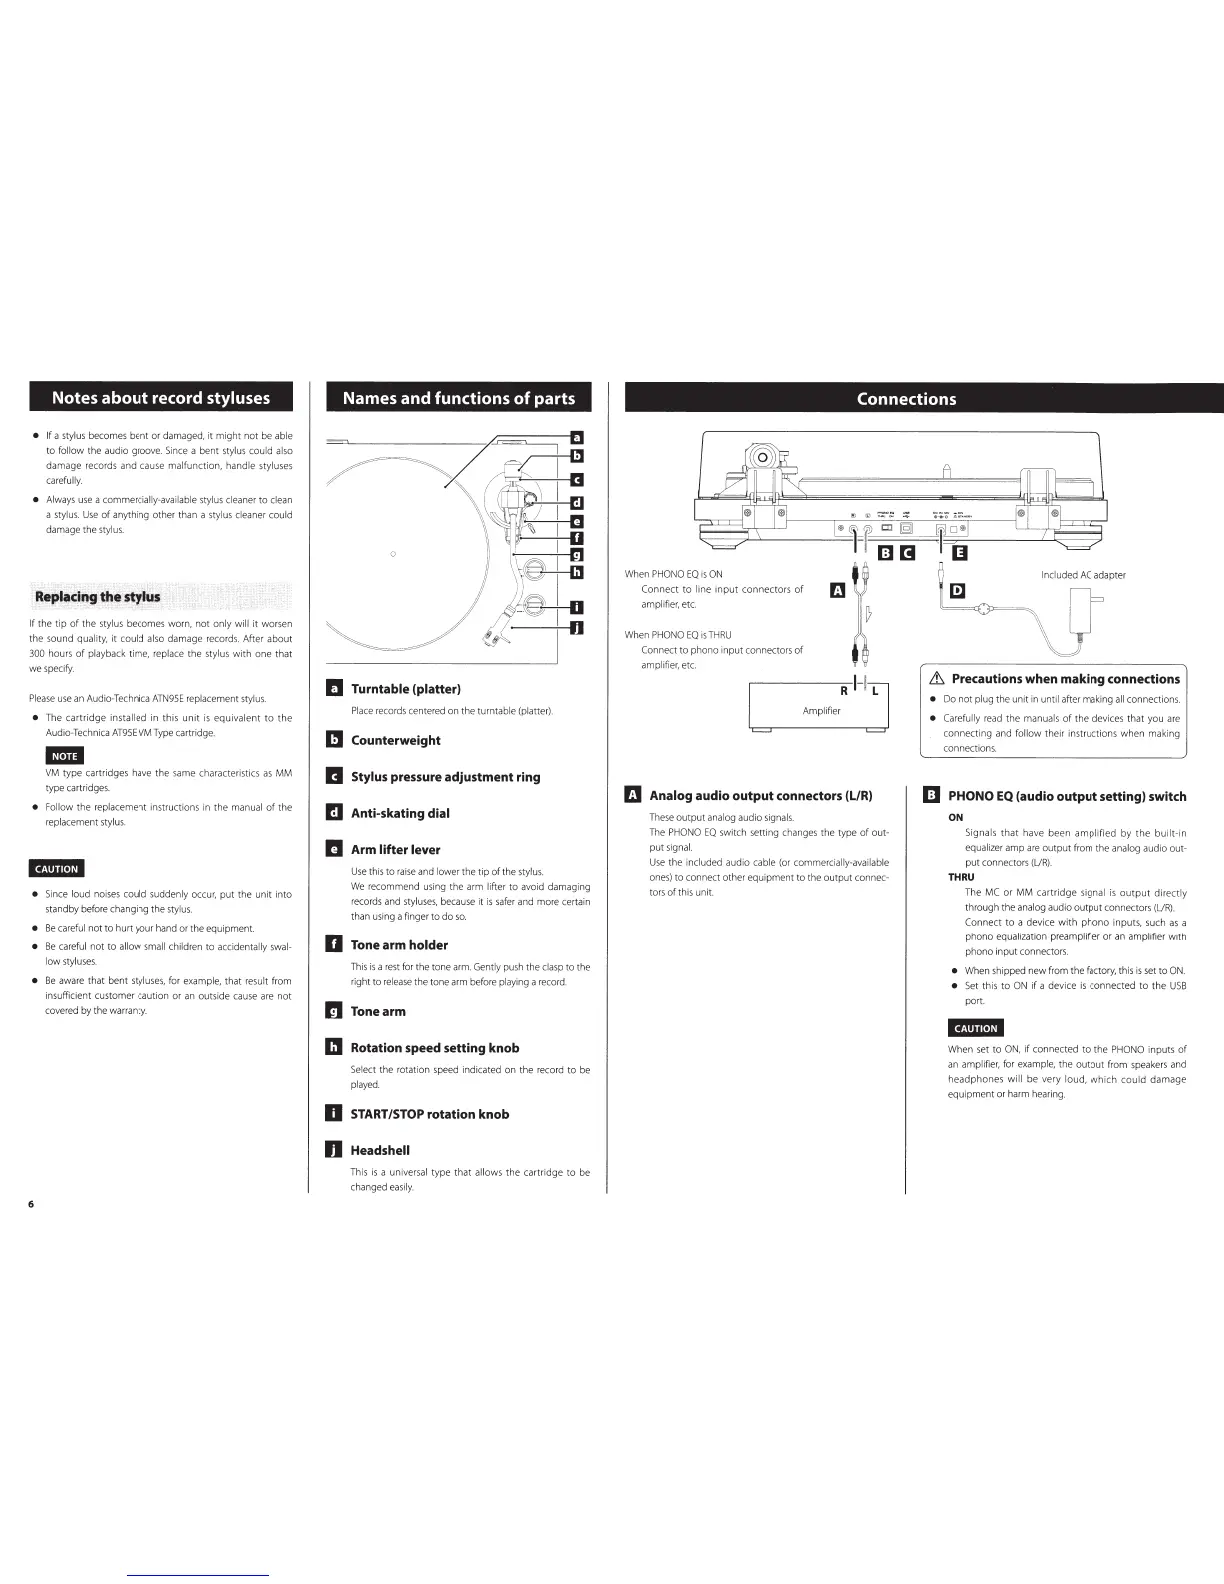
Turntable (platter)
Place
records
ce
ntered on the turntable (platter
).
[!I
Counterweight
II
Stylus pressure adjustment ring
I!]
Anti-skating dial
~~
Arm lifter lever
Us
e
th
is
to
raise
and
lower
the
tip
of
the
stylus.
We recommend
us
ing the arm
li
he
r
to
avoid damaging
records and
sty
luses,
because it
is
safer and
mor
e certain
than using a
finger
to
do
so.
D
Tone
arm
holder
This is a rest for the tone arm.
Gently push the
cl
asp
to the
right
to
relea
se
the tone arm before
playing
a record.
Ill
Tonearm
Ill
Rotation speed setting
knob
Se
lect
the rotati
on
sp
eed indicated
on
the record
to
be
played.
D
START/STOP rotation
knob
n
Headshell
This
is
a
uni
ve
rs
al
type
that
allows the cartridge
to
be
changed
eas
ily.
Connections
When
PHONO
EO
is
ON
Conne
ct
to
line
inpu
t
con
nectors of
l'i]
amplifi
er,
etc.
When
PHONO
EO
is
THRU
Connect
to
phono
input
connectors
of
amp
lifier, etc.
Amplifier
=
R
fl1
Analog
audio
output
connectors
{l/R)
These
out
put
anal
og
audio
sig
nal
s.
The
PHONO
EO
switch setting changes the t
yp
e
of
out-
put
signa
l.
Use
the
included
audio
cable
(or
commercially-available
on
es)
to
conne
ct
other equipment to the
outpu
t
connec-
to
rs of
thi
s unit.
Included
AC
adapter
--
\IF
)J
6
Precautions when
making
connections
• Do
no
t
plug
the unit in
until a
her
making
a
ll
connections
• Carefully
read
the
manua
ls
of
the devi
ces
th
at you are
connecting and
fo
ll
ow
their instructions
when
making
connections.
I]
PHONO
EQ
(audio
output
setting) switch
ON
Signals
that
have been
amp
lified
by
the
built-in
equalizer
amp
are
output
from the
ana
l
og
audio
out-
p
ut
connectors (UR
).
THRU
The
MC
or
MM
cartrid
ge
signal
is
out
put
direc
tl
y
through the
ana
l
og
audio
output
connectors (UR).
Connect
to
a device wi
th
phono
i
np
uts, such
as
a
phono equalizati
on
preamp
li
fier
or
an
amp
lifier
wi
th
phono input connectors.
•
When
shipped n
ew
from the fact
ory,
this is set to
ON.
•
Set
th
is
to
ON
if
a
de
vice
is
connected to the
U
SB
po
r
t.
When set
to
ON,
if
connected
to
the
PHO
NO
inputs of
an
amplifie
r,
for
exa
mp
l
e,
the
output
fr
om
speakers and
headphones
will
be
very
l
ou
d,
wh
ich
could
damage
equi
pment
or
ha
rm h
ea
ring.


 To Next Page