EasyManua.ls Logo

Technika LCD32-210 User Manual

Technika LCD32-210
34 pages
To Next Page IconTo Next Page
To Previous Page IconTo Previous Page
Page #22 background image
USB RECORD
Built into this television a USB record facility. The benefits of this are as follows:
Pause live TV/Radio and then playback, fast forward and rewind up to live TV
One button record, if you decide you want to record the current program
Easy programmable recording from the 7 day TV Guide
Record TV/Radio and watch/listen back on your computer/laptop
Included with the television is a 4GB USB high speed Memory Stick. This will allow you to record approximate 2 hours of
television.
Due to the nature of the product, it is necessary to use a high speed USB memory stick (as the TV reads from and writes to
the memory stick at the same time, some memory sticks may not be suitable)
You can purchase high speed memory sticks from some computer stores, alternatively, we have a selection of tested and
compatible memory sticks available to purchase directly from the helpline/web site. These are available in 4GB, 8GB and
16GB. (Please check the web site/helpline for latest specifications and prices)
Minimum Specification - USB Memory Stick
Setting up the USB Memory Stick
1) Insert the USB Memory Stick into the USB Port located on the side of the television.
The TV will now test the speed of the memory
2) You will then have the option to start time shift
Pause Live TV/Radio (Time Shift)
Pausing Live TV/Radio is very simple.
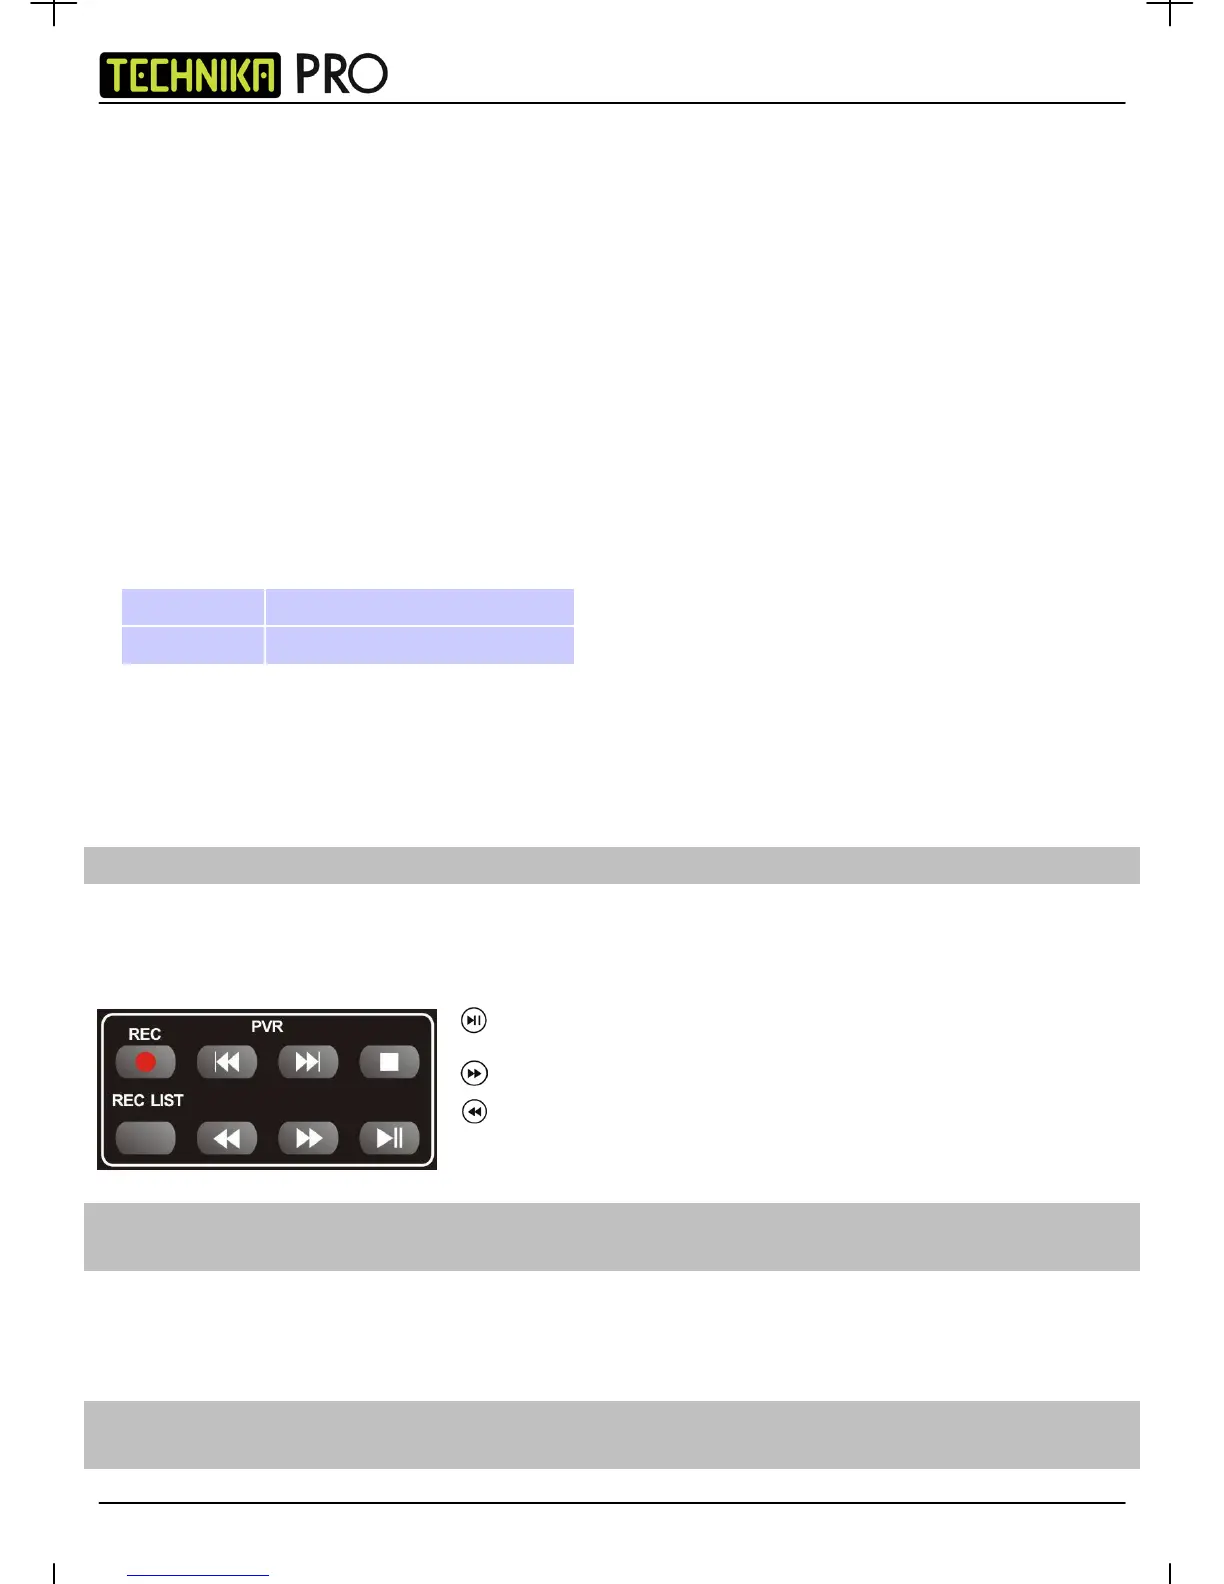
One Button Record
At any point in time you may decide to record the current channel that you watching. To do this you just need to press the
[REC] button and the program will record until it finishes.
Read Speed 20 MB/s (Mega Byte Per Second)
Write Speed 6 MB/s (Mega Byte Per Second)
- Press the play/pause button and the television will pause and the live
content will be recorded. To resume watching press play/pause again.
- Press fast forward to go forward in a recording (i.e. to skip adverts)
- Press fast rewind to go back in a recording (i.e. if you fast forwarded
too far)
Tip: This television contains one TV tuner, therefore it can only record the channel you are watching or record
one channel while the television is in standby mode.
22
Tip: If the TV does not recognise the USB Memory Stick, please check that it is formatted to FAT32.
Tip: When you switch the TV to standby or change channel the Time Shift memory is wiped. To restart time
shift you must press play/pause button.
IDTV
Question and Answer IconNeed help?

Do you have a question about the Technika LCD32-210 and is the answer not in the manual?

Technika LCD32-210 Specifications

General IconGeneral
BrandTechnika
ModelLCD32-210
CategoryLCD TV
LanguageEnglish

Summary

IMPORTANT SAFETY INSTRUCTIONS

Warnings

Essential precautions to prevent fire, electric shock, or damage.

Safety

Guidelines for safe operation, placement, and handling of the appliance.

Maintenance

Instructions for cleaning and caring for the television unit.

Packaging

Guidance on keeping and using original packaging for transport and service.

Fixed Image Display Precautions

Advice on preventing screen burn-in from static images.

Product Disposal

Instructions for environmentally friendly disposal of the electrical product.

WHAT IS INCLUDED IN THE BOX

Accessories

List and visual representation of all items supplied with the TV.

DETACHING THE STAND & WALL MOUNTING

Detaching the Stand

Step-by-step guide to safely remove the television stand.

Wall mounting the TV

Instructions for attaching the TV to a wall mount using specific screws.

GETTING STARTED - INITIAL SET UP

TV BUTTONS & SOURCE MENU

TV Buttons

Identification and function of physical control buttons on the television.

Choosing Mode/Source

How to select different input sources for the TV using buttons.

REMOTE CONTROL

CONNECTIONS

Rear Connections

Overview of all input and output ports located on the rear of the TV.

Connecting a DVD or Video recorder

Guide on connecting VCRs or DVD recorders using SCART or RF.

Connecting a Camcorder, Camera or Games Console

Instructions for connecting video devices via Video and Audio inputs.

Connecting a High Definition (HD) Device

Methods for connecting HD sources via HDMI or Component cables.

PICTURE MENU

SOUND MENU

CHANNEL MENU

FEATURE MENU

SETUP MENU

On Screen Display Timer

Adjusts how long on-screen menus remain visible before disappearing.

First Time Installation

Restarts the initial setup wizard for channel tuning and configuration.

Aspect Ratio

Allows selection of picture format (e.g., 4:3, 16:9) for optimal viewing.

Blue Screen

Configures the background color when no signal is present.

Reset Menu System

Resets all TV settings to their factory default values.

Reset TV Channels

Clears all tuned television channels, requiring a re-scan.

Firmware Upgrade

Instructions for updating the TV's internal software for improved performance.

USING THE TELEVISION AS A COMPUTER MONITOR

PC Setup for Windows XP/Vista via VGA

Detailed steps for configuring PC display settings for VGA connection.

Connecting a Laptop to the TV

Guide for establishing a connection between a laptop and the television.

PC SETUP MENU

USB RECORD

Setting up the USB Memory Stick

Procedure for inserting and testing a USB memory stick for recording.

Pause Live TV/Radio (Time Shift)

How to pause and resume live TV broadcasts using the USB function.

One Button Record

Simple method to start recording the current program with a single button press.

USB RECORD / 7 DAY TV GUIDE

Record from 7 Day TV Guide

Using the TV Guide interface to schedule program recordings.

Playing Back Recorded Content

Accessing and viewing previously recorded programs from the USB drive.

USB MODE / MEDIA PLAYER

Media Categories

Content organization into Movies, Music, Photos, and Recorded Programs.

USING WITH SKY DIGITAL / VIRGIN MEDIA

Connecting via SCART

Instructions for connecting satellite/cable boxes using a SCART cable.

Connecting via RF

Method for sharing a Sky Digital signal using an RF connection.

Using External Remote Controls

Operating TV with Sky or universal remotes via code programming.

TECHNICAL SPECIFICATION

DIGITAL SWITCHOVER

How to Retune Your TV

Steps to follow for re-tuning channels after digital switchover.

Switchover Timeline

Map showing regional digital switchover dates across the UK.

OPTIONAL ACCESSORIES AND REPLACEMENT PARTS

Related product manuals