BEFORE YOU INVERT make sure that the table rotates smoothly
to the fully inverted position and back, and that all fasteners are secure. Make
sure the user settings described below are properly adjusted for your unique
needs and body type. Take your time
nding your proper settings and remember them. Check these
settings every time prior to using the equipment.
FIND YOUR SETTINGS
Figure 2
Figure 4
Figure 3
The inversion table is like a sensitively balanced fulcrum. It responds to very small changes in
weight distribution. As a result, you must always test to make sure you have the correct height
setting. Ensure that there is clearance to rotate in front, above and behind you.
• To begin, rest your head on the mat and place your arms at your sides, then slowly place your
arms on your chest. Check to see:
1. if your head is lower than your feet, then lengthen the height setting by one hole and test
again.
2. if your feet do not move at all, then shorten the height setting by one hole and test again.
3. if the table comes to rest with your feet lifted a few inches off the A-frame, then you have
found the correct balance setting (Figure 8).
NOTE: The correct balance setting will allow your arm movements to rotate the table backward smoothly and slowly,
and return to the upright position in the same manner. This is an important step; spend as much time as necessary to
nd the correct balance setting. Once you nd your setting, it should remain the same as long as your weight does not
uctuate substantially.
SECURE YOUR ANKLES
TEST YOUR BALANCE
Figure 8
1. Adjust the Roller Hinge:
The Roller Hinge setting controls the responsiveness or rate of rotation. There are three
holes; hole selection depends both on your body weight and the rotational responsive-
ness you desire. For beginners, we recommend starting with Setting C (See Figure 1).
IMPORTANT: Place the Roller Hinges in the same hole setting on each side.
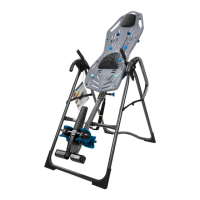
2. Adjust the Height Setting:
The height settings are stamped on the Main Shaft in both inches and
centimeters.
• Pull out the height selector locking pin with your right hand, while sliding the
Main
Shaft with your left (See Figure 2).
• Slide the Main Shaft until the last setting you can read is 1” greater than your
height
(e.g., if you are 5’10’’ the last numbers you should read will be 5’11”). NOTE: The
best height setting for you will depend on your weight distribution and could vary
one or two inches on either side of your actual height. Starting at one or two inches
greater than your height will help
ensure that the rotation of the table is not too fast.
• Release the height selector locking pin so it fully engages in a hole.
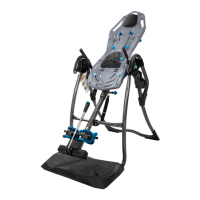
3. Attach the Nylon Tether:
For rst time users, attach the Nylon Tether to help control your angle of rotation (See
Figure 3). You can increase the angle of rotation allowed by the Nylon Tether as you
become more comfortable using the table, or remove it all-together for full inversion.
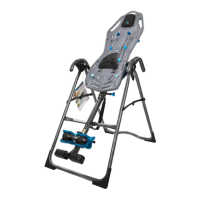
4. Adjust the Foot Platform:
The FitSpine™ Foot Platform can be rotated into either a High or Low setting, with a
one inch height difference between the two sides. The ideal setting will vary by user
and the type of shoes worn. Ideally, the Foot Platform should be set so that the ankle
clamps secure around the smallest part of the ankles (with minimal distance between
the foot clamp and the top of your foot) to reduce body slide while inverted (Figure 4).
• Stand with your back to the Table Bed - do not use the inversion table face-down.
• Step over the Main Shaft, placing your feet on the oor on either side. To balance yourself,
rest only
your lower body against the Table Bed as you slide one ankle at a time between the Ankle Clamps
onto the Foot Platform. Be sure to slide your ankle in from the side (Figure 5); DO NOT insert the foot
through the ankle clamps as you would slide your foot into a shoe. Your feet should always be either on
the oor or on the Foot Platform; never use any other part of the inversion table as a step (Figures 6A
and 6B).
• Press your ankles back rmly against the rear ankle clamps.
• Rotate the top of the rear clamps slightly inward toward your ankles, this will increase your comfort
while inverting.
• Pull the locking pin out to allow the front ankle clamps to snap closed against your ankles (Figure 8).
Make sure your pant legs do not interfere with obtaining a secure closure.
• Adjust the front ankle clamps to make sure both the front and rear ankle clamps are snug
against your
ankles. Release the locking pin so that it fully engages a hole setting (Figure 9).
• If the locking pin does not automatically engage in a hole (Figure 10), push the front ankle clamps
inward until the pin engages fully in the next tightest hole setting. Verify that no part of the footwear or
garments can touch or interfere with the locking pin in any way during inversion.
• Use the concept of HEAR - FEEL - SEE every time you secure your ankles: HEAR the locking pin click
into place; FEEL the locking pin to make sure it is fully engaged in a hole setting; SEE that there is NO
space between the locking pin and its base.Ankle Clamps are locked securely. (Figure 7)
Figure 7
Figure 6A
Figure 6B
Figure 5
Figure 2
U-bar
WARNING
!
For your rst few inversion sessions, ask a spotter to assist you until you are able to
nd your correct balance setting and are comfortable with the operation of the table.
WARNING
!
DO NOT step on the crossbar of the A-frame or on top of the ankle clamps as
this could cause the table to rotate resulting in serious injury or death!
DO NOT lean your upper body against the Table Bed before securing your ankles,
FAILURE to engage the ankle locking pin fully could result in serious injury or death!
DO NOT deviate from these instructions.
WARNING
!
B
A
C
 Loading...