Do you have a question about the Teledyne CombiFlash NextGen and is the answer not in the manual?
Explains hazard symbols like exclamation point for important instructions and lightning flash for dangerous voltage.
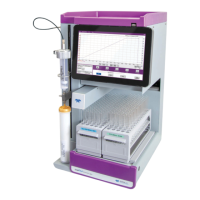
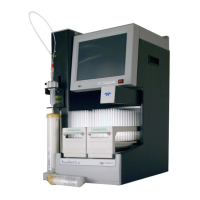
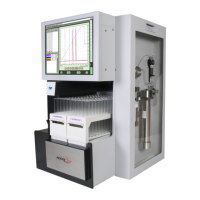
Describes the Teledyne ISCO CombiFlash NextGen system's capabilities including automation, gradients, and detection.
Describes system control via touch screen and network devices, and how commands are processed.
Explains how methods and run history are stored on the internal hard drive and optionally on USB or network.
Details of front panel components like LCD display, USB port, column mount, switches, and injection port.
Describes side panel features including SLCC storage, column mount, top shelf, and vapor enclosure.
Details back panel ports like Ethernet, USB, drain tubes, and cooling fans, along with safety warnings.
Covers solvent inlet ports, exhaust ports, nitrogen inlet, P-trap drain, and ELSD components.
Provides critical warnings about hazardous practices, chemical handling, flammable vapors, and system pressure limits.
Explains the three levels of safety alerts: Caution, Warning, and Danger, with their respective meanings.
Details various hazard symbols used in the manual, including exclamation points, lightning flashes, and pinch points.
Discusses how the system manages pressure through redundant sensors and error reporting for safety.
Details pressure limits set by columns (RFID) and default limits for non-RFID columns, including override procedures.
Explains system responses to overpressure, including flow rate reduction and immediate shutdown.
Provides instructions for unpacking the CombiFlash NextGen system, including warnings about weight and handling.
Specifies ideal placement for the system, requiring adequate space for ventilation and access.
Details on connecting the system to mains power, including safety precautions for voltage and frequency.
Instructions for connecting tubing, with warnings about fire risks and static discharge from conductive tubing.
Connects the carrier gas supply (nitrogen) to the system for ELSD operation, specifying tubing and pressure.
Instructions for connecting and routing drain lines for the fraction collector tray and top shelf, ensuring proper drainage.
Details on securing the optional vapor enclosure and connecting it to an external exhaust system.
Instructions for installing the Solid Load Cartridge Cap (SLCC) storage bracket and ring support.
Guides on moving the system to its operating position, ensuring proper ventilation and container placement.
Details on loading collection tube racks and vials, including available rack types and safety precautions.
Steps to turn on the system using the power switch and circuit breaker, and initial startup routine.
Guide to configuring system settings via the CONFIGURATION menu for optimal operation.
Instructions on naming solvents, enabling solvent level sensing, and understanding density-dependent level settings.
Covers naming the system and configuring general settings like time zone, speaker volume, and region.
Details on setting Time Zone, Speaker Volume, Region, Date/Time, PurIon Delay, and Column Purchase.
Explains the internal vapor sensor's function, default settings, and sensitivity adjustments for safety.
Guides on setting default collection tube volumes, considering flow rate and container capacity to avoid overflow.
How to configure system operation for individual users, including language and print settings.
Explains default run units, pressure units, and enables automatic run length extension for late-eluting peaks.
Describes creating user accounts, setting passwords, and defining roles with varying access levels.
Instructions for properly restarting the system after configuration changes to ensure settings take effect.
Guides on using Auto Prime or Manual Prime to fill solvent lines before the first use or after solvent changes.
Recommends using a verification kit to confirm system operation and provides part numbers for test mixtures.
Describes preparing and injecting soluble samples directly onto the column during a run.
Explains using solid load cartridges for samples with limited solubility or for solid sample introduction.
Step-by-step guide to properly loading RediSep columns, ensuring correct flow direction and fitting.
Instructions for initiating a separation run after installation, sample prep, and column insertion.
Details on ELSD detector, Mass Spectrometer, and PurIon loading settings for optimizing detection.
Explains the function of buttons like START, STOP FLOW, TERMINATE, RESET, and Tube Advance during a run.
Describes bypassing the solid load cartridge to relieve back pressure caused by impurities.
How the system estimates solvent volume, provides alerts for low levels, and options to manage alerts.
Details the main screen interface, including method defaults, sample name entry, and method editing.
Explains the Method Editor screen for controlling less common parameters and accessing gradient optimizer.
Covers settings like Time/CV units, Column, Sample Name, Flow Rate, Equilibration Volume, and Air Purge.
Details on defining gradients via table, changing solvents, and setting a third solvent modifier.
Describes how peak states limit fluid collection: ALL, PEAKS, or NONE, and tube advance triggers.
Sets collection capacity for fluids, allowing default maximum or method-specific volumes, or ELSD/MS configurations.
Configures wavelength for detection, including monitoring, signal gain, slope, and threshold settings.
Enables detection based on a range of wavelengths, comparing total spectrum to solvent spectrum.
Details settings for the Evaporative Light Scattering detector, including sensitivity and spray chamber temperature.
Configures Mass Spectrometer detection and Purity Measure using UV-spectra comparison.
Provides manual control of the solvent pump for troubleshooting, cleaning, and changing solvent systems.
Describes the final chromatogram report, options to print, customize, reuse methods, and scale methods.
Guides on operating the PurIon MS, including startup, standby, shutdown, and method development.
Utilizes the Focus Gradient Generator to create efficient preparative gradient methods for flash chromatography.
Steps to generate a focused gradient by selecting peaks from a scouting run and choosing columns.
Creates preparative gradients using analytical HPLC scouting runs and calibration for focused gradient methods.
Steps to calculate focused gradients using scouting runs from analytical systems and the HPLC Focus window.
Guides on setting up IP address, Netmask, and Gateway for network connectivity.
Details PC requirements and how to access the system via an internet browser using its IP address.
Instructions for configuring the system to print to a network printer, including JetDirect and LPR queues.
Enables automatic saving of run histories to network share folders for archiving and access.
Supports communication between the system and a single PC via Ethernet connection.
Details on placing the system in standby mode to conserve power and proper shutdown procedures.
Outlines minimum periodic maintenance tasks like cleaning, inspection, and tubing checks.
Instructions for cleaning racks and trays made of conductive plastic to maintain static dissipation properties.
Ensures the seal in the cartridge cap is good and monitors the cartridge for leaks during use.
Monthly inspection of solvent, waste, and drain tubing for damage, kinks, or leaks, and testing drain lines.
Default procedure to flush the system with solvent B after a run to remove residual compounds.
Steps for performing a quick flow cell cleaning when alerted by a message, using manual control.
Procedure for monthly flow cell cleaning to maintain lamp energy, involving overnight soaking.
Instructions for carefully removing the ESI or APCI ion source housing from the PurIon system.
Guides on carefully replacing the ESI or APCI ion source housing, ensuring proper alignment and connections.
Troubleshoots plugged capillaries causing high pressure errors by flushing or using a rebuild kit.
Instructions for replacing the ion source housing, ensuring correct alignment and tightening fittings.
Explains causes of overpressure errors related to fluid interface pressure and troubleshooting steps.
Procedure for cleaning check valves that may stick after using volatile salts, using methanol and sonication.
Instructions for installing new check valve cartridges, ensuring correct orientation and tightening.
Addresses restricted vacuum region errors by cleaning the capillary inlet cone assembly.
Steps for removing the capillary inlet cone for cleaning or replacement, including cooling and tool usage.
Details on cleaning the capillary inlet cone using methanol/water mixtures and acetone, followed by drying.
Guides on reinstalling the capillary inlet cone and ion source after cleaning or replacement.
Basic troubleshooting steps for common issues like touch panel display off, checking connections and circuit breakers.
| Brand | Teledyne |
|---|---|
| Model | CombiFlash NextGen |
| Category | Laboratory Equipment |
| Language | English |