2
Tighten the four captive screws in a cross pattern (“X” pattern) using a 2.5mm hex wrench. DO NOT
OVER-TIGHTEN.
1
2
POWER AND CONNECT
3
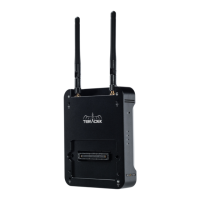
Place Bolt rmly against the back of the Sony VENICE camera.
5
Place the battery plate or recording module rmly against the back of Bolt. Make sure the connector
in front of the module aligns with the connector on the back of Bolt.
4
Turn the camera on. The Power status LED (F) will indicate power is present. Once power is on, use
Bolt’s Power button (D) to turn the power on/o. While the camera is booting, Bolt will also boot.
NOTE: If the camera does not boot when turned on, remove Bolt then re-attach it to the camera,
making sure it’s properly seated. Always use an X pattern when tightening the screws.
To remove Bolt, loosen the four captive screws and pull it o the back of the camera.