-13-
Press “SET” key 5 times, till the “C-0XXXXX” shows on LCD
(calibration mode).
Press “” or “” key to expected position.
Press “” or “” key until the LCD value is same as the
standard CO
2
meter.
Press “” key to store the calibrated value and exit calibration
mode.
Perform CO
2
zero calibration (if need)
Press key to turn on the meter. Use Nitrogen gas has a
CO
2
concentration of zero ppm into the meter Gas inlet
connector.
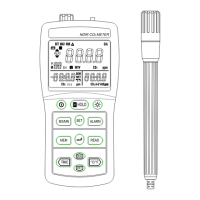
Press “SET” key 6 times, till the “SET CAL” and “CO2” show
on LCD.
Press “” or “” key select LCD third display shows “ 0 ” or
“- -”, symbol “ 0 ” means perform zero calibration, and symbol
“- -” means back to factory default value.
Waiting about 10 minutes, until the meter reading is stable.
Press “” key to store the zero calibration value and exit calibration
mode. Waiting about 1 minute, the meter will display 0 ppm.
Use Standard humidity meter to verify the reading
Press key to turn on the meter.
Press “SET” key 7 times, till the “SET CAL” shows on LCD.
Waiting about 60 minutes, until the meter Temperature/
Humidity sensor probe and standard humidity meter are
environment humidity balance.
Press “” or “” key until the LCD value is same as the
Standard humidity meter.
Press “” key to store the calibrated value and exit calibration
mode.
Use Standard temperature
meter to verify the reading
Press key to turn on the meter.
Press “SET” key 8 times, till the “SET CAL” shows on LCD.
Press “” or “” key until the LCD value is same as the
Standard temperature meter.
Press “” key to store the calibrated value and exit calibration mode.
-14-
VII. MAINTENANCE
7-1 Cleaning
Periodically wipe the case with a dry cloth or a damp cloth
with mild detergent.
Do not use abrasives or solvents to clean this instrument.
7-2 Battery Replacement
When the “ ” symbol appears on the LCD, the six
1.5V „AAA‟ alkaline (large current) batteries must be replaced.
Turn the meter off.
Remove the meter‟s battery cover
Replace the batteries observing polarity
Affix the battery cover and secure the rear screws.
VIII. RS-232 INTERFACE, SOFTWARE INSTALLATION and
OPERATION
For the detailed instruction, please refer to the content of
attached CD-ROM, which has the complete instruction of
RS-232 interface, software operation and relevant
information.
RS-232 protocol : are enclosed within the content of CD-ROM,
please open the CD-ROM for details.