EasyManua.ls Logo

Thermo Scientific Orion Star A221 User Manual

Thermo Scientific Orion Star A221
8 pages
To Next Page IconTo Next Page
Page #1 background imageLoading...
Page #1 background image
Thermo Scientific Orion Star A221
and Star A321 Portable pH Meter
Instruction Sheet
pH
English
Preparation
Power Source
1. Power adapter (sold separately)
a. Select the appropriate wall socket plug plate.
b Slide off the clear plastic cover from the plug plate.
c. Slide the plug plate into the groove on the back of the
power adapter.
d. Connect the power adapter to the meter and power
outlet.
2. Batteries (included with meter)
a. Select four AA alkaline batteries.
b. Confirm that the meter is powered off.
c. Remove the battery compartment cover – loosen the
screws holding the battery cover, release the top portion
of the battery cover from the meter (use a coin or your
finger) and release the bottom portion of the battery cover.
d. Orientate the batteries as shown in the battery
compartment housing and insert batteries.
e. Replace the battery compartment cover and screws.
Electrodes and Other Connections
1. Prepare the pH electrode and any other applicable electrodes according to the
directions in the electrode user guide.
2. Connect the appropriate items as labeled on the meter and as shown in the
figure above:
For additional information on meter setup and operation, refer to the reference guide.
The reference guide is on the included CD and available at
www.thermoscientific.com/water.
DO/
RDO
ATC/
COND
POWER
USB
RS232
REF
BNC
Remove screws
Orion Star A221 &
Star A321 Portable
Use coin
or finger
to lift.
Question and Answer IconNeed help?

Do you have a question about the Thermo Scientific Orion Star A221 and is the answer not in the manual?

Thermo Scientific Orion Star A221 Specifications

General IconGeneral
BrandThermo Scientific
ModelOrion Star A221
CategoryMeasuring Instruments
LanguageEnglish

Summary

Preparation

Power Source

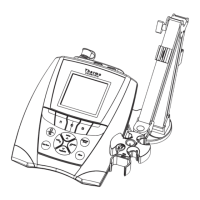
Instructions for connecting the power adapter and inserting batteries for the pH meter.

Electrodes and Other Connections

Guidance on preparing and connecting pH electrodes and other probes to the meter.

Display Information

Power and Data Status Indicators

Icons indicating the meter's power source (AC/battery) and data transfer/logging status.

Alarm and Interface Indicators

Icons for alarm status, RS232, and USB interface connections.

Measurement and Calibration Indicators

Icons showing measurement stability, calibration success, and electrode condition.

Value and Function Key Indicators

Indicators for measurement values, units, method, and function key actions.

Keypad Display Information

Keypad Button Functions

Detailed explanation of the function of each button on the meter's keypad.

pH Calibration

Calibration Procedure

Step-by-step instructions for performing a pH calibration using buffer solutions.

Measurement

Taking Measurements

Instructions for performing sample measurements using AUTO-READ, continuous, or timed modes.

Setup Menu

Navigating the Setup Menu

Guide to accessing and navigating through the meter's setup menu options.

pH Buffer Group Selection

Buffer Group Selection Process

Steps to select the appropriate pH buffer group (USA or DIN) for calibration.

Read Type Selection

Read Type Selection Process

Steps to select the measurement read type (Auto, Continuous, or Timed).

Viewing the Calibration Log

Accessing Calibration History

Instructions for viewing, printing, or getting info on past calibration records.

Viewing the Data Log

Accessing Data Log Entries

Instructions for viewing and printing logged measurement data points.

Related product manuals