E
N
G
L
I
S
H
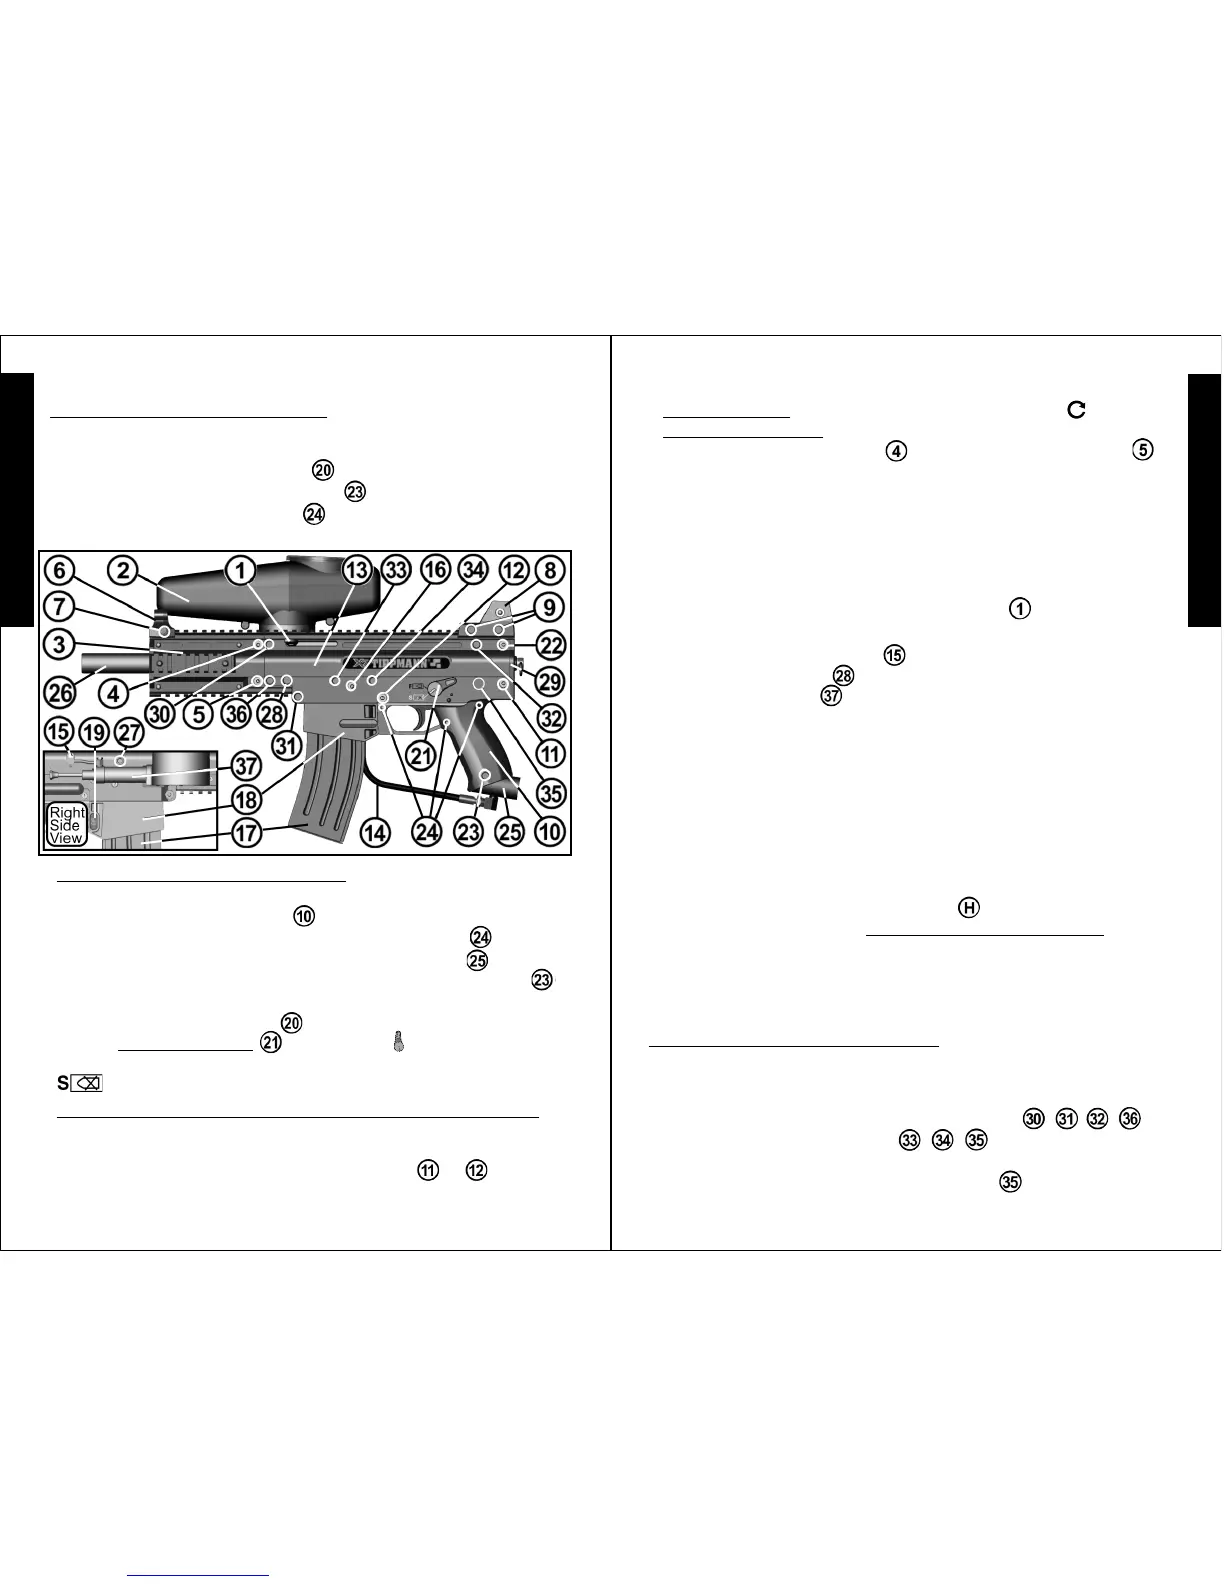
Receiver Disassembly / Assembly (continued from page 13)
14
E
N
G
L
I
S
H
Cyclone
TM
Feed System Removal
FIRST: Remove air supply before any disassembly:
❏
Unload
marker,
❏
remove the air supply as outlined on page 10 and
❏
put
the marker in the uncocked position before beginning to disassemble
it. To uncock the marker, hold the bolt cocking handle back - then
pull the trigger and release handle forward which will uncock
the marker.
❏
Remove banjo fitting bolt from upper receiver.
❏
Remove
Cyclone
TM
housing bolt from left front side of upper receiver and
remove feed system . To install reverse the process.
Receiver Disassembly/Assembly:
(continued on page 15)
• To reassemble the lower receiver (grip):
1)
❏
Make sure the trigger guard is in place.
2)
❏
Replace left grip half .
3)
❏
Secure the grip halves with 3 grip screws .
4)
❏
Attach Tank Adapter: Slide tank adapter into the
lower receiver and align holes;
❏
Insert receiver bolt
and tighten.
5)
❏
Insert trigger group into the grip.
❏
Rotate the
Safety Selector Switch straight up and
❏
insert it into
the left side of the grip and then rotate it to the “SAFE” =
position.
• To attach the lower receiver (grip) to the upper receiver.
❏
Line up lower receiver front push pin holes with upper
receiver holes then gently rock rear of grip until you can
❏
insert the two long lower receiver push pins & to attach.
15
Receiver Disassembly / Assembly (continued from page 14)
Upper Receiver Disassembly:
NOTE: It is only necessary to disassemble upper receiver halves
to access the ball latch, cocking handle, cocking handle spring and
(receiver o-ring - the receiver o-ring is glued in place, only
remove it if it is damaged. To replace the receiver o-ring: 1) pull it
out; 2) clean receiver groove of glue; 3) place 4 equally spaced
drops of CA glue (cyanoacrylate - super glues) into bottom of groove
and press new o-ring into place. 4) Allow the glue to dry before
reassembling.)
To disassemble the Upper Receiver:
1)
❏
Follow Marker / Receiver Disassembly instructions on
pages 11 and 12 until you have removed the gas line/Tombstone
from the upper receiver.
2)
❏
Remove the 4 short Receiver Bolts
/ / /
and
the 3 long Receiver Bolts
/ /
holding the 2 upper
receiver halves together and lift the left half off of the right
receiver half. NOTE: long receiver bolt is not visible until
the lower receiver (grip) has been removed.
Lower Receiver Disassembly/Assembly:
• To disassemble the lower receiver:
1)
❏
Follow the Marker / Receiver Disassembly instructions on pages
11, 12 and 13 until you have
❏
detached the lower receiver and
❏
removed the trigger assembly from the grip.
2)
❏
Remove the tank adapter bolt .
3)
❏
Remove the 3 grip screws
holding the two lower
receiver grip halves together.
Barrel and Front Grip:
• To install Barrel: Insert barrel and turn clockwise .
• To install Front Grip: Slide front grip onto barrel/upper receiver
and insert short push pin in top and long push pin in
bottom to attach.
Upper Receiver Disassembly/Assembly:
(continued on page 16)