WARNING
- NEVER ACTIVATE THE BRAKE LEVER WHEN THE FRONT WHEEL IS DISAS-
SEMBLED.
- ALWAYS POSITION THE WHEEL WITH THE BRAKE DISC UPWARDS TO PREVENT
DAMAGE.
To reassemble the front wheel carefully insert it in the fork, inserting the
disc between the brake pads without damaging them. Position the wheel
correctly and put in the wheel pin.
Temporarily tighten the flanged screw (1) until the wheel shim is blocked.
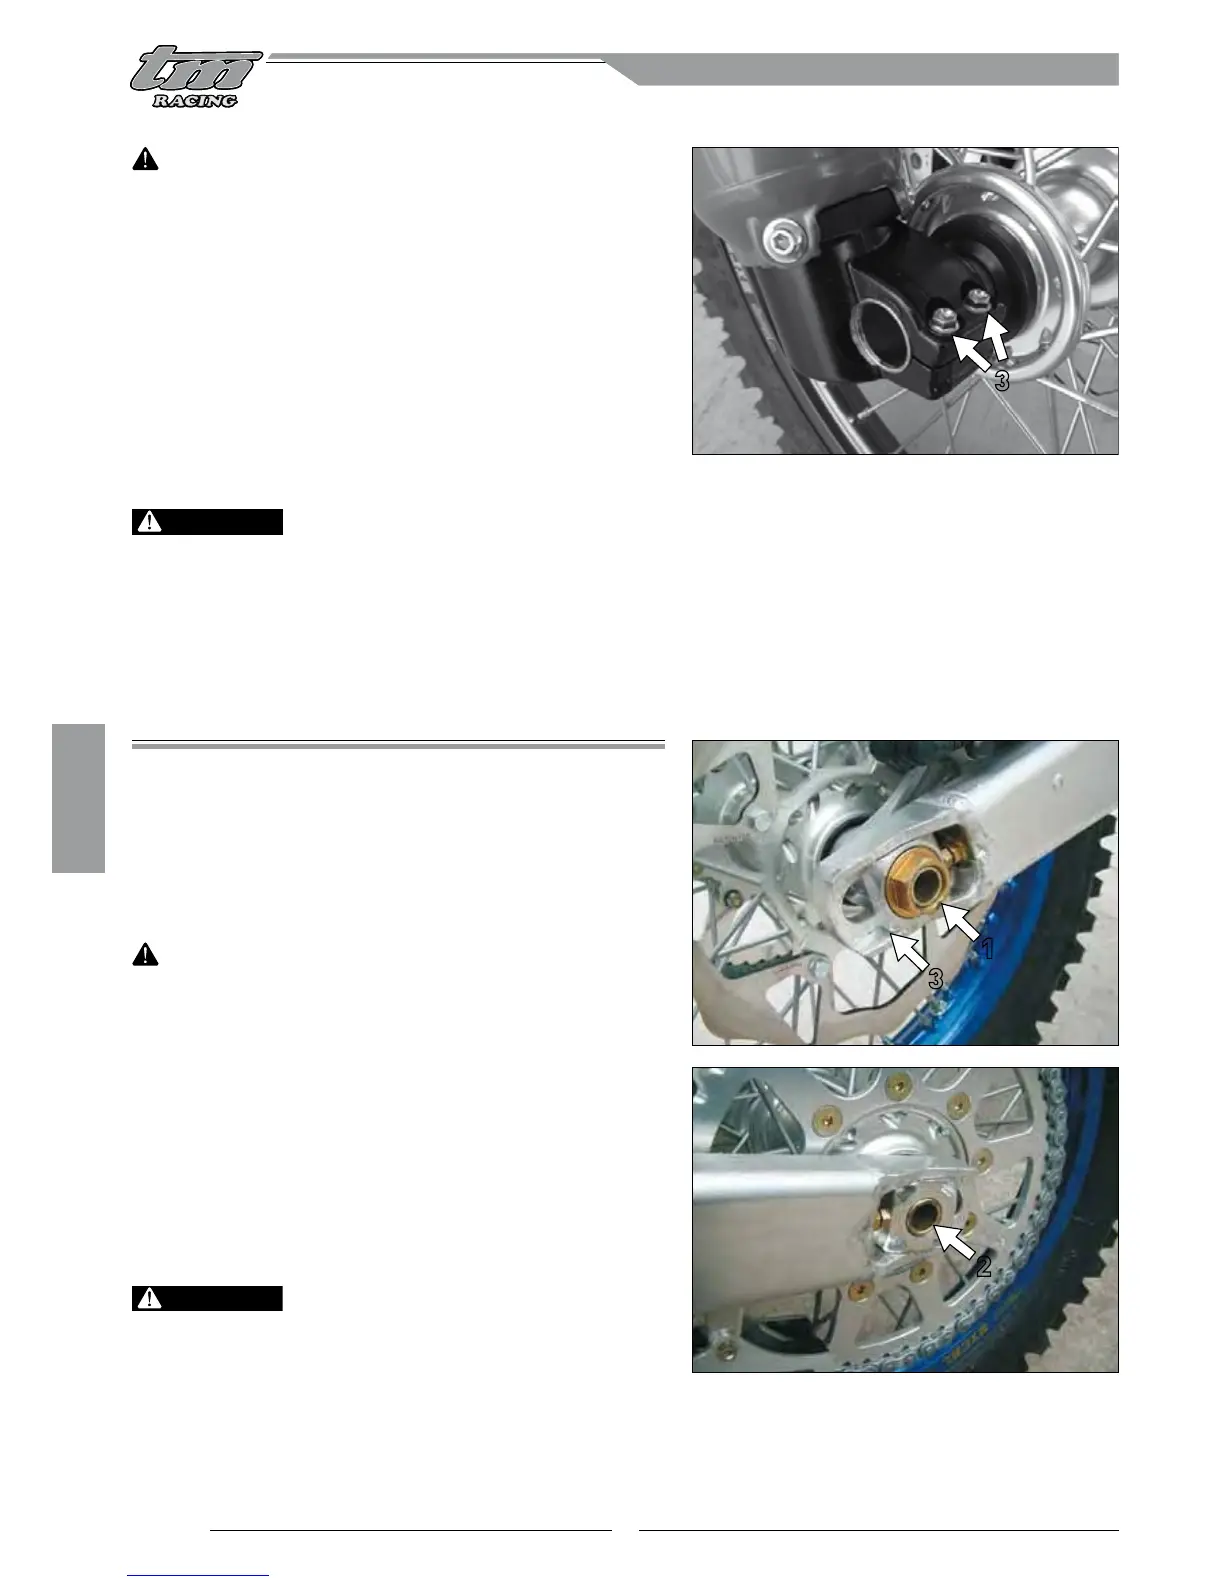
Tighten the locking screws (3) on the right fork foot by 12 Nm to prevent
the wheel pin from turning, and tighten the flanged screw by 40 Nm.
Tighten the locking screws (2) on the left fork foot by 12 Nm. Loosen the
locking screws (3) again on the right foot and remove the motorcycle from
the stand. Engage the front brake and force the fork down several times
to align the rods. Tighten the locking screws (3) permanently on the left
fork foot by 12 Nm.
- IF YOU DO NOT HAVE A TORQUE WRENCH FOR ASSEMBLING, HAVE THE TIGHTENING
TORQUE CHECKED BY A SPECIALISED TM WORKSHOP AS SOON AS POSSIBLE. AN
INCORRECTLY TIGHTENED WHEEL PIN MAY MAKE THE MOTORCYCLE UNSTABLE.
- AFTER HAVING ASSEMBLED THE FRONT WHEEL ACTIVATE THE FRONT BRAKE LE-
VER REPEATEDLY AND MAKE THE PADS ADHERE TO THE DISC. CHECK THE BRAKE
FLUID LEVEL.
- THE BRAKE DISC MUST ALWAYS BE FREE OF OIL AND GREASE. OTHERWISE, THE
BRAKING EFFECT MAY BE CONSIDERABLY REDUCED.
DISASSEMBLING AND ASSEMBLING REAR WHEEL (EN/MX/SMR/SMX)
Position the motorcycle with the frame cradle on a stand to keep the rear
wheel off the ground. Unscrew the flanged nut (1) and, holding up the
wheel, slide out the wheel pin (2), remove the chain tensioner slide (3),
the calliper with its support, take the chain off the sprocket, and carefully
remove the rear wheel from the swing arm. Pay attention to the low wheel
(sprocket side) and high wheel (brake side) spacers.
WARNING
- NEVER ACTIVATE THE BRAKE PEDAL WHEN THE REAR WHEEL IS DISASSEM-
BLED.
- ALWAYS POSITION THE WHEEL WITH THE BRAKE DISC ON A FLAT SURFACE
TO PREVENT DAMAGE.
- WHEN THE WHEEL PIN IS DISASSEMBLED CLEAN THE THREADING OF BOTH
THE WHEEL PIN AND THE FLANGED NUT. RE-GREASE THEM TO PREVENT THE
THREADING FROM SEIZING.
To reassemble the rear wheel, insert the lower spacer (sprocket side) in
the hub, insert the wheel in the swing arm and, holding up the wheel,
assemble the chain on the sprocket and position the calliper with its
support. Insert the wheel pin (2) from the sprocket side halfway into the
wheel to allow the high spacer to be positioned (brake side). Push the pin
completely, insert the chain tensioner slide (3), tighten the nut (1) by 80
Nm. Before tightening the flanged nut, push the rear wheel forward to
allow the chain tensioners to touch the heads of the adjustment screws.
- IF YOU DO NOT HAVE A TORQUE WRENCH FOR ASSEMBLING, HAVE THE TIGHTENING
TORQUE CHECKED BY A SPECIALISED TM WORKSHOP AS SOON AS POSSIBLE. AN
INCORRECTLY TIGHTENED WHEEL PIN MAY MAKE THE MOTORCYCLE UNSTABLE.
- AFTER HAVING ASSEMBLED THE REAR WHEEL, ACTIVATE THE FRONT BRAKE
PEDAL REPEATEDLY AND MAKE THE PADS ADHERE TO THE DISC. CHECK THE
BRAKE FLUID LEVEL.
- THE BRAKE DISC MUST ALWAYS BE FREE OF OIL AND GREASE TO AVOID SIGNIFI-
CANTLY REDUCING THE BRAKING EFFECT.
DANGER
DANGER
2
1
3
4.2 CHASSIS MAINTENANCE
3
 Loading...