IMPORTANT WARNINGS!
These instructions can also be found at www.tommeetippee.com
Keep this instruction sheet for future reference as it includes important
information.
This appliance is intended for household use only. Do not use outdoors. Before plugging
intheBabyFoodMakerforthersttimeensurethatthevoltageiscompatiblewithyour
electricity supply by checking the label on the base of the unit. Ensure water has been added
totheunitbeforeswitchingtheuniton.Donotimmerseinwater.Toprotectagainstre,
electric shock and injury to persons do not immerse cord, plugs or other parts of the unit in
waterorotherliquid.Misuseoftheproductmayresultintheriskofre,electricshockand/
or personal injury. Keep the appliance and its cord out of reach of children. Do not let the
cord hang over the edge of the kitchen work surface or touch hot surfaces. The product has
beenttedwithacordwindonthebaseoftheunittoallowyoutoadjustthelengthofthe
cord safely. It is recommended that the cord be kept as short as possible. This appliance is
not intended for use by persons (including children) with reduced physical, sensory or mental
capabilities, or lack of experience and knowledge, unless they have been given supervision
or instruction concerning the use of the appliance by a person responsible for their safety.
Children do not understand the dangers associated with operating electrical appliances.
Never allow children to use this appliance. User maintenance other than cleaning and
descaling is not required for this product. Cleaning and user maintenance shall not be made
by children.
The surfaces will get hot during use.
The heating element surface is subject to residual heat after use. Do not touch hot
surfaces use handles and knobs. When in use the Baby Food Maker contains hot water
and steam. Keep hands away from steam vents as it can cause burns and scalds. Use
in a well ventilated area. Be careful if hot liquid is poured into the Baby Food Maker as
it can be ejected out of the appliance due to sudden steaming. Ensure that the heating
guidelines are followed to ensure that the food is not heated for too long. Always check
food temperature before feeding. Always stir heated food to ensure even heat distribution
and test the temperature before serving. Do not operate any appliance with a damaged
cord or plug or after the appliance malfunctions or has been damaged in any manner. If
thesupplycordisdamageditmustbechangedbyaqualiedpersoninordertoavoid
ahazard.Alwaysuseonaatheatresistantkitchensurface.Steamfromthedailyuse
of the baby food maker can damage kitchen units, consider positioning the baby food
maker below an open area or away from wall units to allow the steam to dissipate into
the air. Do not move appliance when in use. Do not place anything on top of the Baby
Food Maker. Do not use any accessories other than those supplied with this appliance.
Always disconnect the appliance from supply if it is left unattended and before assembling,
disassembling or cleaning. Switch off the appliance and disconnect from supply before
changing accessories or approaching parts that move in use. Allow to cool before putting
on or taking off parts and before cleaning the appliance. Handle the blade carefully as it is
extremely sharp. Care shall be taken when handling the sharp blades, when emptying the
bowlandduringcleaning.Beforerstuseandaftereveryusewashthejug,basketand
lid in warm soapy water or use a dishwasher (top shelf only) and dry thoroughly. Wash the
blade in warm soapy water and dry thoroughly. The blade is not dishwasher safe. Do not
llabovemaximumlllevelindicatedontheproduct.CAUTION:Topreventdamagetothe
appliance do not use alkaline cleaning agents when cleaning, use a soft cloth and a mild
detergent. Any questions? Visit our website www.tommeetippee.com
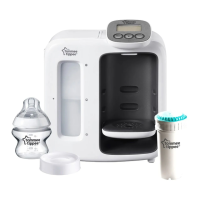
SETUP(Completesetupsectionbeforerstusingtheunit).
Pleaserefertoinstructionsleaetbeforeuseandremembertocleananddescaleyourunitregularly.
WARNING! Handle the blade carefully as it is extremely sharp. Care should be taken when handling the sharp blades, emptying the bowl and during cleaning.
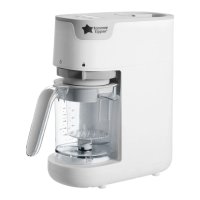
1. To remove blade, hold the blade tab inside the unit while turning the locking ring on the bottom of the container. (Pictures 1,2,3) This will remove the locking ring and the
blade will split into two parts. To re-assemble, reverse these steps.
2. Wash blade, jug, basket, sealing ring and lid in soapy water then dry and reassemble. Place unit on a clean, dry kitchen work surface. Place basket inside jug, place lid on
jug in the correct orientation and lock in place using the locking dial (Pictures 4,5).
3. Unlockwatertankbyrotatinglidanti-clockwise,llwatertankwith350mlofcoldwater,replacecapandlockinplace.Ensurethewaterlevelisnotlledabovetheinside
edge of the water tank (Picture 6).
4. Plug unit into the mains power supply and turn on the mains. Press the start button to turn on the unit and the LCD display will illuminate (Picture 7).
5. Set the steam time to 30 minutes using the + buttons (Pictures 8,10).
6. Press the start button to start (Picture 11). The unit will now run the steam cycle automatically.
7. Whenthecyclehasnishedtheunitwillbeep,theLCDdisplaywillturnoff.Turnoffatthepowersupply,unplugtheunitandallowunittocoolcompletely.Unlockjugand
remove residual water and clean jug and steamer basket following instructions in the cleaning section. Discard any remaining water from the water tank by tipping the unit
sideways over a sink.
8. Wipe unit clean and dry.
9. The unit is now ready to use.
CLEANING & DESCALING
The descaling process will remove deposits of calcium and other minerals in the system that may affect its performance.
CLEANING
Turnoffatthepowersupply,unplugtheunitandallowunittocooldowncompletelybeforecleaning.Beforerstuseandaftereveryusewashthejug,lidandbasketinwarm
soapy water or use a dishwasher (top shelf only) and dry thoroughly. Wash the blade, sealing ring and locking ring in warm soapy water and dry thoroughly.
PLEASE NOTE THE BLADE, SEALING RING AND LOCKING RING ARE NOT DISHWASHER SAFE.
WARNING! Handle the blade carefully as it is extremely sharp. Care shall be taken when handling the sharp blades, emptying the jug and during cleaning.
After every use wipe the jug housing with a damp cloth but do not submerge in water. Do not clean with abrasive cleaners or allow to come in to contact with solvents or harsh
chemicals, damage could result.
DE-SCALING
You should de-scale the water tank of your Baby Food Maker every 4 weeks however if you notice limescale earlier de-scaling may be required sooner. Unplug the unit
and allow to cool before cleaning. After each use allow to cool before pouring away remaining water from the water tank by tipping the unit sideways over a sink. A build up
of limescale can negatively affect the performance of the unit. Living in a hard water area can produce limescale quicker than other areas therefore descaling is required
sooner. Use a descaler that is suitable for use with stainless steel and use as per the manufacturer’s guidelines. Alternatively you can use white vinegar to descale your unit,
pleaseuseaspermanufacturer’sguidelines.Onceyouhavedescaledthenfollowinstructionsundersetuptoperformanalcleaningcycle.Youmayneedtorepeatthe
processifyoundthatlimescaleisstillpresent.DONOTusemetalobjectsorscourerstocleanyourunit.DONOTusebleachtocleantheunit.DONOTuseabrasiveor
anti-bacterial materials.
USAGE
For your child’s safety always check food temperature before feeding
Thisunitcansteamandblendvegetables,fruits(peeledandcored/pipsremoved),meatsandsh(withbonesremoved).Allfoodmustbedicedintoapproximately1-2cm
cubes before being placed into the jug or basket for cooking. Cooking times can be found in these instructions and for recipes visit tommeetippee.com. During the steaming
process hot steam passes through the vent at the back of the unit. Position this unit away from walls and make sure it is not underneath any overhanging shelves or cabinets.
1. Placeunitonaatdrykitchenworksurface.Placejugorbasketwithdicedfoodinunit(4)andlockinplaceusingthelockingdial(5).Steamnomorethan200gmsinone
cycle. Fill water tank with 350ml of cold water and replace the cap (6).
2. Plug unit into mains power supply, the unit will beep. Press the start button to turn on the unit. The LCD display will illuminate.
3. CYCLE OPTIONS
3.1 TO SET AN AUTOMATIC STEAM TO BLEND CYCLE: Use jug with no basket, ensure correct lid orientation.
i. Press the mode button and choose steam option. Set the steam time using the+/- buttons. Maximum steam time of 30 minutes.
ii. Press the mode button and choose blend option. Set the blend time using the+/- buttons. Maximum blend time of 2 minutes.
iii. Press the start button to start. The unit will now run the steam and blend cycle automatically.
Whensettingtheautomaticcycle,theblendtimecanbesetrst,buttheunitwillalwaysstartwiththesteamcyclerst.Duringtheautomaticsteamandblendcycle,the
blades will rotate once every 2 minutes to move food around the container. When cooking meat, it is extremely important to pause the unit every 10 minutes and stir food
thoroughly. This is to ensure even cooking.
3.2 STEAM AND BLEND WITH BASKET: Reduced water for a chunkier texture.
i) Ensure the food is placed in the steaming basket, the lip of the basket is resting in place on the edge of the jug and the lid is in the correct orientation. (see parts guide).
ii) Set the steam time using the +/- buttons. Maximum steam time of 30 minutes.
iii) Press the start button to start. The unit will now run a steam cycle.
iv) Wait for the steam basket to cool, unclip the lock and remove from the unit.
v) Press the mode button and choose the blend option, set the blend time using the +/- buttons. Maximum blend time of 2 minutes.
vi) Press the start button to start. The unit will now start a blend cycle.
3.3 TO SET A STEAM ONLY CYCLE: Our recommendation is to use the basket, especially for stage 2 and 3 where a chunkier texture is required. Please ensure lid is in the
correct orientation.
STEAMING WITHOUT BASKET
i. Press the mode button and choose the steam option, set the steam time using the +/- buttons. Maximum steam time of 30 minutes.
ii. Press the start button to start. The unit will now run a steam cycle.
STEAMING WITH BASKET
i. Set the steam time using the +/- buttons. Maximum steam time of 30 minutes.
ii. Press the start button to start. The unit will now run a steam cycle.
3.4 TO SET A BLEND ONLY CYCLE: Use the jug with no basket, ensure correct orientation with lid.
i. Press the mode button and choose blend option. Set the blend time using the+/- buttons. Maximum blend time of 2 minutes.
ii. Press the start button to start. The unit will now run a blend cycle.
To control the texture of the food a pulse blend can be set. Press the start button, then mode, choose the blend only option, select the time (using 5 second intervals),
press start. The unit will pulse once. Repeat the above process for a further pulse.
4. Whenthecyclehasnishedtheunitwillbeep,theLCDdisplaywillturnoff.Duringsteamingwaterwillcollectinthejug.Instage1weaning,wherefoodconsistency
should be a smooth puree we recommend that you stir in this nutrient rich water. In later weaning stages, when thicker textures are required we would recommend
removing some/all of this water depending on your baby’s preference. Steam and blend separately with the addition of the steam basket and there will be no water mixed
with the food. Leave the unit to stand for 2 mins before unlocking jug and decanting food into storage. Take care when removing the jug and lid as
steam may still be present and jug hot to touch.
EN EN
4 5
 Loading...