EN-19T100 R
3 Product description
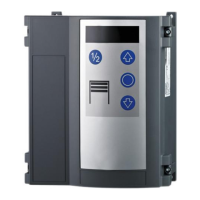
Control elements
1 LED display 4 Door CLOSE button
2 Door OPEN button 5 Housing cover
3 STOP button 6 1/2 open button
Programming control elements
1 LED display 3 Up navigation button
2 LED spot (confirmation of
the programming entry)
4 Down navigation button
5 Programming button (Prog
button)
Rating plate
The rating plate is located at the side on the control housing. Ob-
serve the power supply specifications.
Made in Germany
WN XXXXXX XX/XX
1 Control type 5 Max. motor power
2 Manufacturer and address 6 Protection type
3 Supply voltage 7 Rating plate no.
4 Amperage
Technical data
Control unit T100R
Rating plate no. 15331560850
Heightx widthx depth 250mmx 215mmx 120mm
Assembled vertically
Cable feed-throughs 6 x M20
2 x M16
2 x M20 V cutout
Supply voltage 3N~ 400V
3~ 230V
Control voltage 24V DC
External power supply max. 700mA
Max. motor power Max. 3.0kW
Safety according to
EN13849-1:
Input STOPA: Cat 2 / PL = C
Input STOPB: Cat. 2 / PL = C
Input STOPC: Cat. 2 / PL = C
Protection type IP54/ CEE plug= IP44
Operating temperature
Manufacturer Novoferm tormatic GmbH
Eisenhüttenweg 6
D-44145 Dortmund
www.tormatic.de
4 Installation
DANGER
Hazardous voltage
The product runs on high voltage Before starting
with the installation,observe the following:
• Have all work on electrical connections car-
ried out by a skilled electrician.
• The power connection must be executed in
compliance with the mains voltage avail-
able.
Follow the instructions as well as the illustrations in the
"Connection diagrams" chapter.
1. Tools required
For the assembly of the control, you require the following tools:
• wooden folding rule or tape measure
• cross-tip screwdriver Phillips; size2
• drilling machine
• drill 6mm
• Torx screwdriver, sizeT20
• slotted screwdriver for electricians
• spirit level
• marking pencil
2. Opening the control cover
Open the housing cover by either loosening the two screws on
the left or right on the cover.
 Loading...