22-EN T100 R
5 Programming
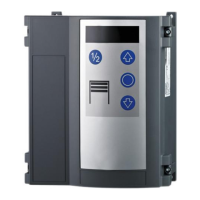
In order to program the Torsteuerung, open the housing cover.
The programming works in a menu-controlled fashion. Carry out
all settings as specified in the Programming procedure chapter,
see also Representation of the menu structure. The Program
overview chapter shows the full scope of the menu.
Programming procedure
Proceed as follows to carry out programming settings:
1. Press the button to reach the programming of the con-
trol. The selection of the individual main menu (in the fol-
lowing referred to as "menu") appears on the LED display.
Up to 9 menus are provided.
2. Navigate with buttons to select the desired menu.
The LED display shows the current selection as value 1-9.
3. Confirm the selection with the button . The LED display
in the first digit now shows the menu which you are in. The
second digit shows the current menu item in this menu.
4. Navigate with buttons to select the desired menu
item. A total of up to 10 menu items is provided to you
(0-9). The LED display shows the current selection in the
second digit as value 0-9.
5. Confirm the selection with the button . The currently set
value for the respective menu item blinks on the LED dis-
play.
6. Set the desired value using the buttons . Depending
on the menu item, values between 0 and 99 can be
entered.
7. Confirm the entry with the button . The LED display
confirms the entry by 5-time blinking of the LED point and
by returning to the selection of the menu item.
8. If you want to complete the programming, press the but-
ton repeatedly until –– appears on the display.
9. Confirm the selection with the button to exit the pro-
gramming.
Representation of the menu structure
Menu Menu item Selection
1.
Activation of programming
2. Menu selection
3. Confirmation of the
main menu selection
4. Selection of the menu
item
5. Confirmation of the
menu item selection
6. Setting of the desired value
7. Confirmation of the
setting
8. Navigation to the next
menu item or to exit
the programming
menu
9. Exit programming
Exit
Information on programming
Before starting programming and initial operation, please observe
the following information:
NOTICE
The correct motor type must be set in menu
items70-72 before adjusting the end positions.
An incorrect setting can cause damage to the
door.
More detailed information on selecting the correct motor and
brake type can be found in the chapter Menu7 drive settings.
 Loading...