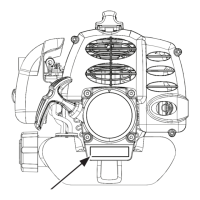
23
Figure 22
Maintenance
Air Filter
Air
Filter
Cover
Knob
Checking the Fuel Cap
WARNING:
A leaking fuel cap is a re hazard and must be
replaced immediately.
The fuel cap contains a non-serviceable lter and check
valve. A clogged fuel lter causes poor engine performance.
If performance improves when the fuel cap is loosened,
the check valve may be faulty or the lter may be clogged.
Replace the fuel cap if necessary.
Cleaning the Air Filter
See Figure 22 and Figure 23.
Clean the air lter as indicated by the maintenance schedule.
Follow these steps to clean the air lter.
1. Stop the trimmer.
WARNING:
Make sure the trimmer head stops rotating when
you release the trigger. Contact with a rotating
trimmer head could cause personal injury.
2. Remove the spark plug boot.
3. Loosen the air lter cover by turning the knob counter-
clockwise.
4. Remove the air lter cover.
5. Remove the air lter.
6. Clean the air lter with warm soapy water.
7. Rinse the air lter and let it dry completely.
8. Work two drops of oil into the air lter.
9. Replace the air lter (ts only one way).
10. Replace the air lter cover.
11. Tighten the air lter cover by turning the knob clock-
wise.
12. Replace the spark plug boot.
Note: Replace the air lter (Part No. 88048) as indi-
cated by the maintenance schedule.
Replacing the Spark Arrester
See Figure 23.
The spark arrester may need to be replaced after repeated
use. If replacement is necessary, use Toro part number
000998216.
To replace the spark arrester:
1. Remove the ve screws that hold the cover.
Note: Removing these screws requires the use of a T20
and T25 torx screwdriver.
2. Remove the cover.
3. Remove the two screws holding the mufer assembly in
place.
4. Remove the mufer assembly and mufer gasket. It
may be necessary to work the mufer assembly free
from the mufer gasket.
5. Separate the mufer cover from the mufer.
6. Remove the three screws that hold the plates on the
mufer.
7. Remove the spark arrester.
8. Replace the old spark arrester with the new one.
9. Reassemble the mufer by reinstalling the plates and
tightening the three screws.
10. Reassemble the mufer and mufer cover and attach to
the mufer gasket with the two screws.
11. Reinsert the mufer assembly.
12. Reinstall the cover on the tool and fasten with the ve
screws.
Note: Do not overtighten screws.
Figure 23
Spark
Arrester
Plate
Muffler
Cover
Muffler
Gasket
Screw(s)
Screw(s)
Cover
Screw(s)
Muffler