17
4. Secure cables with (2) 1/4 x 3/4″ (19 mm) bolts 1/4″
washers and 1/4″ locknuts (Fig. 8).
5. Slide the red terminal boot onto the positive (red)
battery post.
6. Secure battery with J-bolts, hold down clamp and (2)
1/4″ washers and (2) 1/4″ wing nuts (Fig. 8).
7. Position drain tube away from belts and other parts to
prevent corrosion.
1
m–3752
9 5
2
10
4
8
11
7
12
Figure 8
1. Battery
2. Terminal boot
3. Positive battery cable
4. Negative battery cable
5. Ground wire
6. Bolt 1/4-20 x 3/4″ (19 mm)
7. Washer 1/4″
8. Locknut 1/4″
9. Battery clamp
10. J-bolts
11. Wing nut 1/4″
12. Drain tube
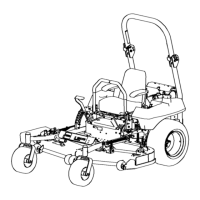
Installing Air Cleaner
1. Remove air cleaner from crate. Keep air cleaner and
bracket together. (Fig. 9).
2. Remove the top two valve cover mounting screws
from both valve covers (Fig. 9).
3. Place air cleaner onto engine and align holes in air
cleaner bracket with holes in valve covers (Fig. 9).
4. Install valve cover screws into air cleaner bracket and
valve covers (Fig. 9).
5. Remove plastic plugs from air intake elbow on engine
and air cleaner hose (Fig. 9).
6. Install hose to air intake elbow on engine and air
cleaner. Tighten hose clamps to secure the hose
connections (Fig. 9).
1
m-4810
2
2
3
6
5
4
Figure 9
1. Air cleaner
2. Valve cover mounting
screws
3. Air cleaner bracket
4. Air intake elbow
5. Air cleaner hose
6. Hose clamp
Hydraulic System
Checking the Hydraulic Fluid
Check the hydraulic fluid level before engine is first
started.
Fluid Type: Mobil 1 15W-50 synthetic motor oil.
Important Use only oil specified. Other fluids could
cause system damage.
Hydraulic System Oil Capacity: 2.1 qt. (2.0 l)
1. Position machine on a level surface and set the parking
brake.
2. Clean area around filler neck of hydraulic tank
(Fig. 10).
3. Remove cap from filler neck. Look inside to check if
there is fluid in the reservoir. (Fig. 10).
4. If there is no fluid, add fluid to reservoir
approximately a 1/4″ (6 mm) below the top of baffle.
5. Run the machine at low idle for 15 minutes to allow
any air to purge out of the system and warm fluid.
Refer to Starting and Stopping the Engine on page 20.
6. Recheck level while fluid is warm. Add fluid to raise
level to top of the baffle, if required.
Note: Fluid level should be to the top of the baffle when
fluid is warm (Fig. 10).