5. Place tw o thic k bloc ks under rear left and right
lo w er edg e of the mo w er dec k so the w eight of
the dec k rests on the bloc ks .
6. Lo w er the mo w er to the 3 inc h (76 mm)
height-of-cut position.
7. Loosen the bolts connecting the tw o c hains
and the tw o rear brac k ets to the mo w er
( Figure 52 ).
8. Adjust the tw o rear bolts so they are in the
middle of the slot located in the pi v ot brac k et
( Figure 52 ).
9. Adjust the bolts so the end of the bolt is flush
with the n ut. T his will allo w the bushing to
roll in the slot in the mo w er dec k brac k et
( Figure 51 ).
10. Adjust the disc harg e side front bolt so it is
in the middle of the slot located in the pi v ot
brac k et ( Figure 52 ).
11. Raise the mo w er dec k and remo v e the bloc ks
holding up the mo w er dec k.
12. Adjust the left front bolt in the pi v ot brac k et
so the c hain has no slac k in it.
13. Inspect the four c hains . T he c hains need to
ha v e tension.
Note: W hen properly adjusted, the front
blade tip will be a 1/4 inc h (6 mm) lo w er for
34 inc h mo w ers and 3/16 (4 mm) lo w er for 40
inc h mo w ers than the rear blade tip . R efer to
Chec king for Bent Blades for the procedure to
measure the blade tip height.
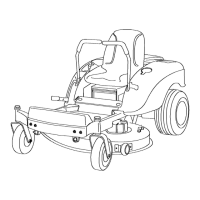
Figure 51
1. Keep the end of the bolt
ush with the nut
3. Nut
2. Rear pivot bracket 4. Bolt
40