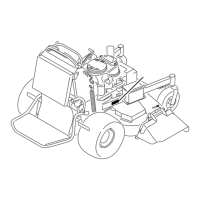
Figure62
1.Armature5.Brakespacer
2.Fieldshell6.Re-gapshim
3.Rotor7.Brakepole
4.Brake-mountingbolt
1.Stoptheengine,waitforallmovingpartstostop,
removethekey,engagetheparkingbrake,andallow
themachinetocoolcompletelybeforestartingthese
instructions.
2.Usinganaircompressor,blowoutanydebrisfrom
underthebrakepoleandaroundthebrakespacers.
Figure63
3.Checktheconditionofthewireharnessleads,
connectors,andterminals.
Note:Cleanorrepairasnecessary.
4.Verifythat12Vispresentattheclutchconnectorwhen
thePTOswitchisengaged.
5.Measurethegapbetweentherotorandarmature.If
thegapisgreaterthan1mm(0.04inch),proceedwith
thefollowingsteps:
A.Loosenbothbrakemountingbolts1/2to1full
turnasshownbelow.
Note:Donotremovethebrakepolefromthe
eldshell/armature.Thebrakepolehasworn
tomatchthearmatureandneedstocontinueto
matchaftertheshimisremovedtoensureproper
braketorque.
Figure64
1.Brake-mountingbolt
B.Usingneedlenosepliers,orbyhand,takeholdof
thetabandremovetheshim(Donotdiscardthe
shimuntiltheproperclutchfunctionhasbeen
conrmed).
Figure65
1.Shim
C.Usingapneumaticline,blowoutanydebris
fromunderthebrakepoleandaroundthebrake
spacers.
D.Torqueeachbolt(M6x1)to13N-m(10ft-lb)
+/–0.7N-m(0.5ft-lb).
E.Usinga0.01inchthickfeelergauge,verifythat
agapispresentbetweentherotorandarmature
faceonbothsidesofthebrakepoleasshown.
Note:Duetothewaytherotorandarmature
faceswear(peaksandvalleys)itissometimes
difculttomeasurethetruegap.
Figure66
1.Feelergauge
44

 Loading...