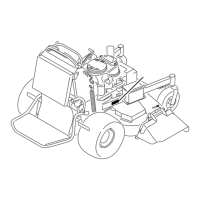
AdjustingtheDeck-LiftSpring
Note:Adjustingthedeck-liftspringwillalterhowmuchthe
deckwilloatandhowmucheffortittakestoliftthedeck
whenusingtheheight-of-cuthandle.
1.Raisethedeck-liftleverandlockitintothetransport
position.
2.Checkthelengthbetweenthespringnutandthe
bottomoftheweldedU-bracket(Figure99).
3.Ensurethatthelengthisbetween47to50mm(1.8to
2inches)for48and52-inchmowerdecks,andbetween
43to46mm(1.7to1.8inches)for60-inchmower
decks(Figure99).
4.Ifneeded,adjustthedistancebyadjustingthebolton
topoftheU-bracket(Figure99).
Figure99
1.Lengthisbetween47to
50mm(1.8to2inches)
for48and52-inchmower
decks
4.Bottomofthewelded
U-bracket
2.Lengthisbetween43to
46mm(1.7to1.8inches)
for60-inchmowerdecks
5.Springnut
3.Adjustmentbolt
6.Deck-liftspring
5.Repeatthisprocedurefortheoppositedeck-liftspring.
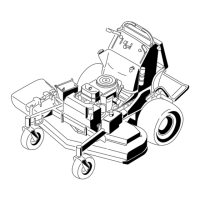
ReplacingtheGrassDeector
WARNING
Anuncovereddischargeopeningcouldallowthe
lawnmowertothrowobjectsintheoperator'sor
bystander'sdirectionandresultinseriousinjury.
Also,contactwiththebladecouldoccur.
Donotoperatethelawnmowerunlessyouinstall
acoverplate,amulchplate,grassdeector,or
bagger.
1.Removethelocknut,bolt,spring,andspacerholding
thedeectortothepivotbrackets(Figure100).
Figure100
1.Bolt
5.Spring(installed)
2.Spacer6.Grassdeector
3.Locknut
7.J-hookendofthespring
4.Spring
2.Removethedamagedorworngrassdeector.
3.Placethespacerandthespringontothegrassdeector.
4.Place1Jendofthespringbehindthedeckedge.
Note:Makesure1Jendofspringisinstalledbehind
deckedgebeforeinstallingtheboltasshowninFigure
100.
5.Installtheboltandthenut.
6.Place1J-hookendofthespringaroundthegrass
deector(Figure100).
Important:Thegrassdeectormustbeable
torotate.Liftthedeectoruptothefullopen
position,andensurethatitrotatesintothefull
downposition.
61

 Loading...