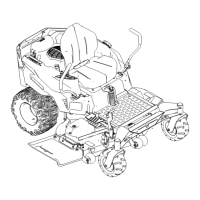
g011149
Figure16
1.Locknut(5/16inch)3.Leftbafe
2.Carriagebolt(5/16x3/4
inch)
4.Installthefastenershere.
5.Removethecarriageboltandlocknutonthe
sidewallofthemowerdecksecuringtheleft
bafetothedeck(Figure16).
6.Removetheleftbafefromthemowerdeck
(Figure16).
7.Locatethe2boltsinloosepartsandusethe
existinglocknutsandinstallthesefastenersinto
theholesshowninFigure16onthemowerdeck
topreventyingdebris.
Note:Installtheboltupward,throughthe
undersideofthedeckanduseanexisting
locknuttosecurefromthetopside.
8.Removethecarriagebolt(5/16x3/4inch)and
locknut(5/16inch)ontherearwallofthemower
decksecuringthebafetothedeck(Figure17).
g190737
Figure17
1.Locknuts—frontof
dischargeplate(install
afterremovingthebafe)
5.Bafeguard—54-inch
decks
2.Hex-headbolt—forward
holeindeck(installafter
removingthebafe)
6.Locknut(5/16inch)
3.Locknut—forwardholein
deck(installafterremoving
thebafe)
7.Carriagebolt(5/16x3/4
inch)
4.Carriagebolts—frontof
dischargeplate(install
afterremovingthebafe)
9.Locatethebafeguardatthefrontedgeofthe
sidedischargeopening(Figure17).
10.Removethefastenerssecuringthebafeguard
andtherightbafetothemowerdeck(Figure
17).
Note:Removethebafeguardandretainall
fasteners.
11.Removethe2locknuts(5/16inch)securingthe
weldedpostsoftherightbafetothetopof
themowerdeckatcenterandrightofcenter
positions(Figure18).
19
 Loading...