5. R un
Local
The
Local
m ode allows the
Command
and
Frequ e nc y
control functions to be carried out via
the
EOI
.
To run the motor
perform the
following:
1.
Press the
Mode
key unt il the
Frequ enc y Co m man d
screen is
displayed.
2.
Press the
Local/Rem ote
key to
enter the
Local
mod e (g reen LED
illuminates).
3.
Turn the
Rotary Encoder
un til the
desired
Frequ e nc y Co mma nd
value is displa yed in the
SET
field
on the
LCD
screen.
4.
Press the
Run
key and the motor
will
run at the
Frequ e ncy Co mma nd
value.
(While running the
Run
LED will illumina te
red). Pre ss the
Stop/Reset
key
to stop
the
motor.
Remote
The
Rem ote
mode allows control of the
ASD via the
Command
mode
(
F003) and
the
Frequ e nc y
mode (F004).
The
Terminal Board
is used in the
follow ing examp le to demonstrate
Remote
mode operation:
To run
the motor
perform the following
.
1.
Press the
Mode
key unt il the
Program
screen is displayed.
2.
Select Progr am
Fundamental
Stand ard Mode Selection
Command Mode Selection
Terminal Block .
3.
Select Program
Fundamental
Standard Mode Selection
Frequency Mode 1
RR
.
4.
Select Progr am
Terminal
Input Term inals
to ver ify t he fo llowing discrete terminal
assignmen ts
:
F111
— F (Forward Run)
F112
— R (Re vers e Run )
F113
—
ST (Stan dby )
F114
— RES (Reset)
5.
Activate the
ST
terminal an d provid e an d
Run
command.
6.
Apply a positive voltage acro ss
RR
and
CC
.
For complete instructions on the
Command
and
Frequ en cy
control functions
see the
G9 ASD Installation a nd Ope ration Manu al
.
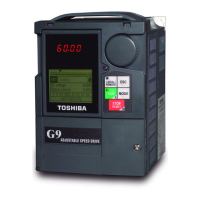
Frequ enc y Co m man d Scr ee n
0
100%
SET:
DC Voltage:
Output Current:
0.00%
0.00%
0.00 Hz
OUT1 OUT2 FL
F R RES S1 S2 S3 S4ST
Startup Wizard...Startup Wizard...
Terminal...Terminal...
ProgramProgram
Direct Access...Direct Access...
Utilities...Utilities...
Fundamental...Fundamental...
Ad ditional Information
Factory Default
Param eter
settings may be returned to factory default values via the
Type Reset
m enu,
Program
Utilities
Type Reset
Reset to Fa ct o ry De f au lt s
.
Save User Settings
A profile of an existing setup may be saved and re-applied when required by using the
Save
User Settings
feature. This function is carried out via Program
Utilitie s
Type Reset
Save User Settings
. With the initial setup saved, troubleshooting and diagnostics may be
performed and the starting setup may be re-applied when finished, via Program
Utilities
Type Reset
Restore User Settings
.
A profile of an existing setup may be saved to the
EOI
via
Program
Utilities
Type Reset
Save User Settings
to EOI.
The initial setup may be resto red from the
EOI
via Program
Utilities
Type Reset
Restore User Settings from EOI
.
6. Braking
The mo tor m ay continue to rotate and coast to a stop after being shut of f due to the inertia of
the load. If an immediate stop is required, one of the following braking systems should be used.
DC Injection Braking
The
DC Injection Braking
function may be setup and enabled by providing the proper
infor mat ion at the paramet ers listed below .
F250
— Braki ng Start Freq uency
F251
— Braki ng C urre nt
F252
— Braki ng Time
F253
— Forward/Reverse Braking Priority
F254
— Motor Shaft Fixing Control
Dynamic Braking
The
Dynamic Braking
function may be setup and enabled by connecting a braking resistor
from terminal
PA
to
PB
of the ASD an d providing the pr oper infor m ation at th e paramet ers
listed
below.
F304
— Braking Enable/ Disa ble
F308
— Braki ng Re sistance
F309
— Braki ng C apacit y
F639
— Braking Resistance Overload Time (10x Rated Torque)
Dynamic Braking uses the transistor
IGBT7
to dissipate the bus voltage when required.
IGBT7
is standard item on the 25 HP and below G9 ASD 230-volt systems and is standard on
the 400 HP a nd be low for the 460-volt s ystems.
IGBT7
is op tion al for all re maining systems.
Mount the resistor pack above or to the side of the ASD — never below. The DBR generates
heat that will af fect the cooling capacity of the heat s ink so it is important to maintain a
minimum of six inches between the resistor pack and the ASD.
For light-duty DBRs, use on e wire size smaller (AWG or kcm il) than the motor leads. For heavy-
duty DBRs, use the same gauge wire as the motor leads — the total wire length from the ASD
to the DBR should not exceed 10 feet. Twist
the w ire approxim ate ly two times per foot
throughout the length of the wire
.
For additional information about braking, see the
G9 ASD Installation and Operation Manual
.
The Customer Support Center is open from 8 a.m. – 5 p.m. (CST), Monday – Friday. The Center’s toll free number is
(800) 231-1412. For after-hours support follow the directions in the outgoing message when calling.
Motor Information Outline
Voltage/Frequency:
Current Rating:
RPM :
G9 ASD Simple Start Guide
efesotomasyon.com -Toshiba inverter,drive,servo,plc
 Loading...