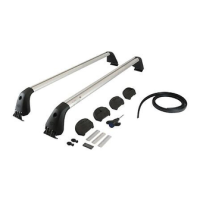
22. Ensure the inside of the foot caps is clean. Apply a 6mm bead of non acetic silicon (not supplied) around the inside
surface of the foot cups. Remove tape liner from foam gasket and apply to base of foot cups as shown, Ensure LH and RH
gaskets match up with foot cup cut-out. Re-attach foot cups to the sports bar feet to ensure silicon seals foot cups. Ensure
silicon does not protrude above foot cups. See Dia #22.
24. Flip the sports bar over and place on a piece of cardboard to avoid damage. Fit the infill panel to the sports bar, secure
the sports bar foot brackets loosely using previously removed hardware. LHS shown, repeat for RHS. See Dia #24.
LHS SHOWN
FOOT CUP
FOOT CUP
SPORTS BAR
BOLTS
LHS SHOWN
DO NOT TIGHTEN FULLY
SILICON INSIDE
SILICON INSIDE
Page 12 of 34Accessory Part No. PZQ70-89870ISSUE 4: 09/10/18
Hard Tonneau Cover, A-Deck
Accessory Part No. PZQ70-89870
TC0403c
23. Fit the sports' bar brackets into the infill panels as shown. NOTE: due to the shape of the front bracket, carefully
install the bracket on an angle to avoid damaging the paint. See Dia #23.
Diagram #23
Diagram #22
Diagram #24
26
27
INSERT AND SLIDE UPWARDS
T50
 Loading...