The provided document is a fitting instruction manual for a Toyota Prado Dash Camera, Part No: PZQ85-33270, designed for models produced from June 2018 onwards. The estimated fitting time is 45 minutes.
Function Description:
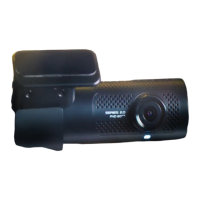
This dash camera is designed to record events while driving, providing a visual record for safety and security purposes. It integrates with the vehicle's electrical system, drawing power from the battery (B+) and accessory (ACC) signals, and includes a ground connection. The camera records onto a Micro SD card, which is inserted into the dash camera module. The device features an "Action" button for specific functions and includes LED indicators for error (orange) and recording (green) status. The camera lens position can be adjusted to a specific mark (3rd from the left) for optimal recording.
Important Technical Specifications:
- Part Number: PZQ85-33270
- Vehicle Compatibility: Toyota Prado, June 2018 production onwards.
- Power Input: B+ (12V) and ACC (12V) signals, with corresponding 1A and 3A fuses in the harness.
- Ground Connection: Utilizes the vehicle's ground signal.
- Storage: Micro SD card.
- Wiring: The harness includes specific wires for battery signal (yellow, 0.5AVSS), ACC signal (red, 0.5AVSS), and ground signal (black). Splice connectors (blue with red wire for IG signal, blue with yellow wire for battery signal) are used for integration with the vehicle's existing wiring.
- Battery Post Terminal Torque: 5.5Nm +/- 2Nm (for reconnection after installation).
- Bolt Re-installation Torque: 8.5Nm (for vehicle ground terminal).
Usage Features:
- Recording: The camera automatically starts recording when the vehicle engine is turned ON, indicated by a green LED.
- Error Indication: An orange LED indicates an error, which should turn off once a proper GPS signal is acquired.
- Calibration Setting: The camera requires a calibration setting procedure, which involves pressing and holding the "Action" button while turning the vehicle engine ON. A double high-tone "beep" sound and green LED light indicate successful booting.
- Lens Adjustment: The camera lens position can be manually adjusted using an adjustment screw, with a recommended setting to the 3rd mark from the left.
- Micro SD Card: The camera uses a Micro SD card for storage, which needs to be inserted into the dash camera module.
Maintenance Features:
- Initial Setup: The manual outlines a detailed initial setting procedure, including inserting the Micro SD card, reconnecting the battery, acquiring a GPS signal in an open area, and performing calibration.
- Troubleshooting (Error LED): If the error light remains ON after initial setup, the user is instructed to repeat specific steps of the initial setting procedure until the error light switches OFF upon GPS signal acquisition.
- Component Removal and Refitting: The installation process involves removing various vehicle components such as instrument cluster panels, under covers, scuff plates, cowl side trims, indash cluster panels, glove boxes, registers, assist grips, A-Pillar panels, heat control panels, sat nav units, instrument lower panels, instrument lower switch panels, and the meter cluster. The manual emphasizes referring to the vehicle's Workshop Manual for component removal and securing all fasteners to Service Manual torque specifications during refitting.
- Battery Disconnection/Reconnection: The negative battery terminal must be disconnected before installation and reconnected after, with a specified torque for the battery post terminal.
- Cleaning: Prior to installing the dash camera, the inside of the windscreen in the installation area must be cleaned using an alcohol wipe cleaner.
- Wiring Management: The manual provides instructions for routing and securing the dash camera wiring using harness tape and cable ties, ensuring it is protected from sharp edges and integrated with existing vehicle harnesses. It specifically warns against cable-tying the dash camera wire to the vehicle's water hose.
- Reprogramming: After battery disconnection, radio stations and clock settings may need to be reprogrammed according to the vehicle's owner manual.
- Owner Manual Placement: The dash camera owner manual should be placed in the glove box after installation.