Do you have a question about the Toyota PZQ90-89011 and is the answer not in the manual?
| Brand | Toyota |
|---|---|
| Model | PZQ90-89011 |
| Category | Dash Cameras |
| Language | English |
General guidelines, notices, and definitions of key terms used in the manual.
Critical safety measures and installation procedures for installers.
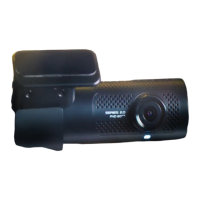
Lists all components included in the Hilux Rear Camera Kit (PZQ90-89011).
Details the Hilux Camera Patch Wire Harness (PZQ60-00230), for 2013+ models.
Instructions for removing dashboard and glove box panels for single cab.
Steps to remove heater, audio units, and door/cowl trim for single cab.
Installing the camera to the bracket and adjusting its angle for single cab.
Applying protection tape and securing the camera for single cab.
Mounting the rear camera assembly to the tray body for single cab.
Routing the camera wire underneath the vehicle for single cab.
Passing wire through grommet and routing it inside the vehicle for single cab.
Instructions for removing dashboard and glove box panels for double cab.
Steps to remove heater, audio units, and door/scuff plates for double cab.
Removing seat belts, pillar garnish, and front seat bracket for double cab.
Installing the camera to the bracket and adjusting its angle for double cab.
Applying protection tape and securing the camera for double cab.
Mounting the rear camera assembly to the tray body for double cab.
Routing the camera wire underneath the vehicle for double cab.
Passing wire through grommet and routing it inside the vehicle for double cab.
Instructions for removing the audio panel and connectors for single cab.
Instructions for removing the front door scuff plate LH for single cab.
Shows camera mounting example, bracket types, and angle adjustment for tub.
Applying protection tape and mounting assembly to tray body for single cab.
Routing the camera wire underneath the vehicle for single cab.
Passing wire through grommet and routing inside the vehicle for single cab.
Instructions for removing the audio panel and connectors for extra cab.
Instructions for removing the front door scuff plate LH for extra cab.
Removing seat belt anchors, quarter trim, and front seat bracket cover for extra cab.
Shows camera mounting example, bracket types, and angle adjustment for tub.
Applying protection tape and mounting assembly to tray body for extra cab.
Routing the camera wire underneath the vehicle for extra cab.
Passing wire through grommet and routing inside the vehicle for extra cab.
Instructions for removing the audio panel and connectors for double cab.
Instructions for removing door scuff plates and rear door scuff plate for double cab.
Removing seat belts, pillar garnish, and front seat bracket for double cab.
Shows camera mounting example, bracket types, and angle adjustment for tub.
Applying protection tape and mounting assembly to tray body for double cab.
Routing the camera wire underneath the vehicle for double cab.
Passing wire through grommet and routing inside the vehicle for double cab.
Connects the rear camera 4-pin connector to the audio unit for 2011 models.
Connects the pre-wire connector using a patch harness for 2013+ models.
Adjusts camera angle for proper view and horizon visibility in tub vehicles.
Utilizes a drilling jig for accurate bracket hole placement.
Specifies torque values for battery terminal clamp, seat belts, and seats.
Instructions for placing the owner's manual and hanging the caution label.