Do you have a question about the Toyota PK6A3-33HT1 and is the answer not in the manual?
Lists the components included in the Dash Camera and Wire Harness kits.
Highlights critical safety and operational warnings during installation.
Outlines general guidelines for quality accessory installation.
Provides a visual overview of the wire harness routing and connections.
Details the steps for disassembling vehicle interior components.
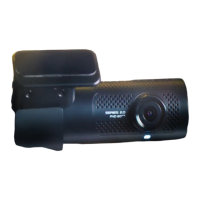
Covers the mounting and initial setup of the dash camera unit.
Explains how to route and connect the wire harness components.
Guides on reassembling vehicle components after installation.
Verifies that all installed accessory functions operate correctly.
Inspects the vehicle for any damage after installation.
Confirms all vehicle systems are functioning as expected post-installation.
This document outlines the installation and reassembly procedures for a Toyota 4Runner Dash Camera, identified by part numbers PK6A3-33HT1 and PK6A4-33HW1. It also includes a comprehensive checklist for accessory function and vehicle appearance/function checks to ensure a quality installation.
The Toyota 4Runner Dash Camera is an accessory designed to record events from the vehicle's perspective. It integrates with the vehicle's electrical system and is mounted on the windshield, typically near the rearview mirror. The camera captures footage, which is stored on a microSD card. The installation process involves disassembling various interior panels, routing wiring, connecting to the vehicle's electrical harness, and then reassembling the panels. The system is designed for seamless operation once installed, providing continuous recording capabilities.
| Night Vision | Yes |
|---|---|
| GPS | Yes |
| G-Sensor | Yes |
| Loop Recording | Yes |
| Resolution | Full HD (1920x1080) |
| Storage | MicroSD card |
| Power Supply | 12V |