Do you have a question about the TP-Link Wi-Fi 7 and is the answer not in the manual?
Connect the router's 10 Gbps Combo port to the internet using an Ethernet cable.
Connect your PON stick to the router's SFP+ Port 2 for fiber internet.
Use the Tether app for guided setup of your Archer BE800 router and internet connection.
Steps to change the router's internet connection port for service.
Troubleshooting common issues preventing access to the router's configuration interface.
Solutions for when your router cannot access the internet.
How to find or change your Wi-Fi network name and password.
Guide to positioning your router for the best Wi-Fi performance and coverage.
Diagnosing why your computer's speed may not be reaching the router's 10 Gbps capability.
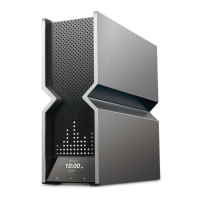
The TP-Link BE19000 Tri-Band Wi-Fi 7 Router is a high-performance networking device designed to provide robust, stable, and seamless wireless connections throughout your home. This Quick Installation Guide outlines the steps for setting up the router and leveraging its advanced features, ensuring an optimal Wi-Fi experience.
The BE19000 router serves as the central hub for your home network, connecting all your internet-enabled devices to the internet. It supports the latest Wi-Fi 7 standard, offering tri-band connectivity for enhanced speed and efficiency. The router is equipped with multiple high-speed ports, including a 10 Gbps Combo port (RJ45 and SFP+) and additional WAN/LAN ports, allowing for flexible internet connection options via Ethernet or fiber.
Beyond basic internet connectivity, the router integrates advanced features to optimize network performance, security, and management. It is EasyMesh-compatible, enabling you to create a unified, seamless Wi-Fi network with other compatible devices, eliminating dead zones and ensuring consistent coverage. The router also includes TP-Link HomeShield, a suite of premium security services designed to protect your network from cyber threats, manage bandwidth, enforce parental controls, and provide comprehensive network reports.
The device features an intuitive LED screen that visually displays various functions and information, such as network status, WPS connection status, and upgrade progress. Physical buttons on the front panel provide quick access to WPS, Wi-Fi on/off, and LED on/off functions, offering convenient control over key router operations.
Setting up the BE19000 router begins with a straightforward hardware connection process. It is crucial to keep the router vertical for optimal Wi-Fi performance. The router's 10 Gbps Combo port can be connected to the internet via an Ethernet cable from your modem or directly to an Ethernet outlet. Alternatively, if your internet service uses fiber, you can connect a PON stick (sold separately) to the router's SFP+ Port 2. After connecting the internet source, the power adapter is plugged in, and the Power button is pressed to turn on the device. The LED screen will cycle through graphics, indicating that the router is ready for the next steps.
For a convenient setup experience, the TP-Link Tether app is recommended. Users can download the app from the App Store or Google Play. Once installed, open the app and log in with your TP-Link ID. If you don't have an account, you'll need to create one first. Within the Tether app, tap the "+" button, select "Wireless Router," and then choose "Archer BE800" (or the specific model if different). Follow the on-screen instructions to complete the setup and connect to the internet. The Tether app also allows you to bind your TP-Link ID to the router for access to more complete services.
Alternatively, the router can be set up via a web browser. First, connect your device (computer or smartphone) to the router wirelessly using the default Wi-Fi network names (SSIDs) and password printed on the label at the back of the router, or connect via an Ethernet cable. Then, launch a web browser and enter "http://tplinkwifi.net" or "http://192.168.0.1" in the address bar. You will be prompted to create a password to log in. After logging in, follow the step-by-step instructions to configure your internet connection and register for the TP-Link Cloud service.
The LED screen on the router provides visual feedback on its operational status. Pulsing LEDs indicate that the router is starting up or being reset. Cycling graphics mean the router is ready for setup. A stable display of information (set in Tether) or cycling emojis signifies that the router is working correctly and has internet access. During a WPS connection attempt, a checkmark (✓) will appear if successful, while an "x" will indicate a failure. An upward-pointing arrow indicates that the router is being upgraded. A downward-pointing arrow means the router is disconnected from the internet. Lastly, LEDs pulsing in a line at the top indicate that Wi-Fi is off.
Three physical buttons on the front of the router offer quick control:
This feature provides premium security services to keep your home network safe. It includes:
The router supports EasyMesh, enabling you to build a unified Wi-Fi network with seamless roaming. This means your mobile devices will automatically connect to the router or extender with the best signal, and all compatible devices will share a single Wi-Fi name. One-click settings allow for easy setup of an EasyMesh network by pressing the WPS button on the main router and satellite device within two minutes. The system offers flexible scalability, allowing you to expand your network with different vendors and product categories, though TP-Link recommends using TP-Link APs for optimal compatibility.
The router's USB port facilitates file and media sharing across multiple devices. You can access the USB drive remotely when away from home, share files with devices on your local network, or use it as a media server to play content on your computer and smart devices.
The guide provides solutions for common problems:
For the best Wi-Fi performance, keep the router vertical, avoid placing it in corners or closets, keep it away from obstacles and high-powered appliances, and position it in a central location at a certain height.
To ensure your computer reaches 10 Gbps speeds, verify it's connected to the router's 10G LAN port, confirm your ISP provides 10 Gbps or higher bandwidth, and use Cat6/6a or higher network cables.
To ensure longevity and safe operation, keep the device away from water, fire, humidity, and hot environments. Do not attempt to disassemble, repair, or modify the device; contact support if service is needed. Use only recommended chargers and avoid damaged ones. Do not use the device where wireless devices are prohibited. The power adapter should be installed near the equipment and easily accessible.
For further technical support, replacement services, user guides, and other information, users are directed to visit the TP-Link support website: https://www.tp-link.com/support.
| Wi-Fi Standard | Wi-Fi 7 (802.11be) |
|---|---|
| MU-MIMO | Yes |
| OFDMA | Yes |
| Beamforming | Yes |
| Bands | Tri-band (2.4 GHz, 5 GHz, 6 GHz) |
| Security | WPA3 |
| Ports | Varies by model (typically includes multiple Gigabit Ethernet ports and one or more multi-gig ports (2.5G/10G)) |