-8-
WARNING:
The vacuum cleaner contains materials that are
hazardous to one’s health. Have the emptying
and maintenance, including the disposal of
dust-collection containers, carried out only by
specialists. Appropriate protective equipment
is required. Do not operate the vacuum cleaner
without the complete filter system. Otherwise
there is danger to your own health.
Date Code Position
The date code, which includes the year of manufacture,
is printed on the rating plate that can be found on the
appliance top housing.
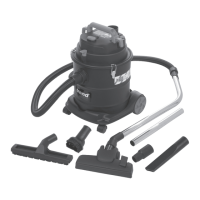
ITEMS ENCLOSED
1 x Cartridge Filter HEPA H13
2 x Castors
2 x Main Wheels
1 x Container
1 x Synthetic Collection Bag
1 x Hose 3m x 39mm Ø with Hose Spout
2 x Extension Tubes
1 x Curved Metal Tube
1 x High Efficiency Floor Brush
1 x Hard Floor Brush
1 x Power Tool Adaptor
1 x Crevice Tool
1 x Brush Tool
1 x Manual
1 x Guarantee Card
DESCRIPTION OF PARTS - (Fig 1.)
A. Switch ON-OFF
B. Extraction velocity monitor
C. Shaker button
D. Carrying handle
E. Cartridge filter HEPA
F. Collection bag
G. Container
H. Container hose inlet
I. Container deflector flange
J. Blower outlet
K. Lid
L. Container catch
M. Castors
N. Main wheels
O. Hose bayonet fitting
P. Hose 3m x 39mmØ
Q. Extension tubes
R. Curved metal tube
S. Brush Tool
T. Power tool adaptor
U. Hard Floor Brush
V. Hose spout
W. High efficiency floor brush
X. Onboard storage locations
Y. Crevice Tool
• Check for damage to the tool, parts or accessories,
which may have occurred during transport. Parts and
accessories may be inside container.
• Take the time to thoroughly read and understand this
manual prior to operation
WARNING:
Never modify the appliance or any part of it.
Damage or personal injury could result.
ASSEMBLY - (Fig 2.)
Accessories are secured inside the container. Undo the
three container catches, remove the motor lid, remove
accessories. Turn the container upside down, insert front
castor wheels. Locate main wheels, and click to lock
into place. Turn container right way up. Fit collection
bag (see Inserting and Removing the Collection Bag
section). Ensure the cartridge filter butterfly screw is
tight. Refit motor and ensure all three container catches
are fastened.
Inserting Collection Bag - (Fig 3.)
• Unlock the container catches and remove the lid.
• The collection bag has a card-reinforced opening with
a tab at the top.
• Ensure that the collection bag is handled with care to
prevent damage and that is does not get caught or
ripped by the container deflector flange or other sharp
objects or projections.
• Insert the collection bag into the container with the
opening towards the front of the vacuum cleaner.
• Pull the collection bag opening over the container
deflector flange ensuring the collection bag opening
passes over the ridge on the container deflector.
• Ensure collection bag is pushed tight.
• Fold out the rest of the disposal collection bag
downwards into the container.
CAUTION:
Take care of the bag to ensure it does not get
damaged when fitting or when removing
Removing the Collection Bag
- (Fig.4)
To remove bag undo the container hose pull bag off the
EN - T32