This document is an instruction manual for the Treyco Model 3000, a machine designed for sharpening clipper blades. The manual covers safety precautions, unpacking, assembly, charging the honing disc, sharpening A-5 style clipper blades, blade charts, and honing disc replacement.
Function Description:
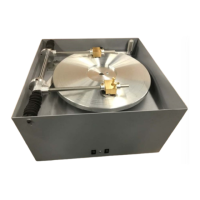
The Treyco Model 3000 is a specialized machine used for sharpening clipper blades, specifically A-5 style blades, Oster 10, 11, and 111 barber blades, and Andis BG blades. It utilizes a honing disc and a system of magnetic blade holders to achieve a precise and consistent sharpening result. The machine is equipped with a two-speed drive, allowing for both low and high-speed operation, which is important for different stages of the sharpening process, particularly during the initial charging of the honing disc. The automatic arm system ensures that blades are moved across the honing disc in a controlled manner, promoting even wear and sharpening. The device is designed to remove a precise amount of metal from the blades, as indicated by a metal removal gauge, to restore their sharpness without excessive material loss.
Important Technical Specifications:
- Drive System: Two-speed drive. The machine is shipped set on low speed.
- Speed Change: To switch to high speed, the orange belt needs to be moved from the upper pulley groove on the drive plate to the lower pulley groove, and then from the upper pulley groove on the motor to the lower. Reversing these steps returns the machine to low speed.
- Honing Disc: Double-sided, with an "H" side (HOLLOW GROUND) for small animal and human hair blades, and an "F" side (FLAT GROUND) for large animal blades.
- Blade Holders: Magnetic holders that do not require adjustments for various blade sizes.
- Slide Mechanism: Linear ball bushing slide, completely sealed with rubber bellows, ensuring smooth and protected operation of the arm assembly.
- Brake System: Features a brake for quick stopping of the honing disc. The brake pad is designed to wear and can be indexed to a different keyway when wear occurs.
- Power Source: Not explicitly stated, but implied to be an electrical device given the motor and automatic arm functions.
- Honing Powder: 1# jar of honing powder is supplied.
- Honing Oil: Atomizer sprayer with oil is supplied, requiring pressurization to 50-90 pounds air pressure.
Usage Features:
- Safety First: Emphasizes wearing safety glasses and a dust mask, avoiding loose clothing, keeping hair pulled back, and maintaining a clean work area. It also warns against modifying machine speed and operating the machine without understanding the manual.
- Unpack and Assemble: The machine is shipped in three cartons: one with the assembled machine, one with the honing disc, and one with accessories. Assembly involves mounting the honing disc and preparing it for sharpening.
- Honing Disc Preparation: The honing disc must be washed with warm water and mild dish soap, rinsed, and air-dried before use. It is then installed onto the spindle, ensuring the correct side ("H" or "F") is facing up, and secured with a screw. The center hole should be covered with tape to prevent powder contamination.
- Charging the Honing Disc: This is a crucial initial step for new or resurfaced discs. It involves applying a fine mist of honing oil to the slowly revolving disc, followed by an even application of honing powder. A wooden charging stick is then used to distribute the powder and fill the disc's fine grooves. This process is repeated with a specific blade (Oster comb blade size 10 or 15) to achieve a uniform dull gray color on the disc surface.
- Sharpening A-5 Blades:
- Metal Removal Gauge: Blades are first disassembled and cleaned. The comb blade is placed on a metal removal gauge, and the indicator dial is set to zero. After sharpening, the needle should indicate a removal of 0.002 inches (2 lines from zero).
- Mounting Comb Blade: The comb blade is mounted on the holder labeled "A-5 COMB BLADE," with the floating magnets fitting into the counterbores. The teeth of the blade should point down. The arm is lowered (with the disc off) to visually check that both teeth and the wear bar sit on the disc surface.
- Mounting Cutter Blade: The cutter blade is mounted on the holder labeled "OSTER CUTTER," ensuring the formed magnets fit into the blade guide groove and the screw head fits into the cutout for the lever. Similar to the comb blade, the arm is lowered (with the disc off) to verify proper contact with the disc.
- Applying Oil and Powder (Per Blade): Before sharpening each blade, a small amount of oil and powder is applied to the disc, similar to the initial charging process, but with 2-3 revolutions of the charging stick.
- Sharpening Cycle: The disc and automatic arms are turned on. The comb and cutter blades are lowered onto the disc, cycling for 2 minutes on low speed (or 1 minute on high speed).
- Blade Inspection: After sharpening, the powder residue on the blades is inspected for correct consistency (moist, not dry like sand or wet like grease). Adjustments to oil/powder application are made if needed.
- Cleaning Blades: Blades are washed in blade wash, mineral spirits, or kerosene to remove all powder. A two-container system (wash and rinse) and a small paintbrush are recommended.
- Reassembly: Blades are reassembled, checking and adjusting spring tension and ensuring the cutter teeth are slightly behind the comb teeth to prevent scratching. A test cut on a rabbit pelt is recommended.
- Blade Charts: Provides specific "Cutter Set Back" measurements for various A-5, Oster, and Andis blades (e.g., 1/16", 1/32", 1/64").
Maintenance Features:
- Honing Disc Resurfacing/Replacement: When a new or resurfaced honing disc is installed, adjustments to the machine's arms are necessary due to variations in disc thickness.
- Adjusting Arms Parallel to Honing Disc: This involves mounting a size 10 or 15 comb blade and a cutter blade, lowering the arms (with the disc off), and loosening screws on the side of the machine to raise or lower the automatic assembly until the arms are parallel to the honing disc surface.
- Adjusting Holders to Centerline of Disc: This ensures the cutter and comb teeth are aligned with the centerline of the honing disc. It involves raising the arms, mounting a comb blade, lowering the arm, and observing if the comb blade overlaps the inner and outer edges of the disc equally during its stroke. If not, the set screws are loosened, and the pivot block assembly is moved left or right until proper overlap is achieved. This process is repeated for the cutter blade holder.
- Brake Pad Replacement: The brake pad wears over time. The manual describes how to remove the screw, lift the pad, index it to a different keyway, and reattach it.
- Cleaning: Regular cleaning of the work area and blades is emphasized.