10 of 20
32. Using the cleaning wipe provided, clean the areas
on both the left and right hand sides of the rear
subframe shown in grey below.
1. Area to be cleaned (right hand shown, left hand similar)
33. Take a self-adhesive protective film from the kit.
Peel approximately 15 mm of the backing paper
away from one end of the protective film. Locate
the protective film against the right hand side of
the rear subframe, positioned as shown below.
1. Protective film position (right hand shown, left hand
similar)
34. When aligned correctly, carefully press the
exposed area of film onto the rear subframe.
35. Gradually peel away the backing paper from the
protective film, pressing the areas of exposed
film to the contours of the rear subframe until
the protective film is fully applied.
36. Use a soft, lint free cloth to press the protective
film firmly on to the rear subframe, removing air
pockets where necessary.
37. Repeat steps 33 to 36 for the left hand side of
the rear subframe.
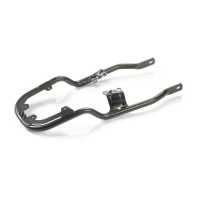
38. Fit the end plugs provided into the pannier third
mounts as shown.
1. Pannier third mount
2. End plug
39. Fit the moulded caps into the clevis section of
the left and right hand pannier third mounts,
ensuring the moulded caps locate correctly in
the hole provided in the clevis.
1. Pannier third mount (left hand shown)
2. Clevis section
3. Moulded cap
40. Collect the pannier cable from the kit.