Do you have a question about the Trotec BM31 and is the answer not in the manual?
Explains the function and purpose of the dielectric humidity sensor.
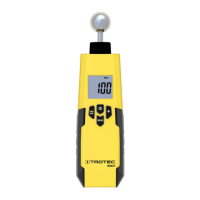
Illustrates the physical components of the moisture indicator.
Details the functions of buttons and controls on the device.
Explains the indicators and readings shown on the device's screen.
Step-by-step guide for installing the power source correctly.
Instructions on how to power up and start the calibration process.
Recommendations for safely moving the device.
Guidelines for storing the device in optimal conditions.
Procedures for taking a single moisture measurement.
Method for scanning a surface to identify moisture variations.
How to use the maximum and minimum value recording features.
Instructions for activating the screen backlight.
Manual procedure to power down the device.
Important considerations and limitations for dielectric measurements.
Techniques for accurate measurement placement and contact.
Understanding the device's penetration depth and its implications.
How material properties affect moisture readings.
Impact of surface preparation on measurement accuracy.
Factors influencing readings based on humidity spread.
When and how to replace the device's battery.
Proper methods for cleaning the moisture indicator.
Guidance on handling device repairs and modifications.
The BM31 is a dielectric moisture indicator designed for quick, indicative, and non-destructive localization of humidity and moisture distributions in materials. It is particularly suited for the preliminary assessment of building materials' readiness for covering, prior to subsequent CM measurements. The device's moisture indication helps identify the most significant measuring spots for material extraction during CM measurements.
The BM31 operates on the dielectric measuring principle, which is an indirect method. It determines material or wood moisture content by deducing it from changes in the material's dielectric permittivity. Dry air has a dielectric constant of 1, while water has 80. Therefore, the more humidity a material contains, the higher the displayed measured value will be. The device displays unitless digit values ranging from 0 to 100, which do not represent moisture data in mass % or volume %.
The device features a max/min function, allowing for the assessment of measurements by displaying either the highest or lowest measured value during a measurement. An automatic switch-off function conserves battery power when the device is not in use for approximately 30 seconds. The display also includes a selectable illumination feature for improved visibility in various lighting conditions.
Before first use, the supplied 9V battery must be inserted into the battery compartment, ensuring correct polarity. The battery compartment is located at the rear of the device and is opened by sliding down the cover.
To switch on the device, press the on/off button. The display will switch on, and the device will begin its calibration process. The first measurement after switch-on is automatically carried out for calibration purposes. During calibration, hold the device near the bottom, away from your body and any objects, in clear space. "CAL" will flash on the display for approximately 5 seconds, and the calibration is complete once the "CAL" indication stops flashing. The device is then ready for operation.
To perform a measurement, place the device in a vertical position on the component to be measured. Press and hold the "MEAS" button until the desired measurement interval is completed, then release it. The "HOLD" indication will appear on the display, and the last measured value will be shown in the measurement value indication.
For a humidity scan, place the device in a vertical position on the component and run it over the surface to be measured without interruption, while pressing and holding the "MEAS" button. Observe the indicated measured value for changes. Upon releasing the "MEAS" button, the "HOLD" indication will appear, displaying the last measured value.
The max/min function can be activated before a measurement by pressing the "MAX/MIN" button. Pressing it once will activate the "MAX" indication, displaying the highest measured value during the measurement. Pressing it again will activate the "MIN" indication, displaying the lowest measured value. After selecting the desired setting, carry out the measurement.
The display illumination can be switched on by pressing the "Lamp" button. Pressing it again will deactivate the background illumination.
When using the device, it is important to consider several factors that can influence measurement results. When the ball head is held to corners (e.g., window frames), the measured value may be higher due to the measuring head's stray field. A distance of more than 8 to 10 cm from a corner should be observed. Always hold the ball head perpendicular to the material and press it firmly against the surface without tilting.
The device's penetration depth ranges from 5 to 40 mm, depending on the material's bulk density and moisture penetration. Conclusions about zones at lower levels cannot be drawn. Material characteristics such as soluble salts, material aggregates, and their concentration can distort results. Electrically conducting materials or fields can also increase the dielectric constant, simulating high moisture values. Metal objects (nails, screws, pipes) within the sensor's measuring field can cause the measured value to skyrocket due to intense reflections. Static charge on the material, potentially caused by friction or low wood moisture, can also falsify results. It is recommended to remove static charge using suitable grounding measures.
Before measuring, ensure the measuring point is clear of impurities like paint residues or dust. Oily or aqueous timber preservatives can affect results. Rough surfaces will typically lead to lower measured values, so the surface should be as level as possible for thorough contact with the measuring probe. For material thicknesses less than 2 cm, there is a risk of humidity values from adjacent layers affecting the measurement. Ideally, moisture should be evenly distributed within the material.
A battery change is required when the battery indication is displayed or if the device can no longer be switched on. To change the battery, open the battery compartment, disconnect the old 9V battery from the battery clip, connect a new 9V battery with correct polarity, place it in the compartment, and slide the cover back on.
To clean the device, use a soft, damp, and lint-free cloth. Ensure no moisture enters the housing. Do not use sprays, solvents, alcohol-based cleaning agents, or abrasive cleaners; only clean water should be used to moisten the cloth.
The device should not be modified, and no spare parts should be installed by the user. For any repairs or device testing, contact the manufacturer.
When storing the device, ensure it is kept dry, protected from frost and heat, and free from dust and direct sunlight. The storage temperature should comply with the values specified in the technical data. For longer storage periods, remove the batteries from the device. When transporting the device, use a suitable bag to protect it from external influences.
| Display | Digital |
|---|---|
| Accuracy | 1 |
| Display type | LCD |
| Product color | Black, Yellow |
| Housing material | Plastic |
| Self-test function | Yes |
| Measurement technology | - |
| Penetration depth (max) | 40 mm |
| Penetration depth (min) | 5 mm |
| Material moisture measuring range | 0 - 100 |
| Material moisture measuring accuracy | 100 % |
| Battery voltage | 9 V |
| Operating temperature (T-T) | 0 - 50 °C |
| Operating relative humidity (H-H) | 0 - 80 % |
| Depth | 180 mm |
|---|---|
| Width | 35 mm |
| Height | 45 mm |
| Weight | 180 g |