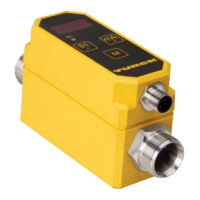
9.1 Setting by manual bridging
9.1.1 Manual bridging – Setting the measuring range
Switch on the power supply of the device.
Place the positioning element at the required zero point of the measuring range.
Bridge pin 5 and pin 3 for 2s.
LED 2 flashes green for 2 s during bridging.
The zero point of the measuring range is stored.
Switch on the device power supply.
Place the positioning element at the required end point of the measuring range.
Bridge pin 5 and pin 1 for 2s.
LED 2 flashes green for 2 s during bridging.
The end point of the measuring range is stored.
9.1.2 Manual bridging – Resetting the sensor to factory settings
Switch on the device power supply.
Bridge pin 5 and pin 1 for 10s.
LED 2 flashes green for 2 s,
then shows a continuous green light for 8 s
and flashes green again (after 10s).
The sensor is reset to its factory settings.
9.1.3 Manual bridging – Resetting the sensor to inverted factory settings
Switch on the device power supply.
Bridge pin 5 and pin 3 for 10s.
LED 2 flashes green for 2 s,
then shows a continuous green light for 8 s
and flashes green again (after 10s).
The sensor is reset to its inverted factory settings.
9.1.4 Manual bridging – Activating the Teach Lock
NOTE
The Teach Lock function is deactivated by default.
Switch on the device power supply.
Bridge pin 5 and pin 1 for 30s.
LED 2 first flashes green for 2 s,
then shows a continuous green light for 8 s
and flashes green again (after 10s)
and then flashes green (after 30 s) at a higher frequency.
The Teach Lock function of the sensor is activated.
9.1.5 Manual bridging – Deactivating the Teach Lock
Switch on the device power supply.
Bridge pin 5 and pin 1 for 30s.
LED 2 shows a continuous green light for 30 s (Teach Lock is still activated)
and flashes green after 30 s at a higher frequency.
The Teach Lock function of the sensor is deactivated.
 Loading...