Do you have a question about the Tyco Electronics AMP Series and is the answer not in the manual?
Details on the plastic components, pre-assembled parts, and secondary latches for the 31-way MT/SPT connector.
References for contacts and seals, including specifications for wire gauges and types.
Provides specifications for the 31-way MT/SPT connector, Standard Power Timer contacts, Micro Timer 2 contacts, and interface.
Details the procedures and tooling for crimping contacts, including specific precautions for 1mm² wire.
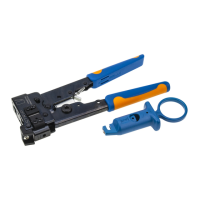
Instructions and tools for removing receptacles from the connector.
Steps for fitting contacts into the connector cavities.
Instructions for inserting and fully seating secondary latches into their respective keyways.
Steps for routing the cable and fitting the horizontal cover, including cable clamp placement.
Steps for routing the cable and fitting the vertical half covers, including cable clamp placement.
Instructions for connecting the connector to the header, including opening and closing the bail lock.
Procedure to disengage and withdraw the connector using the bail lock.
Steps to remove the connector cap by cutting the cable clamp and releasing retaining catches.
Procedure to remove the connector cap and proceed with contact removal as per technical manual.
States that the axial seal must not be removed; replace the connector if faulty.
| Category | Cables and Connectors |
|---|---|
| Manufacturer | Tyco Electronics |
| Series | AMP |
| Connector Type | Varies by specific part number within the series (e.g., Rectangular, Circular, D-Sub, etc.) |
| Contact Material | Varies by specific part number within the series (e.g., Brass, Phosphor Bronze, Copper Alloy, etc.) |
| Contact Plating | Varies by specific part number within the series (e.g., Gold, Tin, Nickel, Silver, etc.) |
| Voltage Rating | Varies by specific part number within the series |
| Current Rating | Varies by specific part number within the series |
| Operating Temperature | Varies by specific part number within the series |
| Insulation Material | Varies by specific part number within the series (e.g., PVC, Nylon, Polypropylene, etc.) |
| Wire Gauge Range | Varies by specific part number within the series |