TFP1326
Page 11 of 22
Valve Setting
Procedure
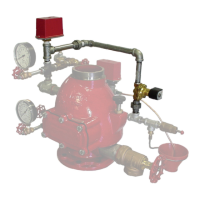
Perform Steps 1 through 13 when ini-
tially setting the TYCO DV-5A Valve with
Remote-Resetting, Pressure-Reducing
Trim for service or after an operational
test of the fire protection system (Ref.
Figure 9).
Step 1. Close the System Main Control
Valve (B).
Step 2. Close the Diaphragm Supply
Valve (P).
Step 3. Open the Main Drain Valve
(D) and System Drain Valve (E). Close
the System Drain Valve (E) after water
ceases to discharge. Leave the Main
Drain Valve (D) open.
At this time make certain that the
Pressure Gauge Valves and the Alarm
Control Valve (H), as applicable, are
open.
Step 4. Depress the plunger of the
Automatic Drain Valve (F) to verify that
it is open.
Step 5. Clean the Diaphragm Supply
Strainer (Q) by removing the clean-
out plug and strainer basket. The Dia-
phragm Supply Strainer (Q) may be
flushed out by momentarily opening
the Diaphragm Supply Valve (P).
Step 6. Reset the electric detection
system in accordance with the manu-
facturer’s instructions to de-energize
the solenoid valve.
Step 7. Operate (open) the Manual
Control Station (M) and then open
the Diaphragm Supply Valve (P). After
unaerated water ceases to discharge
from the Manual Control Station (M)
drain tube, slowly close the operating
lever by pushing it up. Do not close the
hinged cover at this time.
Step 8. Inspect drain connections from
the Manual Control Station and Sole-
noid Valve. Before proceeding to the
next step, correct any leaks.
Step 9. Verify the ability for the DV-5A
Diaphragm to hold pressure as follows:
• With the diaphragm chamber pres-
surized per Step 7, temporarily close
the Diaphragm Supply Valve (P), and
then observe the Diaphragm Gauge
(K) for a drop in pressure.
• If a drop in pressure is noted, the
DV-5A Diaphragm is to be replaced
and/or any leaks must be corrected
before proceeding to the next step.
• If the Diaphragm Gauge (K) indicates
no drop in pressure, re-open the Dia-
phragm Supply Valve (P) and pro-
ceed to the next step.
Step 10. Partially open the System
Main Control Valve (B). Slowly close
the Main Drain Valve (D) as soon as
water discharges from the Main Drain
Valve (D). Observe the Automatic Drain
Valve (F) for leaks. If there are leaks,
determine/correct the cause of the
leakage problem before proceeding.
NOTICE
When the System Main Control
Valve (B) is partially opened, the pres-
sure on the DV-5A Diaphragm Chamber
may increase. This increase in pressure
is normal, and if the pressure is greater
than the valve trim maximum pressure
rating provided in the Technical Data
section, the pressure is to be relieved
to at least the valve trim pressure rating
by partially and temporarily opening the
Manual Control Station (M); however,
do not allow the pressure as indicated
on the Diaphragm Gauge (K) to drop
below the supply pressure shown on
the Water Supply Gauge (J), since
this action may result in tripping of the
DV-5A Valve.
Step 11. Close the hinged cover of the
Manual Control Station Valve (M) and
insert a new break rod in the small hole
through the top of the enclosing box.
Step 12. Fully open the System Main
Control Valve (B).
Step 13. After setting a fire protec-
tion system, notify the proper authori-
ties and advise those responsible for
monitoring proprietary and/or central
station alarms.
Adjusting Pilot
Valve Pressure
A minimum flow of 100 gpm (380 lpm)
is required to adjust the Pilot Valve’s
pressure.
NOTICE
After any downstream pressure adjust-
ment, the following items are to be
recorded on a tag attached to the valve:
• Valve installation location
• Inlet static pressure
• Inlet residual pressure
• Outlet residual pressure
• Intended outlet flow
The tag is not to be removed until after
the system has been accepted by the
authority having jurisdiction. It is rec-
ommended that the tag not be removed
even after acceptance by the author-
ity having jurisdiction unless another
means of record keeping is maintained.
Pressure in the Pilot Valve is factory-
set. To re-adjust the pressure, set
the valve first, according to the Valve
Setting Procedure described in this
technical data sheet, then follow the
steps below. Refer to Figure 10 as
needed.
Step 1. To set the pressure in the field,
trip the valve manually or electrically.
It is recommended that the valve is
tripped electrically to test the entire
system.
Step 2. Remove the Tamper Cap of
the Pilot Valve by first loosening the
Set Screw and unscrewing the Tamper
Cap.
Step 3. If surging flow occurs, attempt
to bleed trapped air from the system via
the Automatic Drain Valve.
Step 4. Loosen the Lock Nut on the
Adjusting Screw of the Pilot Valve.
Step 5. Turn the Adjusting Screw
clockwise to increase outlet pressure
or counterclockwise to decrease outlet
pressure.
Step 6. Observe the Outlet Pressure
Gauge for changes. The valve needs
time to reach the new set point after
changing the preset pressure. Turn the
Adjusting Screw ½ turn at a time until
the pressure stabilizes.
If necessary, turn the Adjusting Screw
again until the desired set point is
achieved.
Step 7. After the desired performance,
tighten the Lock Nut.
Step 8. Replace the Tamper Cap and
tighten the Set Screw.
Step 9. Ensure that the system is prop-
erly drained.
The DV-5A Deluge Valve is now set for
service.
 Loading...