EasyManua.ls Logo

Tyger TG-BP9D80398 User Manual

Tyger TG-BP9D80398
6 pages
To Next Page IconTo Next Page
Page #1 background imageLoading...
Page #1 background image
1/6
Customer Support: www.TygerAuto.com/Contact
Parts List
TYGER Rear Bumper
Push-in License Plate Light
Plastic Plugs for License Plate Mount
Hole Plug for Step Area
Sensor Hole Plugs
Sensor Retaining Rings
20mm X 2mm Foam Washers
Dodge Wiring Harnesses
Sensor Cover Kit
12mm Double Nut Plates
12-1.75mm X 40mm Hex Bolts
12mm X 37mm X 3mm Flat Washers
12mm Lock Washers
4mm X 10mm Button Head Bolts
2.5mm Wrench
Nylon Cable Ties 200mm
x1
x1
x2
x1
x4
x4
x4
x2
x1
x2
x4
x4
x4
x8
x10
x1
TG-BP9D80398
BEFORE INSTALLATION
READ INSTRUCTIONS CAREFULLY BEFORE STARTING INSTALLATION. REMOVE
CONTENTS FROM BOX AND VERIFY ALL PARTS ARE PRESENT. FAILURE TO
IDENTIFY DAMAGE BEFORE INSTALLATION COULD LEAD TO A REJECTION OF
ANY CLAIM. IF MISSING PARTS OR ANY DAMAGE FOUND, PLEASE TAKE A
PICTURE FOR THE CLAIM PURPOSE. TO FILE YOUR CLAIM, PLEASE VISIT:
WWW.TYGERAUTO.COM/CONTACT
TORQUE VALUES
6mm
8mm
10mm
12mm
6-7
15-16
31-32
54-55
6-7
22-23
44-45
78-79
14mm 87-88 125-126
Class 10.9 Torque (ft-lbs)
Class 8.8 Torque (ft-lbs)
Fastener Size
REAR BUMPER
Question and Answer IconNeed help?

Do you have a question about the Tyger TG-BP9D80398 and is the answer not in the manual?

Tyger TG-BP9D80398 Specifications

General IconGeneral
BrandTyger Auto
ModelTG-BP9D80398
MaterialSteel
ColorBlack
InstallationBolt-On
TypeBumper Protector
FinishTextured

Summary

Before Installation

Installation Procedure

Step 1: Unplug Wiring Harnesses

Start installation by unplugging all wiring harnesses leading to the bumper. Move wiring away.

Step 2: Remove Factory Bumper

Remove license plate, support bumper, remove hex bolts and factory bumper bolts to slide off bumper.

Step 3: Remove Harness and Outer Plug

Remove the wiring harness and outer tow harness plug from the factory bumper.

Step 4: Handle Sensors and Plugs

Determine if vehicle has sensors. Install rubber plugs or remove/reinstall sensors with new seals.

Step 5: Install Towing Harness Plug

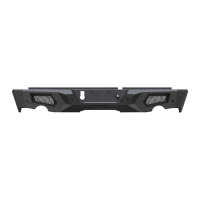
Snap the towing harness plug into the opening in the LD2 Bumper. Use screwdriver to help lock.

Step 6: Attach License Plate Light and Plugs

Insert push-in plugs for license plate, then the license plate light. Secure wiring harness.

Step 7: Position and Support Bumper

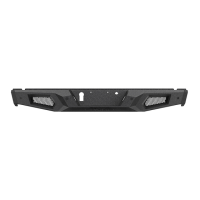
With assistance, position the Bumper onto frame brackets. Temporarily support the bumper's weight.

Step 8: Mount Bumper to Frame

Line up bumper mounting holes with frame brackets. Attach with 12mm bolts, lock washers, flat washers.

Step 9: Level and Tighten Bumper

Level and adjust the bumper. Check tailgate clearance. Once adjusted, fully tighten all hardware.

Step 10: Connect License Plate Light

Connect license plate light to harness. Reattach bumper wiring harness and seal open connections.

Step II: Periodic Inspections

Perform periodic inspections to ensure all hardware remains secure and tight.

Related product manuals