23
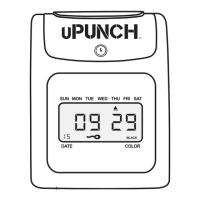
After you have set the time, you will set the days of
the week.
3. Use the + and – buttons to scroll through the days.
A ashing triangle indicates the day that is currently
selected. The + button moves your selection from
right to left and the – button moves your selection
from left to right. Press the Back button to toggle
each day on or off.
For example, if you would like to set the column shift
for weekdays only, you will disable the setting for
Saturday and Sunday. When you see the ashing
triangle on Sunday, press the Back button and the
triangle will be removed. Then press the – button to
select Saturday. When you see the ashing triangle
on Saturday, press the Back button to disable
Saturday. Monday through Friday are still selected.
4. Press Enter to conrm these settings.
Next, you will select which column the time clock will
punch. The options are:
01 Column 1
02 Column 2
03 Column 3
04 Column 4
05 Column 5
06 Column 6
5. Use the + and – buttons to make your selection.
For the rst punch of the day, select 01 and press
Enter to conrm the setting.
Repeat these steps for the remaining codes. To follow
the example in this section, you would set up code
02 to punch at 12:00pm on Monday–Friday in column
02; code 03 to punch at 1:00pm on Monday–Friday
in column 03; and code 04 to punch at 5:00pm on
Monday–Friday in column 04. You can enter up to 12
codes.

 Loading...