EasyManua.ls Logo

Vermont Castings CF9030 User Manual

Vermont Castings CF9030
8 pages
To Next Page IconTo Next Page
Page #1 background imageLoading...
Page #1 background image
Page 1
CF9030 ASSEMBLY
CF9030 ASSEMBLY PROCEDURES
Step 1: Unpack carton.
Tools Required: Knife or scissors; hammer; Philips or Robertson screwdriver
Use the knife or scissors to cut the strapping on the package, then lift off the cardboard cap.
Remove the cardboard sleeve by lifting it straight over top of the barbecue. Remove and unpack the
enclosed parts boxes. Carefully remove any protective covering from stainless steel parts.
CAUTION: Some exposed edges may be sharp.
VERMONT
C
astings
Box #2
Box #5
Box #4
Box #3
Box #1
50001515 12/02 Rev.0 En
Question and Answer IconNeed help?

Do you have a question about the Vermont Castings CF9030 and is the answer not in the manual?

Vermont Castings CF9030 Specifications

General IconGeneral
BrandVermont Castings
ModelCF9030
CategoryGrill
LanguageEnglish

Summary

Step 1: Unpack Carton

Carton Unpacking Procedure

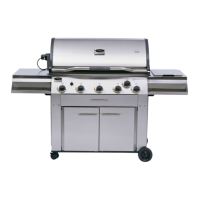
Use knife/scissors to cut strapping, lift off cap, remove sleeve, unpack boxes, and remove protective covering.

Step 2: Position Main Grill Head

Positioning the Grill Head

Lay grill on its back on a protective surface. Best with two people. Use gloves. Ensure lid is secure.

Step 3: Assemble Legs to Bottom Panel

Leg Attachment to Bottom Panel

Assemble four legs to the bottom panel using two bolts each. Tighten all bolts securely.

Step 4: Assemble Legs to Grill Unit

Securing Legs to Grill Unit

Position leg assembly into base unit, aligning holes. Use two bolts per leg, leaving them slightly loose.

Step 5: Assemble Casters

Caster Installation

Push casters into the bottom of each leg until locked. Ensure locking tabs are in the "down" position.

Step 6: Install Front Panel

Front Panel Mounting

Position the front panel between grill legs, align holes, and push plastic pins into place.

Step 7: Install Grease Cup, Cup Holder and Pan

Grease Management System Installation

Assemble cup holder to grease pan, place cup in holder. Position pan on support rails at the rear.

Step 8: Assemble Side Shelf Brackets

Side Shelf Bracket Attachment

Attach spring clips to brackets. Mount brackets to leg bolts, push down fully, and tighten bolts.

Step 9: Assemble Side Shelves

Side Shelf Attachment

Position shelves over brackets, slide them on, align slots with tabs, and fasten with bolts.

Step 10: Install Internal Components

Internal Component Placement

Place sear plates, cooking grates, and warming rack into the base unit and lid supports.

Step 11: Install the LP Cylinder

LP Cylinder Connection (LP Models)

Install the LP gas cylinder (not supplied). Refer to owner's manual for proper handling and safety.

Related product manuals