EasyManua.ls Logo

Vermont Castings Signature VCS3006 User Manual

Vermont Castings Signature VCS3006
12 pages
To Next Page IconTo Next Page
Page #1 background imageLoading...
Page #1 background image
50003807 01/06 Rev.0 En
Page 1
Tools Required: knife or scissors, #2 and #3 Phillips or Robertson (square head) screwdriver,
7/16” and 3/8” wrench or ratchet, hammer, flat head screwdriver.
VCS3006 / VCS3506 ASSEMBLY PROCEDURES
Step 1: Unpack Carton and Verify Contents
CAUTION:
Use a sharp cutting tool to cut the straps on the packaging and then open the carton top. The sleeve
surrounding the barbecue can be removed by lifting it straight up and over the top of the unit. Unpack all
parts and c Next,
. Be careful not to scratch or damage the finish of the metal
parts when removing the protective plastic. Refer to the parts list for fastener detail.
Some parts may have sharp edges; to avoid injury, wearing gloves during assembly is strongly
recommended
ompare all contents to the parts list that accompanies this assembly manual. remove the
protective plastic coverings from the metal parts
Question and Answer IconNeed help?

Do you have a question about the Vermont Castings Signature VCS3006 and is the answer not in the manual?

Vermont Castings Signature VCS3006 Specifications

General IconGeneral
BrandVermont Castings
ModelSignature VCS3006
CategoryGrill
LanguageEnglish

Summary

VCS3006 / VCS3506 Assembly Procedures

Tools Required for Assembly

Lists all the necessary tools required for assembling the barbecue unit.

Step 1: Unpack Carton and Verify Contents

Instructions for unpacking the barbecue and verifying all parts are present.

Step 2: Attach Caster Inserts to Cabinet Sides

Attaching caster inserts to the bottom corners of the cabinet sides.

Step 3: Attach Cabinet Sides to Bottom Panel

Connecting the cabinet sides to the bottom panel using specified bolts and nuts.

Step 4: Install the Casters

Inserting and securing the barbecue casters into the attached caster inserts.

Step 5: Install the Front Panel

Securing the front panel to the cabinet side using bolts and lock nuts.

Step 6: Attach U-Clips and Insert Side Shelf Bolts

Attaching U-clips to the grill body and inserting bolts for the side shelves.

Step 7: Attach the Grill Head to the Cabinet

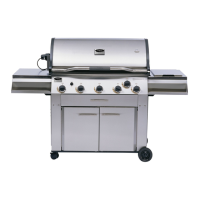
Lifting and securing the main grill unit onto the assembled cabinet structure.

Step 8: Install the Front Fascia

Sliding and securely fastening the front fascia panel onto the grill assembly.

Step 9: Install U-Clip Fasteners to Shelf Supports

Attaching U-clip fasteners to the side shelf supports as shown in the diagram.

Step 10: Pre-Assemble Side Shelves

Assembling the side shelves with their supports, U-clips, and fasteners.

Step 11: Attach the Side Shelves

Connecting the pre-assembled side shelves to the grill body using partially inserted bolts.

Step 12: Secure the Side Shelves to the Grill Body

Finalizing the attachment of the side shelves to the main grill body with screws and bolts.

Step 13: Attach Shelf Insert (VCS3506 Only)

Installing the shelf insert, specific to the VCS3506 model, with bolts and lock nuts.

Step 14: Attach Knobs

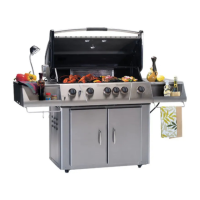
Placing the control knobs onto the valve stems and ensuring a snug fit.

Step 15: Install Grease Cup, Cup Holder and Pan

Assembling and installing the grease cup, holder, and collection pan.

Step 16: Install Internal Components

Placing sear plates, cooking grates, and warming rack inside the grill tub.

Step 17: Install the Battery

Inserting the AAA battery into the ignition button housing for operation.

Step 18A: Install the LP Cylinder (LP Models Only)

Securing the LP gas cylinder to the bottom panel using a thumbscrew.

Step 18B: Install the NG Hose Bushing (Natural Gas Models Only)

Installing the bushing for the natural gas hose connection in the bottom panel.

Related product manuals