https://www.zenstores.com/help/how-congure-zebra-gk420d-printer-printing-royal-mails-2d-barcode-labels/#:~:text=How%20to%20congure%20the%20Zebra%20GK420D%20printer%20for,your%20Royal%20Mail%202D%20barcode%20labels%20in%20Zenstores.https://www.zenstores.com/help/how-congure-zebra-gk420d-printer-printing-royal-mails-2d-barcode-labels/#:~:text=How%20to%20congure%20the%20Zebra%20GK420D%20printer%20for,your%20Royal%20Mail%202D%20barcode%20labels%20in%20Zenstores.https://www.zenstores.com/help/how-congure-zebra-gk420d-printer-printing-royal-mails-2d-barcode-labels/#:~:text=How%20to%20congure%20the%20Zebra%20GK420D%20printer%20for,your%20Royal%20Mail%202D%20barcode%20labels%20in%20Zenstores.
https://www.zenstores.com/help/how-congure-zebra-gk420d-printer-printing-royal-mails-2d-barcode-labels/#:~:text=How%20to%20congure%20the%20Zebra%20GK420D%20printer%20for,your%20Royal%20Mail%202D%20barcode%20labels%20in%20Zenstores.https://www.zenstores.com/help/how-congure-zebra-gk420d-printer-printing-royal-mails-2d-barcode-labels/#:~:text=How%20to%20congure%20the%20Zebra%20GK420D%20printer%20for,your%20Royal%20Mail%202D%20barcode%20labels%20in%20Zenstores.https://www.zenstores.com/help/how-congure-zebra-gk420d-printer-printing-royal-mails-2d-barcode-labels/#:~:text=How%20to%20congure%20the%20Zebra%20GK420D%20printer%20for,your%20Royal%20Mail%202D%20barcode%20labels%20in%20Zenstores.
https://www.zenstores.com/help/how-congure-zebra-gk420d-printer-printing-royal-mails-2d-barcode-labels/#:~:text=How%20to%20congure%20the%20Zebra%20GK420D%20printer%20for,your%20Royal%20Mail%202D%20barcode%20labels%20in%20Zenstores.https://www.zenstores.com/help/how-congure-zebra-gk420d-printer-printing-royal-mails-2d-barcode-labels/#:~:text=How%20to%20congure%20the%20Zebra%20GK420D%20printer%20for,your%20Royal%20Mail%202D%20barcode%20labels%20in%20Zenstores.https://www.zenstores.com/help/how-congure-zebra-gk420d-printer-printing-royal-mails-2d-barcode-labels/#:~:text=How%20to%20congure%20the%20Zebra%20GK420D%20printer%20for,your%20Royal%20Mail%202D%20barcode%20labels%20in%20Zenstores.
https://www.zenstores.com/help/how-congure-zebra-gk420d-printer-printing-royal-mails-2d-barcode-labels/#:~:text=How%20to%20congure%20the%20Zebra%20GK420D%20printer%20for,your%20Royal%20Mail%202D%20barcode%20labels%20in%20Zenstores.https://www.zenstores.com/help/how-congure-zebra-gk420d-printer-printing-royal-mails-2d-barcode-labels/#:~:text=How%20to%20congure%20the%20Zebra%20GK420D%20printer%20for,your%20Royal%20Mail%202D%20barcode%20labels%20in%20Zenstores.https://www.zenstores.com/help/how-congure-zebra-gk420d-printer-printing-royal-mails-2d-barcode-labels/#:~:text=How%20to%20congure%20the%20Zebra%20GK420D%20printer%20for,your%20Royal%20Mail%202D%20barcode%20labels%20in%20Zenstores.
https://www.zenstores.com/help/how-congure-zebra-gk420d-printer-printing-royal-mails-2d-barcode-labels/#:~:text=How%20to%20congure%20the%20Zebra%20GK420D%20printer%20for,your%20Royal%20Mail%202D%20barcode%20labels%20in%20Zenstores.https://www.zenstores.com/help/how-congure-zebra-gk420d-printer-printing-royal-mails-2d-barcode-labels/#:~:text=How%20to%20congure%20the%20Zebra%20GK420D%20printer%20for,your%20Royal%20Mail%202D%20barcode%20labels%20in%20Zenstores.
https://www.zenstores.com/help/how-congure-zebra-gk420d-printer-printing-royal-mails-2d-barcode-labels/#:~:text=How%20to%20congure%20the%20Zebra%20GK420D%20printer%20for,your%20Royal%20Mail%202D%20barcode%20labels%20in%20Zenstores.
14105 Avalon Boulevard, Los Angeles, CA 90061 | Tel 800-465-1660 x1 | Fax 310-353-7109
www.Versatables.com
Assembly
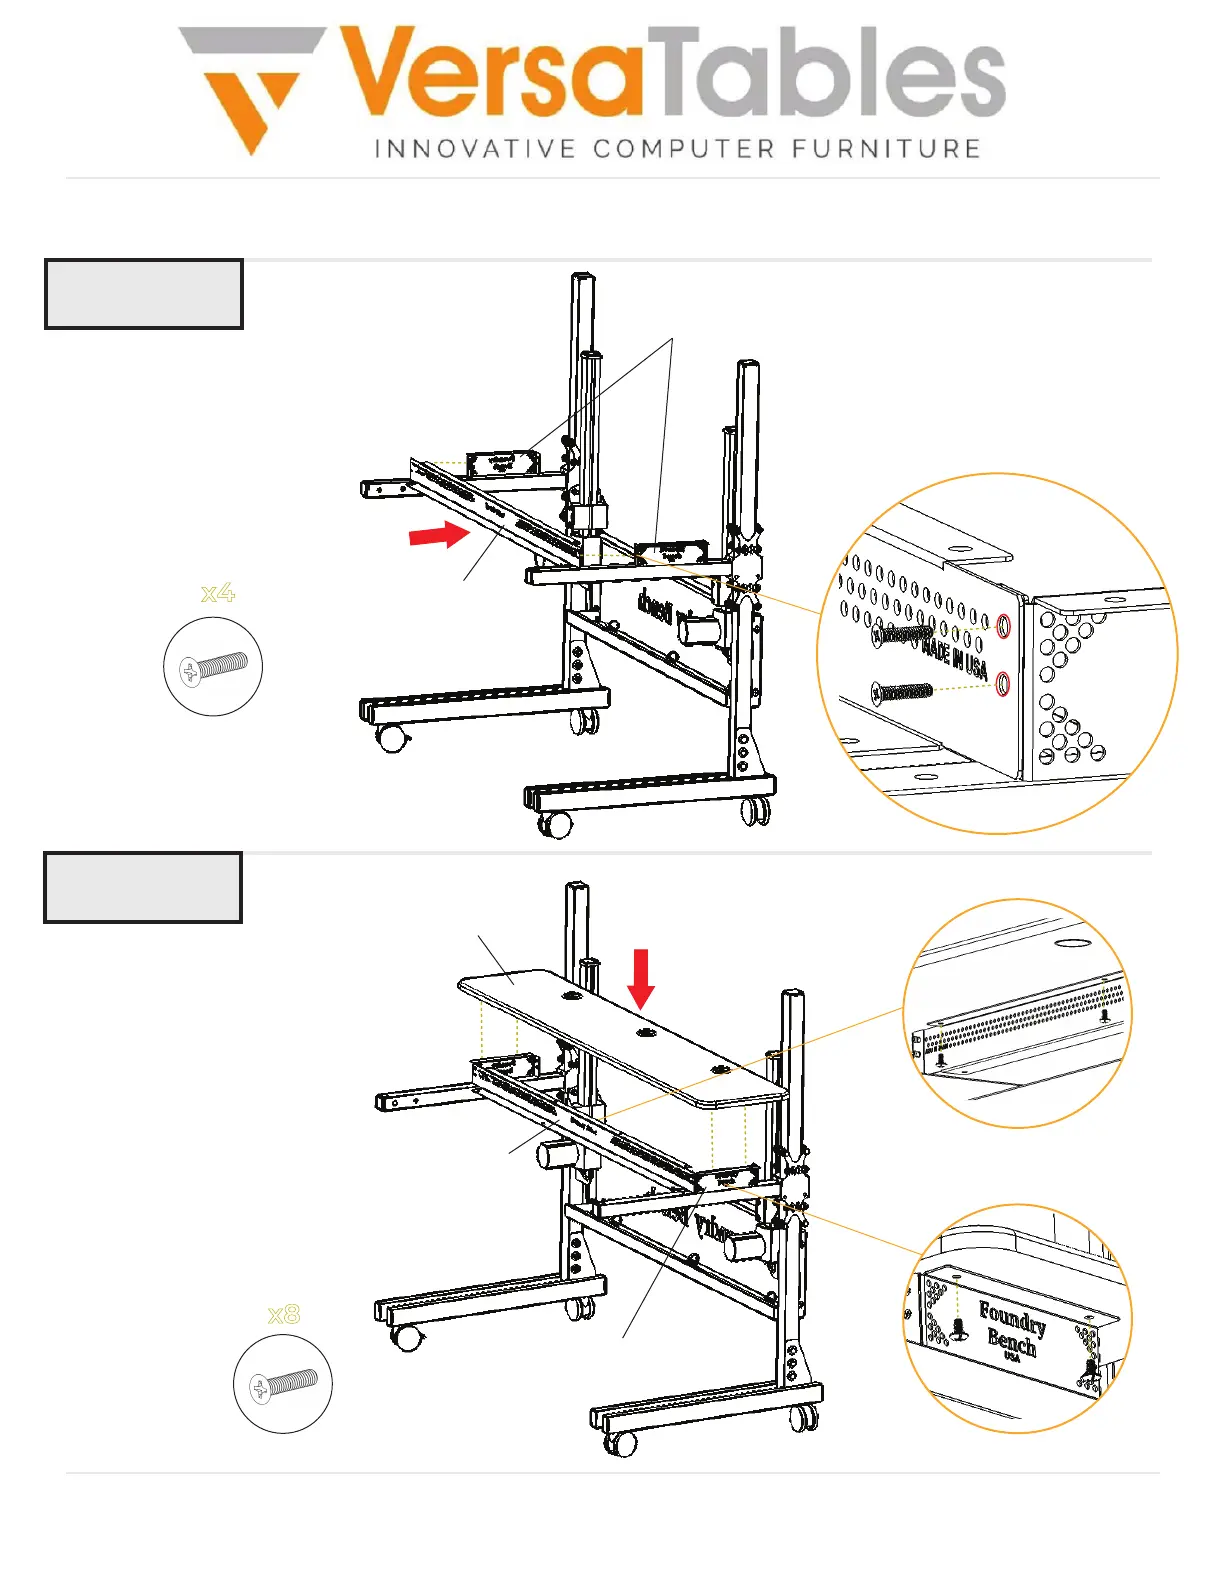
Step 8
Step 7
Attach the Front Panel to both
of the supporting brackets
using (4) 8-32 x 3/4” Flat Head
Screws (2 screws per side).
Front Panel
Supporting Brackets
8-32 x 3/4
Flat Head Screw
x4
Place the Top Surface on top of
the supporting brackets and the
Front Panel.
To attach the Top Surface
to the supporting brackets,
use (4) 1/4-20 x 1/2 Truss
Head Screws (2 per side).
To attach the Top Surface to
the Front Panel, use another
(4) 1/4-20 x 1/2 Truss Head
Screws.
1/4-20 X 1/2 Truss Head Screw
x8
Front Panel
Top Surface
Supporting Bracket
Front Panel
Top Surface
 Loading...