EasyManua.ls Logo

VEVOR HFP250A-10 - User Manual

VEVOR HFP250A-10
16 pages
Print Icon
To Next Page IconTo Next Page
Loading...
Technical Support and E-Warranty Certificate
www.vevor.com/support
SAND FILTER PUMP
OWNER'S MANUAL
MODEL:HFP250A-10 / HFP250A-12
We continue to be committed to provide you tools with competitive price.
"Save Half", "Half Price" or any other similar expressions used by us only represents an
estimate of savings you might benefit from buying certain tools with us compared to the major
top brands and does not necessarily mean to cover all categories of tools offered by us. You
are kindly reminded to verify carefully when you are placing an order with us if you are
actually saving half in comparison with the top major brands.

Questions and Answers

Summary

Safety Precautions and Warnings

General Installation and Usage Warnings

Essential safety warnings for installation, operation, and use, including dangers and prohibitions for children.

Pre-Operation Safety Checks

Instructions for releasing air before performing filter maintenance or work.

Electrical Safety Guidelines

Requirements for grounding electrical equipment and turning off power before electrical work.

High Pressure and Electrical Hazards

Warnings about tank separation due to high pressure and severe risks from pump electrical shock.

Product Parameters

Explosion Plan and Parts List

Filter Overview and Installation Preparation

Filter Overview

Explains the function of the sand filter, its operation, and when backwashing is needed.

Initial Setup and Inspection

Guide to unpacking components, checking for damage, and initial setup.

Filter Placement and Drain Assembly

Instructions for positioning the filter, ensuring a stable base, and assembling the drain.

Tank, Pump, and Valve Installation

Steps for assembling the tank, pump, standpipe, sand, and control valve.

Filter Control Valve Functions

Initial Start-Up Procedure

Pool Preparation and Initial Backwash

Steps for cleaning the pool, ensuring proper water flow, and performing the initial backwash.

Rinse and Filter Cycle Initiation

Instructions for the rinse cycle, starting the filter cycle, and checking for leaks.

Monitoring Filter Pressure

Guidance on recognizing when the filter needs backwashing based on pressure gauge readings.

Cleaning and Maintenance

Identifying Filter Cleaning Needs

Methods to determine when the filter requires backwashing, including flow and pressure indicators.

Preventative Maintenance

Recommendations for regular cleaning of pump strainer and skimmer baskets.

Chemical Cleaning Indicator

Criteria for performing a chemical cleaning procedure based on starting pressure after backwashing.

Filter Backwash Procedure

Backwashing Steps

Detailed instructions for stopping the pump, setting valve positions, and performing backwash and rinse.

Post-Backwash Pressure Check

Guidance on checking pressure after backwashing and identifying when chemical cleaning is needed.

Winterizing Your Filter

Winterization Preparation

Steps for preparing the filter system for winter to prevent damage from freezing.

Winter Position Warning

Warning about the correct multi-port valve position during the shutdown season to prevent damage.

Troubleshooting Guide

Pool Water Quality Issues

Addresses problems with pool water not being sufficiently clean and their potential causes.

Control Valve Functionality Problems

Diagnoses issues related to control valve settings and gasket integrity.

Pump Operation Without Water Flow

Identifies causes for the motor running but no water flowing through the pump.

Sand Issues and High Pressure

Troubleshoots sand-related problems and causes of higher filter pressure.

Diminished Return Flow

Addresses issues with reduced water flow back to the pool and low filter pressure.

Overview

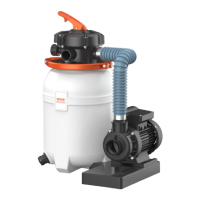
The VEVOR Sand Filter Pump is designed to provide clear, sparkling water for swimming pools with minimal maintenance when installed, operated, and maintained according to the instructions provided. This manual covers two models: HFP250A-10 and HFP250A-12.

Function Description:

The sand filter pump utilizes special filter sand as a dirt-removing medium. Pool water containing suspended dirt particles is pumped through the piping system and directed by the filter control valve to the top of the filter tank. As the water passes through the filter sand, dirt particles are trapped, and the filtered water flows from the bottom of the filter tank, up through the standpipe, back to the valve, and then returned to the pool. Over time, accumulated dirt increases resistance to flow, indicating the need for cleaning (backwashing). During backwashing, the water flow is reversed, directing water to the bottom of the tank, up through the sand, and out through the waste line, flushing out trapped dirt and debris. After backwashing, the control valve is manually resequenced to "Rinse" and then "Filter" to resume normal operation.

Important Technical Specifications:

Model HFP250A-10 HFP250A-12
Input AC115V 60Hz AC115V 60Hz
Max Power 0.33 HP 0.35 HP
Max Flow 6 m³/h 6 m³/h
Max Lift 7 m 7 m
Sand tank size 10 inch 12 inch
Can filter sand size 0.45-0.85mm 0.45-0.85mm
Adaptable to hose size 1.5" 1.5"

Functional Types (Control Valve Positions):

  • FILTER: Normal filtering and vacuuming. Water flows from pump, through valve, downward through filter sand bed, up through center pipe to valve return port, and back to the pool.
  • BACKWASH: Used for cleaning the filter by reversing flow. Water flows from pump, through valve, down through center pipe, up through filter sand to valve, and out waste port.
  • RINSE: Used for start-up cleaning and resettling the filter bed after backwashing. Water flows from pump, through valve, downward through filter sand, up through center pipe to valve and out waste port.
  • WASTE: Bypasses the filter, directing water directly to waste. Used for vacuuming to waste, lowering pool level, or draining the pool.
  • CLOSE: No flow in this position. Not to be used while the pump is operating.
  • WINTER: Valve position for a winterized filter.

Usage Features:

  • Installation: The filter system should be installed below pool water level on a level concrete slab or firm ground. Ensure piping connections, control valve, and winter drain are accessible. The drain should be assembled to the lower outlet of the filter tank, ensuring o-rings are correctly assembled to prevent leakage. The standpipe and underdrain assembly are placed in the center of the tank, capped with a sand shield before adding filter sand. Only No. 20 standard silica sand with a uniformity coefficient of 1.75 or less (particle size 0.45-0.55 mm) should be used. The filter control valve is then inserted into the tank neck, ensuring the standpipe slips into the hole at the bottom of the valve. The valve is positioned with ports correctly aligned (pump port to pump discharge, waste port to waste line, return port to pool return). A flange clamp secures the tank and valve.
  • Electrical Connections: All electrical equipment must be grounded before connecting to the power supply to prevent electrical shock hazards. A suitable Ground Fault Circuit Interrupter (GFCI) should always be installed at the power supply source. Power to all electrical equipment must be turned OFF before working on electrical connections.
  • Initial Start-Up: For new pools, clean the pool before filling to prevent damage to the pump and filter. Ensure all pool suction and WASTE lines are open. Set the control valve to "BACKWASH." Check the pump strainer pot for water and prime the pump. Run the pump for at least 2 minutes or until backwash water is clean to remove impurities from the sand. Turn off the pump, set the valve to "RINSE," and run for at least two minutes. Turn off the pump, set the valve to "FILTER," and restart. Note the operating pressure when the filter is clean. Check for leaks and correct them with the pump off.
  • Operation: The filter removes dirt, causing pressure to rise and flow to diminish. Backwash the filter when the pressure gauge reading is 5-10 psi higher than the clean filter reading.
  • Safety: Do not permit children to use or operate the sand filter. Never work on the pump while it is running or power is connected. Always turn off the pump before changing valve positions to prevent damage to the control valve and potential injury. Release air by pressing down the control valve handle before working on the filter. High pressure from the sand filter can cause severe injury or property damage if the tank separates; release all pressure before working on the sand filter.

Maintenance Features:

  • Backwashing: The filter needs backwashing when the flow decreases by 30% from the original clean filter flow, when the water flow from the directionals in the pool wall is reduced, or when the filter gauge reading increases 10 PSI over the initial clean filter reading. Backwashing too frequently can lead to poor filtration. Factors like weather, heavy rains, dust, pollen, and water temperatures affect backwash frequency.
  • Backwash Procedure: Stop the pump. Ensure suction and WASTE lines are open. Set the control valve to "BACKWASH." Start the pump and backwash for 3-5 minutes or until the water runs clean. Stop the pump, set the valve to "RINSE," and run for approximately 30 seconds. Stop the pump, set the valve to "FILTER," and restart. If, after backwashing, the pressure is 4-6 psi above the normal starting pressure, a chemical cleaning procedure is necessary.
  • Cleaning: Clean the pump strainer and skimmer baskets regularly to prevent damage and ensure proper system operation.
  • Winterizing: In freezing temperatures, pool equipment must be winterized. Backwash the sand filter. Turn off the pump and move the valve handle to the "WINTER" position. Remove the drain cap from the bottom of the filter tank and leave it off to completely drain the tank. Drain and winterize the pump and all appropriate system piping. Leaving the multi-port valve in the "WINTER" position during shutdown prevents damage from leaking water.
  • Troubleshooting: The manual provides a troubleshooting guide for common issues such as pool water not being sufficiently clean, control valve malfunction, motor running but no water flow, sand flowing to the pool, higher filter pressure, and diminished return flow with low filter pressure. Solutions include checking pool chemistry, sand amount/size, turnover rate, valve settings, gaskets, hose connections, strainer lid tightness, pump position, and removing obstructions.

VEVOR HFP250A-10 Specifications

General IconGeneral
BrandVEVOR
ModelHFP250A-10
CategoryWater Pump
LanguageEnglish

Related product manuals