Do you have a question about the Vex Robotics Clawbot and is the answer not in the manual?
Gather all necessary materials and tools for sensor attachment as listed.
Mount the bumper sensor using screws and thin spacers according to the diagram.
Install the ambient light sensor on the robot's structure using specified hardware.
Install the potentiometer, involving disassembly and reassembly of the arm mechanism.
Mount the sonar sensor to the front of the robot using screws and spacers.
Position and secure the limit switch between the front bent bars of the robot.
Attach the line tracking sensors, ensuring they are centered on the robot.
Mount the gyroscope as close to the center of the robot as possible.
Assemble external quadrature encoders to the drive train shafts.
Install integrated motor encoders by modifying the existing motors.
Mount the LCD display to the robot's C-channels using screws and a standoff.
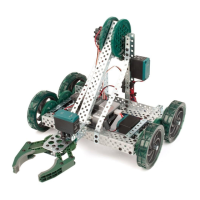
| Category | Robotics |
|---|---|
| Motor Count | 4 |
| Claw | Yes |
| Controller | VEXnet Joystick |
| Programmable | Yes |
| Name | Clawbot |
| Motor Type | VEX 393 Motor |
| Power Source | 7.2V NiMH Battery |
| Programming Language | VEXcode |
| Material | Metal and Plastic |
| Compatibility | VEX Robotics Design System |