The Open Source Scan Converter (OSSC) is a next-generation line-doubler designed to process individual scanlines in real time, converting 15kHz video from retro consoles to 31kHz video suitable for modern displays with minimal input lag (a few microseconds). It supports various video inputs and offers extensive customization options for image processing.
Function Description:
The OSSC's primary function is to convert analog video signals from retro gaming consoles, PCBs, and vintage computers into digital video signals (DVI-D or HDMI) at higher resolutions, making them compatible with modern displays. It acts as a line-doubler, tripler, quadrupler, or quintupler, processing scanlines in real time to minimize lag. The device also includes features for simulating CRT scanlines, deinterlacing interlaced video, and fine-tuning image parameters.
Important Technical Specifications:
- Power Supply: Requires a 5-volt, 2.1 x 5.5mm positive tip power supply unit (PSU) supplying at least 1 amp of current. Never connect a PSU supplying more than 5 volts.
- Video Output:
- v1.5 and earlier: DVI-D connector for digital video output. Does not support/output analog DVI.
- v1.6 and later: HDMI compatible video connector.
- Video Inputs:
- AV1 In: RGB SCART input. Supports RGB or YPbPr. S-video and composite SCART sources are not supported and require transcoding to RGB first. Only European spec RGB SCART cables are supported; Japanese JP21 cables require a converter.
- AV2 In: Component video or RGB with sync on green sources.
- AV3 In: Standard D-Sub15 (VGA) connector. Suitable for sources like Sega Dreamcast or retro gaming PCs. This input lacks a sync low pass filter, as it's typically not needed for VGA.
- Maximum Input Resolution: Signals up to 720p are supported on all inputs.
- Audio Output:
- v1.5 and earlier: Standard 3.5mm stereo headphone plug type connector. Audio fed through AV1 (RGB SCART) is output here. An audio upgrade board allows analog audio input through this connection (disconnect SCART cable from AV1 if using).
- v1.6 and later: Additional 3.5mm audio connector for outputting audio from AV1/SCART or inputting audio for AV2/Component video sources.
- Audio Input (v1.6 and later):
- AV2 audio in/AV1 audio out: Standard 3.5mm stereo headphone plug type connector for inputting audio for AV2/Component video sources.
- AV3 audio in: Standard 3.5mm stereo headphone plug type connector for inputting and digitizing audio for AV3/D-Sub15 (VGA) sources.
- Digital Audio: Standard on OSSC 1.6; can be added to earlier models with an audio expansion board.
- Controls:
- Buttons: BTN0 and BTN1 for various functions without a remote.
- Power Switch: Toggles power off and on.
- IR Sensor: Receives commands from the optional remote control unit (line of sight required).
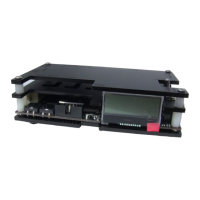
- LCD: Displays menus and information about the current source.
- Status LEDs: Green LED indicates power (briefly goes out when IR code detected). Red LED indicates unstable sync.
- MicroSD Card Slot: For firmware updates.
- JTAG Connector: For software development and firmware updates.
Usage Features:
- Connecting the OSSC:
- Connect a suitable 5V, 1A positive tip power supply to the OSSC's power connector.
- Connect a DVI or HDMI cable between the OSSC's video out and your display. While most HDMI/DVI-D compatible displays work, full adherence to DVI/HDMI specifications is not guaranteed. For displays with only analog inputs, a converter is required. OSSC does not use HDCP.
- Turn on the PSU, then power on the OSSC using the power switch. The LCD will display the current firmware version (a letter 'a' indicates audio-capable firmware).
- Switch your display to the correct input. A grey test card pattern should appear.
- Connecting a Console/Hardware:
- Power off the OSSC.
- Connect your source (console, PCB, etc.) to AV1, AV2, or AV3. RGB SCART to AV1 is generally recommended.
- Power on the OSSC.
- Select the appropriate input using the remote or by pressing BTN0 until the LCD displays the correct input.
- Power on your console/hardware. The image should now be displayed.
- Options Menu:
- Press the "Menu on/off" button on the remote to access the OSSC's options menu (LCD will show "menu mode").
- Navigate between categories using "Prev/next option" buttons and select options with "OK".
- Change values using "Value -/+" buttons.
- Refer to the wiki page (junkerhq.net/xrgb/index.php/OSSC) for detailed option descriptions.
- Scanlines:
- Simulates the blank lines seen on CRT displays with retro consoles.
- Enable/disable via "Post-Proc" -> "Scanlines" in the menu. "Auto" applies scanlines to 240p/288p sources; "Manual" applies to all sources.
- Toggle scanlines using BTN1 or the "Scanline Mode" button on the remote.
- Adjust scanline strength via the menu or "Scanline Int" button on the remote.
- Line Multiplication Modes (Line Triple, Quadruple, Quintuple):
- Default: Line double (240p to 480p).
- Line3x, Line4x, Line5x modes attempt to triple, quadruple, or quintuple each scanline for sharper images on compatible displays.
- Change mode: Menu -> "Output opt" -> "240p/288p Proc". Use prev/next buttons to select.
- Ensure "Generic 4:3" is selected under "Line3x mode" (or appropriate setting for your chosen multiplication mode) in the "Output opt" menu.
- For Line5x, choose picture format (1920x1080, 1600x1200, or 1920x1200) under "Line5x format". 1920x1080 mode may crop the image.
- Trying different modes will not damage your display. If no picture appears, use the LCD to turn off line triple mode.
- Interlace Video (480i/576i):
- OSSC can deinterlace interlaced sources (e.g., PS2, Gamecube) with no input lag, but may exhibit flickering and combing artifacts due to lacking a frame buffer.
- Choice: Use OSSC's deinterlacer (low lag) or your display's built-in deinterlacer (better picture quality).
- Toggle: Menu -> "Output opt" -> "480i/576i Proc". "Passthru" uses display's deinterlacer; other options use OSSC's. "Line 2x (Bob)" is common and compatible.
- Caution: Using OSSC's deinterlacer on static graphics/text for long periods can cause image retention/burn-in due to constant flickering.
- Fine Tuning:
- Options like "Video LPF", "Analog Sync LPF", and "H-PLL Post-Coast" allow fine-tuning the image or fixing compatibility issues. Default settings are usually sufficient.
- Consult the wiki (junkerhq.net/xrgb/index.php/OSSC) for specific recommendations.
- Audio Toggle (v1.6 and later): Switch between outputting audio from AV1 or inputting and digitizing audio on AV2.
- Routing Audio/Video: Routing OSSC's video output through home theatre receivers, video processors, switches, splitters, or audio integrators can add input lag and increase re-sync time when game titles switch between 480i and 240p modes.
Maintenance Features:
- Firmware Updates:
- New features are added periodically via firmware updates.
- Update process: Format an SD card with the new firmware, insert it into the OSSC, enter the menu, and select "FW. update".
- Check for the latest firmware and tutorials at videogameperfection.com/ossc-fw.
- Firmware file naming conventions:
-jp: Japanese language version.-aud: Digital audio enabled version (for OSSCs with audio expansion board or OSSC 1.6).
- Troubleshooting: A table is provided in the manual to address common issues:
- Genesis/Megadrive games not working: Adjust "Coast values" (H-PLL coast pre 3 and post 3).
- Vertical flicker/shimmer on interlace sources: Normal side effect of lag-free deinterlacing; no action needed.
- Unstable/flickering image (SNES/Super Famicom): Try a different display or install a de-jitter board.
- Horizontal jitter/wobble: Adjust low pass filter settings (see wiki).
- Missing pixels (wrong line triple mode): Use "generic 4:3" or "generic 16:9" line triple mode.
- Display incompatibility: Try a different display or line multiplication mode.
- Sample mode incompatible: Change "Down-sampling" option under "Audio options" to 2x.
- No audio on AV2: Change audio toggle switch (next to HDMI connector) to output mode.
- No image (wrong sync mode): Press source button to change sync mode (RGBs for SCART, YPbPr for component, RGBHV for DSub15/VGA).
- No image (line triple/quadruple/quintuple enabled): Switch to line double mode (other modes may not be compatible).
- No image (HDMI/DVI handshake failed): Power cycle the OSSC.
- No image (unusual sync signal): Power off OSSC and source, power on OSSC and select input, then power on source.
- No image and LCD says NO SYNC (source not powered on): Check power to source device.
- No image and LCD says NO SYNC (source not outputting RGB or YPbPr): Ensure source outputs RGB and SCART cable is wired for RGB.
- OSSC Resets/reboots: Use a different PSU with at least 1 amp (available at Videogameperfection.com).
- Disposing of your OSSC:
- If malfunctioning, contact VideogamePerfection.com for repair or replacement (1-year warranty; out-of-warranty service available).
- If no longer wanted, consider contacting for disposal advice.
- Recycle for free at local recycling centers.
- UK: recycle-more.co.uk (enter postcode).
- Republic of Ireland: weeeireland.ie/household-recycling/where-can-i-recycle/.
- Outside UK/ROI: Check local authorities or contact for return arrangements.