The OSSC Pro, or Open Source Scan Converter Pro, is a next-generation video processor and scaler designed to enhance the display of older, fixed-resolution video games and consoles on modern, fixed-resolution displays. It converts video signals from a range of vintage gaming systems into formats suitable for modern TVs and monitors, including LCDs and CRTs.
Function Description
The OSSC Pro's primary function is to convert and scale analog video signals from classic gaming consoles into digital formats (like DVI and HDMI) that are compatible with modern displays. It supports a wide array of input sources, including RGB SCART, YPbPr, S-video, composite, and VGA, allowing users to connect various retro gaming systems. The device aims to provide a high-quality, low-latency video output, preserving the original aesthetic of retro games while improving compatibility with contemporary display technology. It features multiple operating modes (Pure line multiplier, Adaptive line multiplier, and Scaler) to cater to different preferences and display requirements.
Important Technical Specifications
Power Supply: The OSSC Pro requires a 5 volt, 2.1 x 5.5mm positive tip power supply unit (PSU) capable of supplying at least 2.5 amps of current. It is crucial to use a PSU that meets these requirements to avoid damage. The OSSC Classic PSU is not recommended as it does not provide sufficient amps.
Video Input/Output:
- Inputs:
- AV1 (SCART) Input: Connects an RGB SCART source. Supports RGB or YPbPr, S-video, and composite SCART sources (though transcoding may be required for S-video and composite). Japanese JP21 cables can be used with a converter.
- AV2 In: Connects component video or RGB with sync on green sources.
- AV3 In: Standard D-Sub15 (VGA) connector. Connects sources like the Sega Dreamcast or a retro gaming PC.
- AV4 In: Connects a standard digital video source (DVI) to this port. DVI sources will require an adapter.
- AV2 Audio Input/Output Connector (AV3 In/AV2 In/AV3): This connector serves as an audio input/output break out from AV1 SCART.
- Outputs:
- DVI/HDMI Output: The device outputs video via DVI or HDMI cables. It supports various output resolutions and refresh rates, including 240p, 288p, 350p, 400p, 480i, 480p, 576i, 576p, 720p, 1080i, and 1080p, with various line multiplication options (Line2x, Line3x, Line4x, Line5x).
- Video Out: Connects a standard high definition digital cable to this port, extending the end of the cable to your television or monitor.
- SPDIF Input: For connecting high-quality digital audio input from compatible consoles or devices. This audio input can also be assigned to any video input.
- AV2 Audio: Connects any analogue audio source to these two RCA connectors. This audio input can be assigned to any video input.
Connectivity:
- USB Port: For connecting and controlling external devices such as video switching hardware, or connecting accessories.
- MicroSD Card Slot: For updating the devices firmware and storing display profiles.
- IR Receiver: Receives commands from the remote control unit.
- JTAG Connector: For software development purposes and firmware updates.
- Expansion Connector: For adding expansion boards to the OSSC Pro.
Display and Control:
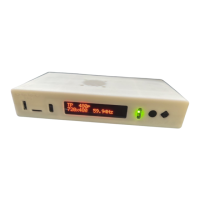
- OLED Display: Shows current input, resolution, and refresh rate (e.g., "TP 480p 720x480 59.94Hz").
- Status LEDs: Indicate various functions of the OSSC Pro. A red and green LED illuminate together indicates an error condition with the current input. A blue LED indicates when frame lock is active.
- Menu Button: Press to enter or exit the OSSC Pro's menu. Press and hold to toggle between On and Standby.
- Control Stick: Used to navigate through the OSSC Pro's menus. Move up, down, left, or right to navigate. Click the control stick to choose a menu option.
- Remote Control: A comprehensive remote control unit provides access to all functions, including power, P-LM, A-LM, Scaler modes, keypad input, profile load, navigation, scanline controls, and scaler keys.
Scaling Algorithms:
- Pure LM: Max 2 lines latency, variable display compatibility, Bob/Noninterlace restore deinterlace, X: oversample, integer Y: integer scaling, very fast input mode switch delay, Pan transformations, Scanlines, Border, Masks postprocessing.
- Adaptive LM: Max 60 lines latency, very high display compatibility, Bob/Noninterlace restore deinterlace, X: oversample, integer Y: integer scaling, very fast input mode switch delay, Pan transformations, Scanlines, Masks postprocessing.
- Scaler - framelock: ~1 frame latency, very high display compatibility, Bob, Weave, Motion adaptive deinterlace, X: oversample, polyphase Y: polyphase scaling, fast input mode switch delay, Zoom, Pan, (Rotate*) transformations, Scanlines, Masks, BFI postprocessing.
- Scaler - no framelock: 1-2 frames latency, full display compatibility, Bob, Weave, Motion adaptive deinterlace, X: oversample, polyphase Y: polyphase scaling, instant input mode switch delay, Zoom, Pan, (Rotate*) transformations, Scanlines, Masks, BFI postprocessing.
Scanlines: The OSSC Pro can simulate scanlines, which are characteristic of CRT displays, to enhance the retro gaming experience.
Framelock: This feature helps to synchronize the output refresh rate with the input, reducing judder. It can be configured for PAL material (50Hz) or NTSC (60Hz).
Usage Features
Connecting the OSSC Pro:
- Power: Connect a suitable power supply (5 volts, 2.5 amp positive tip) to the OSSC Pro's power connector. The red Standby light should illuminate on the front of the unit.
- Video Output: Connect a DVI or HDMI cable from the video out on the OSSC and your display. The OSSC Pro does not use HDCP, so any basic converter should work.
- Power On: Power on your OSSC Pro using the power button on the remote control or by holding the menu button on the front of the unit. The OLED display will light up and show "TP 480p" as the default display.
- Input Selection: Use the remote control or the control stick to navigate the on-screen menu. Select "Input Select" and then choose the relevant input for your console (e.g., "AV1_RGBS" for standard RGB SCART devices, "AV2_YpbPr" for component video, "AV3_RGBHV" for VGA sources, or "AV4" for digital video sources).
- Display Adjustment: If the display is incorrect, a grey test card pattern can be displayed to help with adjustments.
Getting to Know Your OSSC Pro:
- On-screen Menu: All settings are configured using the on-screen menu, accessed via the remote or the menu button on the device. The top-level menu includes options like "Input select," "AV1-3 sync opt," "AV4 video in opt," "Line multiplier opt," "Scaler opt," "Output opt," "Audio opt," "Scanline opt," "Post-proc," and "Settings."
- Operating Modes: The OSSC Pro offers three main operating modes:
- Pure line multiplier: Offers a lag-free scaling solution for retro video consoles, with more flexible output options.
- Adaptive line multiplier: Offers a lag-free scaling solution for retro video consoles, with more flexible output options.
- Scaler: Provides a more traditional scaling approach, with various options for deinterlacing and post-processing.
- Changing Modes: To switch between line multiplier and scaler modes, navigate to "Output opt" and press "OK." To change between adaptive and pure line multiplier modes, first choose "Line multiplier mode" and then use the Return button to go back to the top-level menu.
- Connecting Consoles: For best results, always use the best quality connection from your source device to your OSSC Pro. RGB SCART is often the easiest and best option. The OSSC Pro can handle various digital video (including systems with after-market modifications) via the AV4 input.
- Scanlines: The OSSC Pro can simulate scanlines. You can configure various scanline settings using the SL buttons on the remote or through the on-screen menu.
- Setting Output Resolutions: The OSSC Pro supports a wide range of output resolutions (e.g., 240p, 288p, 480p, 720p, 1080p) and refresh rates (50Hz, 60Hz). You can choose the output resolution based on the input resolution and your display's capabilities.
- Scaling Algorithm: You can change the appearance of the scaled image by choosing different scaling algorithms.
- Interlace Video: The OSSC Pro can deinterlace content, which is important for certain retro consoles and computers. It offers various deinterlacing modes (Bob, Weave, Motion adaptive).
- Fine Tuning Image Settings: The OSSC Pro allows for fine-tuning image settings to achieve excellent results. This includes options for color, brightness, contrast, and other visual parameters.
- Audio Input and Output: The OSSC Pro supports analog audio inputs (AV2 RCA, 3.5mm jack) and digital audio inputs (SPDIF). You can assign different audio inputs to different video inputs.
Maintenance Features
Firmware Updates:
- Process: New features and improvements are periodically added through firmware updates. The firmware can be updated using a FAT32 formatted MicroSD card.
- Steps:
- Remove the MicroSD card from the OSSC Pro.
- Insert the card into your computer's SD card reader.
- Copy the new firmware file to the card, ensuring it is renamed to "ossc_pro.bin."
- Re-insert the MicroSD card into the OSSC Pro.
- Power on the device.
- Open the on-screen menu, choose "Settings," and then "Fw. Update."
- Follow the on-screen prompts to complete the update.
- Firmware Size: Firmware updates are typically small, usually no bigger than 3MB.
- Latest Firmware: Users can check for the latest firmware on the official website.
Troubleshooting:
- Vertical Flicker/Shimmer: Interlace source connected. Solution: Set deinterlace mode to motion adaptive (see page 15).
- Horizontal Jitter/Wobble: Fine tuning required. Solution: Adjust low pass filter settings or consult the wiki for recommendations.
- Missing Pixels: Wrong optimal mode selected. Solution: Use Generic 4:3 or Generic 16:9 mode instead.
- No Audio:
- Display incompatibility. Solution: Use a different display or choose a different output mode.
- Sample mode incompatible. Solution: Change the Sample format under "Audio options" to 24bit/48KHz.
- Sync mode set wrong. Solution: Press the sync source button again to change sync mode. Most common sync type is RGBS for SCART, YPbPr for component, and RGBHV for DSub15/VGA.
- No Image:
- Incompatible output mode selected. Solution: Switch to a compatible mode.
- HDMI/DVI handshake failed. Solution: Power cycle the OSSC Pro.
- Black Screen and NO SYNC Message:
- Source not powered on. Solution: Check power to source device.
- Source not outputting RGBs or YPbPr. Solution: Make sure your source device outputs RGB and your SCART cable is wired for RGB.
Disposing of the OSSC Pro:
- Malfunctions: If the OSSC Pro malfunctions, contact the manufacturer (VGP Media) for repair or replacement.
- Recycling: The unit should be recycled at a local recycling centre. Information on recycling in the UK and Ireland is provided, and users outside these regions should check with local authorities for proper disposal.