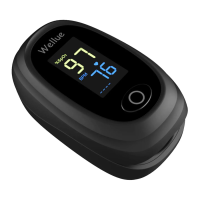
Fingertip Oximeter
Operation Guide
Model: POD-2
Contact us: service@getwellue.com
Website: www.getwellue.com
Note:
It's not a medical device. This device is for
Sports and Aviation use only and not intended
for medical use.
English
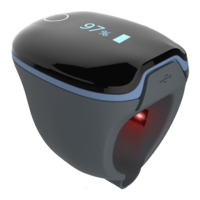
Appearance
Features
SpO2, PR, Pulse bar
Auto on/off
Operation
1. Battery Installation. Insert two AAA size
batteries into the battery compartment properly,
and note the polarity markings.
2. Start. Open the clip and put finger inside the
cushions of the clip (make sure the finger is in the
correct position), and then clip the finger.
Wait 2 seconds, the Oximeter will power on
automatically and start to measure;
3. Readings. The screen displays as below:
END. When finger is out, the Oximeter shuts down
automatically.
4. Display Perfusion Index . Press and hold Display
Key to display the Perfusion index(PI) value.
Attention to the Operation
The finger should be put into the sensor
correctly.
Do not shake the finger and relax during
measurement.
Do not put wet finger directly into sensor.
Do not let anything block the emitting light
from device, i.e. do not use finger nail
polish/paints.
Vigorous exercise and electrosurgical device
interference may affect the measuring
accuracy.
Nail polish may affect the measuring
accuracy, and too long fingernail may cause
failure of measurement or inaccurate result.
If the first reading appears with poor
waveform , then the reading is unlikely true,
the more stable value is expected by waiting
for a while.
Specification
2 x alkaline batteries (AAA)
Measuring accuracy:
≤
2%
for 70%~100%
Measuring accuracy: ±2bpm
or ±2% (whichever is greater)
Deutsch
Hinweis: Dieses Produkt ist kein medizinisches
Gerät und sollte nicht zur Vorbeugung,
Diagnose, Behandlung, Überwachung,
Remission oder für andere medizinische Zwecke
verwendet werden.
Aussehen
Eigenschaften
SpO2, PR, Pulsbalken
Auto ein / aus
Überschreitungsanzeige
Operation
1. Batterie-Installation. Legen Sie zwei
AAA-Batterien ordnungsgemäß in das Batteriefach
ein und beachten Sie die Polarit
ä
tsmarkierungen.
2. Starten Sie. Öffnen Sie den Clip und legen Sie
den Finger in die Kissen des Clips (stellen Sie sicher,
dass sich der Finger in der richtigen Position
befindet). Befestigen Sie dann den Finger.
Warten Sie 2 Sekunden, das Oximeter schaltet sich
automatisch ein und beginnt zu messen.
3. Lesungen. Der Bildschirm wird wie folgt
angezeigt:
4. END. Wenn der Finger heraus ist, schaltet sich
das Oximeter automatisch aus.
5. Perfusionsindex anzeigen. Halten Sie die
Anzeigetaste gedrückt, um den Wert des
Perfusionsindex (PI) anzuzeigen.
Aufmerksamkeit auf die Operation
Der Finger sollte korrekt in den Sensor
eingeführt werden.
Schütteln Sie nicht den Finger und
entspannen Sie sich w
ä
hrend der Messung.
Stellen Sie den nassen Finger nicht direkt in
den Sensor.
Lassen Sie nichts das vom Ger
ä
t emittierte
Licht blockieren, d. H. Verwenden Sie keinen
Fingernagellack / Farben.
Starkes Training und St
ö
rungen durch
elektrochirurgische Geräte können die
Messgenauigkeit beeinträchtigen.
Nagellack kann die Messgenauigkeit
beeinträchtigen, und ein zu langer
Fingernagel kann zu Messfehlern oder
ungenauen Ergebnissen f
ü
hren.
Wenn der erste Messwert mit einer
schlechten Wellenform angezeigt wird, ist es
unwahrscheinlich, dass der Messwert wahr
ist. Der stabilere Wert wird erwartet, wenn
Sie eine Weile warten.
Spezifikation
2 x Alkali-Batterien(AAA)
Messgenauigkeit:
≤
2% for
70%~100%
Anzeigebereich: 30~240bpm
Messgenauigkeit:
±
2bpm or
±
2% (der gr
öß
ere Wert gilt)
Italiano
Avviso: Questo prodotto non è un dispositivo
medico e non deve essere utilizzato per la
prevenzione delle malattie, la diagnosi, il
trattamento, il monitoraggio, la remissione o
qualsiasi altro scopo medico.
Aspetto
Caratteristiche
SpO2, PR, Barra del polso
Accensione / spegnimento automatico
Operazione
1. Installazione della batteria. Inserire
correttamente due batterie AAA nel vano batterie
e osservare i contrassegni di polarità.
2. Start. Aprire la clip e inserire il dito all'interno
dei cuscinetti della clip (assicurarsi che il dito sia
nella posizione corretta), quindi agganciare il dito.
Attendere 2 secondi, l'Ossimetro si accender
à
automaticamente e inizier
à
a misurare;
3. Letture. Lo schermo viene visualizzato come di
seguito
:
4. END. Quando il dito è fuori, l'Ossimetro si
spegne automaticamente.
5. Visualizza indice di perfusione. Tenere premuto
il tasto Display per visualizzare il valore dell'indice
di perfusione (PI).
Attenzione all'operazione
Il dito deve essere inserito correttamente
nel sensore.
Non scuotere il dito e rilassarsi durante la
misurazione.
Non mettere le dita bagnate direttamente
nel sensore.
Non lasciare che nulla blocchi l'emissione di
luce dal dispositivo, ovvero non utilizzare
smalti / vernici per unghie.
L'esercizio fisico intenso e l'interferenza del
dispositivo elettrochirurgico possono influire
sulla precisione della misurazione.
Lo smalto per unghie pu
ò
influire sulla
precisione della misurazione e un'unghia
troppo lunga può causare errori di
misurazione o risultati inaccurati.
Se la prima lettura viene visualizzata con una