1. HOW TO RESET SAFE TO FACTORY DEFAULT SETTINGS
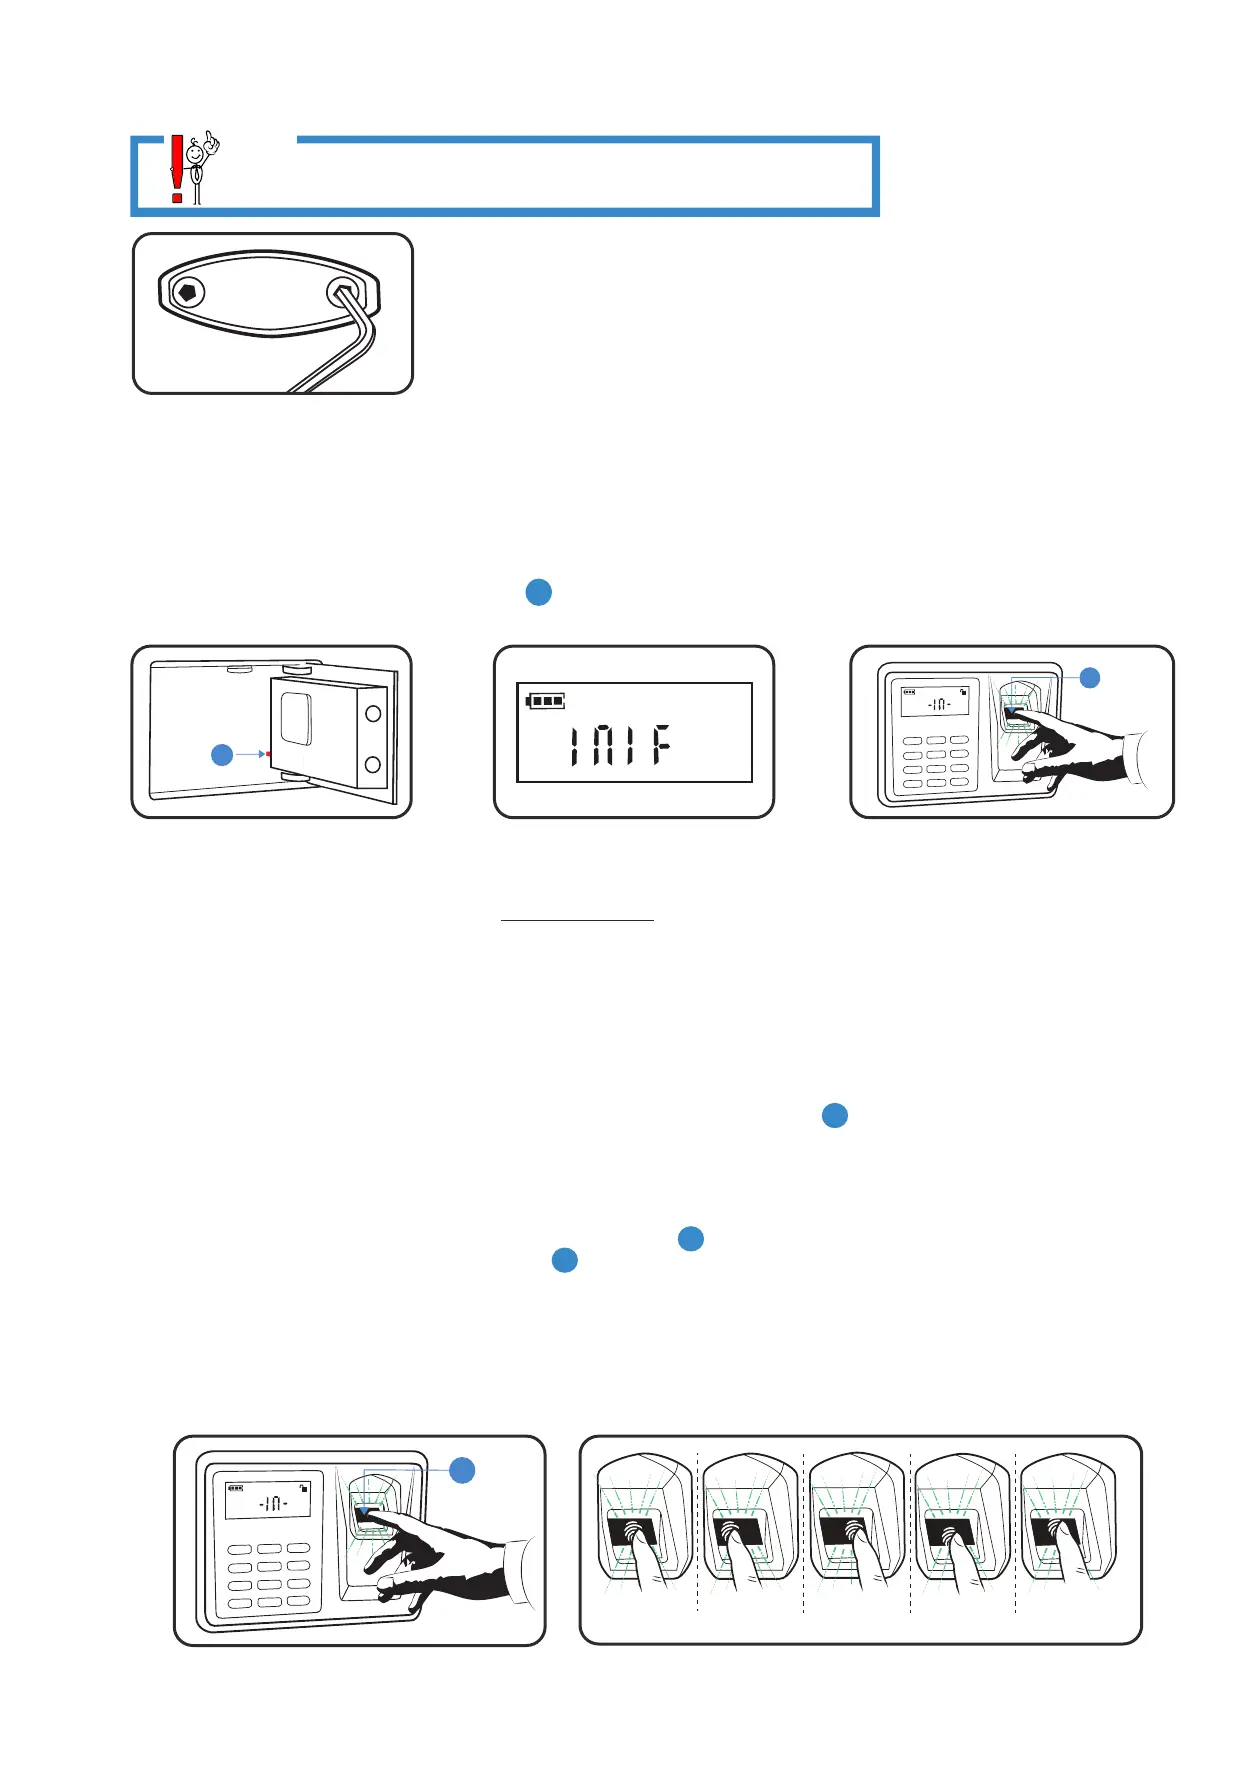
1.1. PRESS and HOLD down Reset Button A for 10 seconds or until you see “INIF" on the screen. Your safe is
reset to Factory Default. All data is deleted, and you can begin with Set Up.
2. HOW TO CHANGE PIN CODE ON KEYPAD
Step 1: Enter the Default PIN 1234 and HOLD down # until (------) shows up (1-2 seconds).
Step 2: Enter your New PIN Code and #. Wait for the Beep, and enter # AGAIN. (Do NOT hold down #). You will
see OK on the screen confirming New PIN code is registered.
Note: You enter your New PIN only once, but you Enter # twice. Please, test to ensure only your New PIN will
unlock the safe.
Step 3: Test. Enter the Old/Default PIN code 1234 # - it should give show ERR. Safe remains locked.
Enter your New PIN Code # - The safe should unlock.
Note: Should you need to change a Registered PIN follow the same steps using your Registered PIN instead of
the Default PIN.
Note: When Reset to factory default mode, by holding down the Reset Button A for 10 seconds all data is erased.
Only Default PIN or Key can open the safe. To change it to your New PIN Code again, follow the steps above.
3. HOW TO REGISTER FINGERPRINTS ON FINGERPRINT SCANNER
3.1. Unlock your safe using PIN (Do Not Use Key)
3.2. To register fingerprints, PRESS BRIEFLY Reset button A . As soon as Green Light comes on, place your
fingerprint on the Glass Fingerprint Reader F . LCD screen will display “- IN -”. One fingerprint is registered.
Repeat this step up to 32 to add more fingerprints.
3.3. If the registration fails "Err" will be displayed on LCD screen. Register the same finger again by repeating Step 3.1.
3.4. Repeat Step 3.1 with the same fingerprint but change fingerprint position on the Glass Fingerprint Scanner - left,
right, up, down, to the side.
Note: The more times and various positions you program one fingerprint the more likely it is to open in an emergency.
3.5. To register a completely different fingerprint, repeat 3.2.
A
Fingerprint
Lock
2
5
8
0
2
4
7
*
3
6
9
#
F
Fingerprint
Lock
2
5
8
0
2
4
7
*
3
6
9
#
F
Center Left Right
...
Down
Up
www.vikingsecuritysafe.com | Help@VikingSecuritySafe.com
page 3/6
BEFORE FIRST USE
1. UNLOCK your safe with Key and open the door. (Remove Logo Plate, to access
the keyhole)
2. With door open, LOCK the safe with Key and remove the Key.
3. Install batteries while the safe is in LOCKED position. Press any button on the
keypad and look for the battery indicator icon on the LCD screen confirming your
safe has power.
4. Then UNLOCK your safe electronically with PIN 1234 # and proceed with set up: change PIN and add fingerprints.
REMEMBER: All Electronic functions of your safe are disabled when your safe is in LOCKED position - Locking Bars
Stick Out. Lock the safe with Key, Remove the Key and UNLOCK your safe electronically to proceed with Set up.
Unlock the safe electronically means using PIN or regiered ngerprint. However, if the safe is new and/or in Default
mode only factory default PIN 1234 # will unlock the safe. Fingerprints function is disabled in Factory Default Mode.
VIKING
11-16-2021
NOTE
If you Unlock your safe with Key, use Key to Lock it.
If you Unlock it with PIN or Fingerprint, LOCK it electronically with #
 Loading...